
Love is in the air, and your nails should reflect the romance that surrounds Valentine’s Day! Valentines nails is a trend a lot of celebrities love to join and every season we’ve seen stars like Hailey Bieber, JLO and Kourtney Kardashian slay a new design. So, as Cupid prepares to unleash his arrows, it’s time to adorn your fingertips with a touch of love and glamour.
That is why we have gathered all the perfect heart nails tutorial for designing your own valentine nails so that your special occasion nails look no worse than any February acrylic nails done at the salon! For the romantics, we’ve found beautiful red, pink and heart designs, modern twists on classics with cutout details and heart French tips. So get your nail polish collection out and create something you can truly crush on.
Easy Marble Nails Design
We’ve spotted awesome marble-inspired manicures on the likes of Katy Perry, Rita Ora and a lot of other celebrities who are fans of this classic manicure design. Whether you’re a nail art novice or a seasoned enthusiast, these simple marble techniques will have you achieving stunning, marble-inspired nails in no time.
Valentines day nails will look fascinating with this gorgeous nail art on!
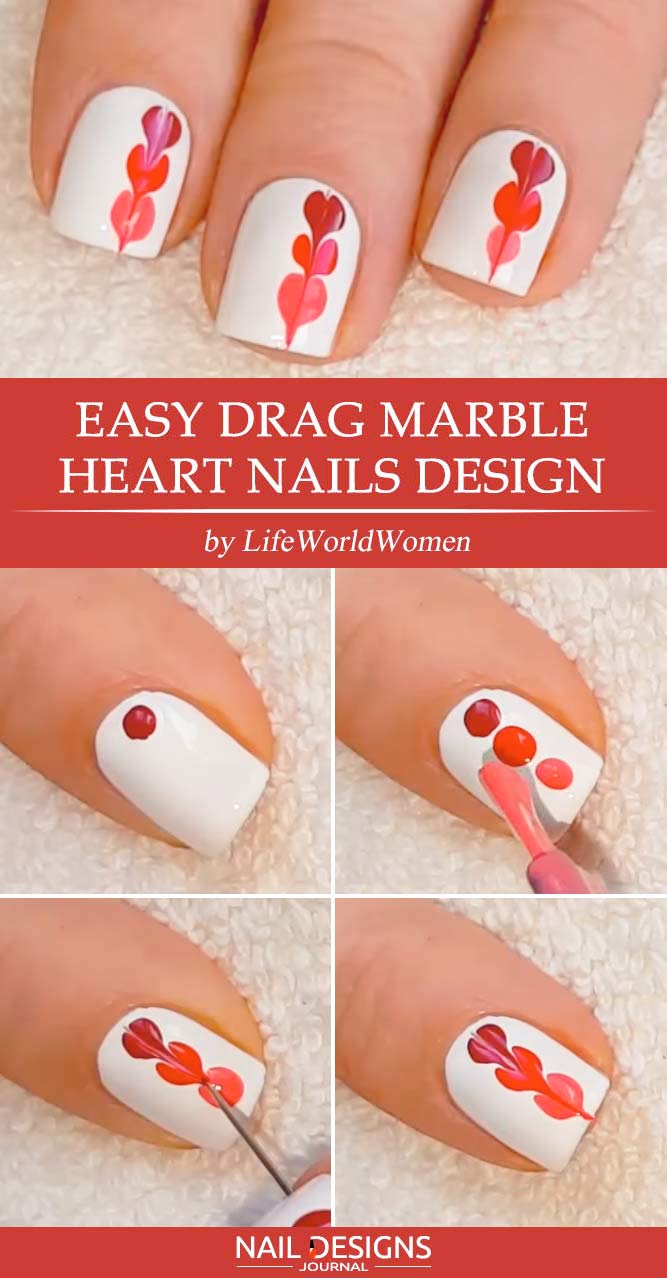
- Apply a base coat.
- Apply a white base coat to your nails, one at a time, since we need wet nail polish to complete the design.
- Put three blobs of different shades of red on the base.
- Drag the needle across the blobs.
- Repeat it once again.
- Apply top coat.
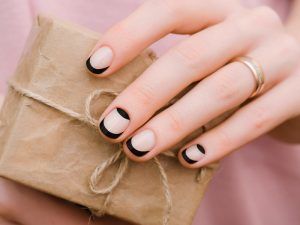
DIY Half-Moon Valentines Nails Design
This delightful and romantic nail art trend adds a modern twist to classic elegance, perfect for expressing your affection on Valentine’s Day. What’s more, is that heart nail designs for short nails can be extremely cute and thematic as well. Whether you’re an expert in doing your manicure or a beginner, these easy steps provided below will bring your half-moon manicure to life.
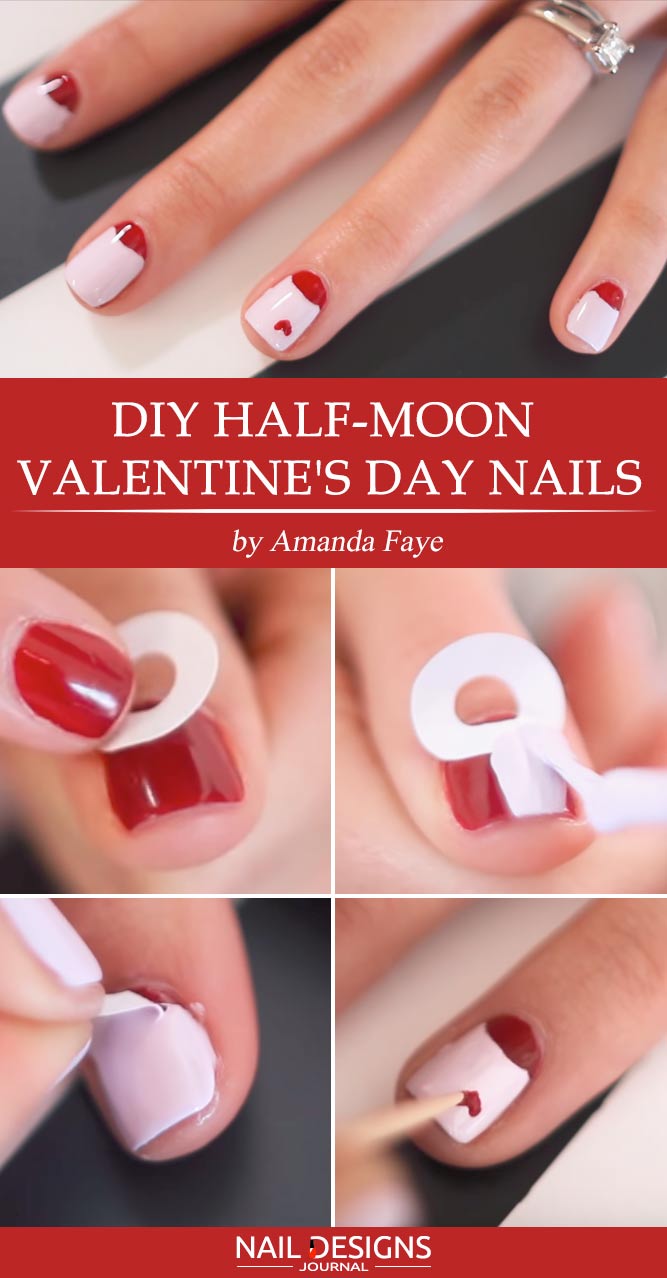
- Apply a base coat.
- Apply a red base coat.
- Place the reinforcement labels on the lower half of your nail to create a half-moon design.
- Apply pastel lavender base coat to your nail.
- Peel the sticker off.
- With the help of a toothpick and red nail polish add a little heart to your ring finger.
- Apply top coat.
Gradient Nails In Simple Steps
Say goodbye to monotony and hello to a burst of color with gradient love nails! If you’re looking to add a touch of chic to your nail game, gradient nails are the perfect way to do it. If you do decide to do it from the comfort of your home, you’ll need red, white, and neutral polishes, a small makeup sponge for blending the polish, tape or liquid latex, some Q-tips and nail polish remover to help clean up stains.
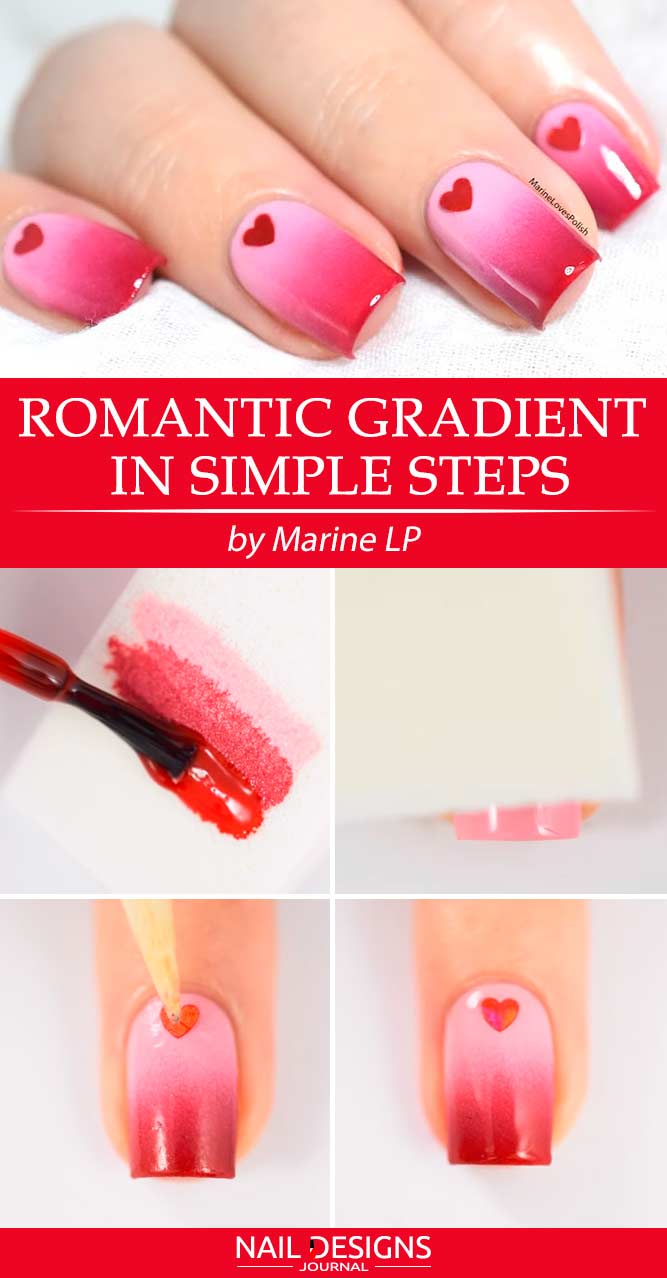
- Apply a base coat.
- Apply a baby pink base coat.
- Apply liquid latex around your nail.
- Use a sponge and three various shades of red to create an ombre effect on your finger.
- Press the sponge over the finger.
- Remove liquid latex.
- Add a heart-shaped stud to the bottom of your fingernail.
- Apply top coat.
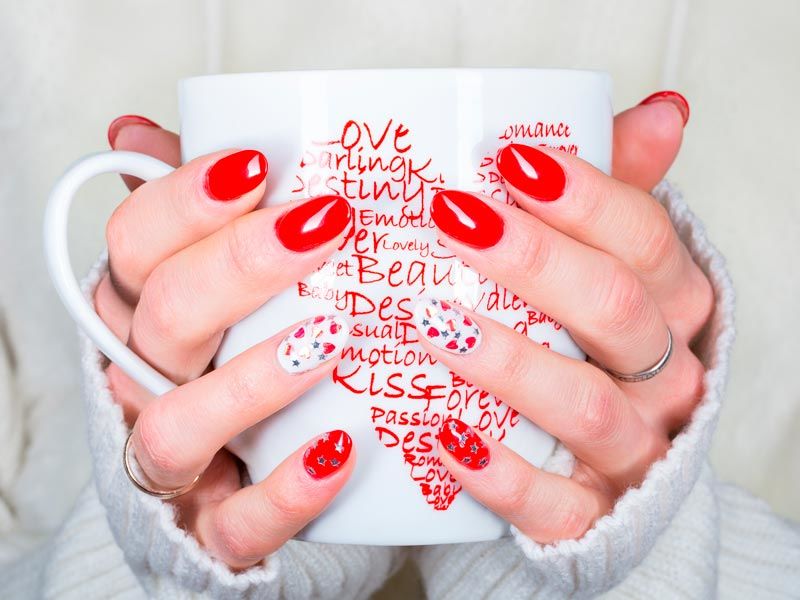
Hand Painted Kisses You Can Do Yourself
Interested in DIY nails for valentine’s day? One of the popular designs you can easily do yourself is hand painted kisses. If you are yet to come up with the hot valentine’s day nail designs you are going to sport this year, we have something special for you! You don’t need to be a pro to effortlessly replicate this design. Have the right tools such as detail brushes, dotting tools, nail art pens, then follow these simple steps!
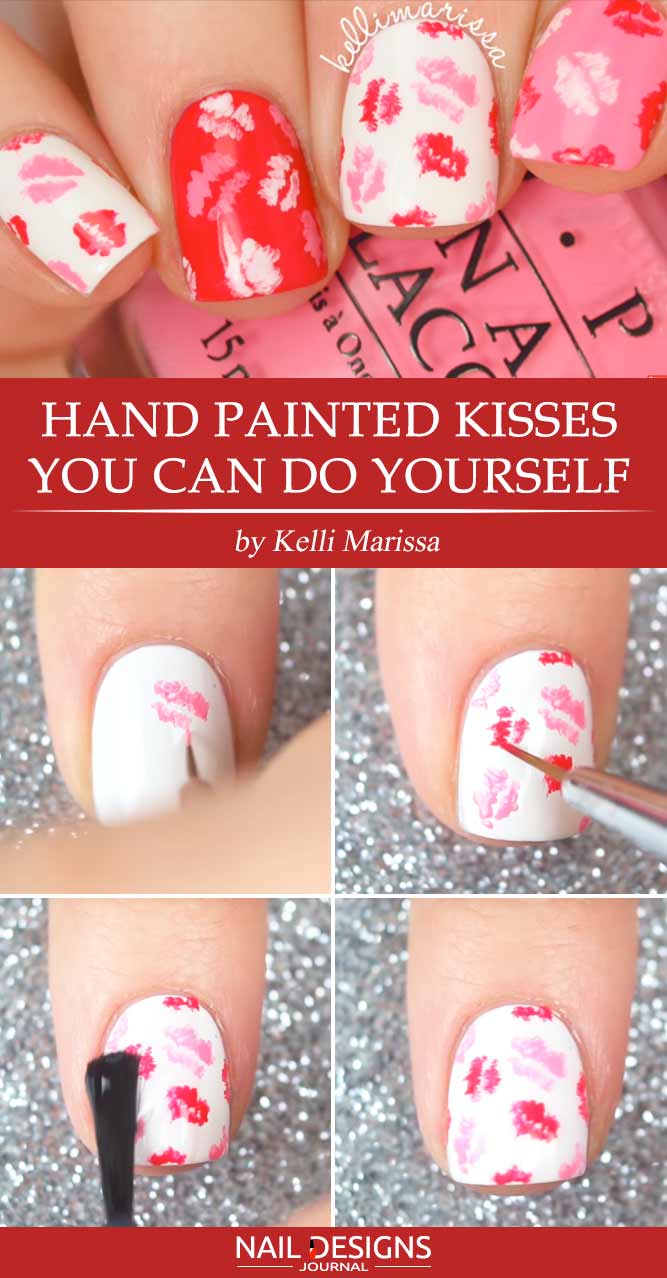
- Apply a base coat.
- Apply white, pink and red base coats to your nails in any order you like.
- Use a tiny brush and pink nail polish to create the messy lines on your white base so that they resemble ‘kiss marks’.
- Add a few more ‘kiss marks’ to your white base.
- Fill in the spaces with red ‘kiss marks’.
- Mix and match the shades and repeat the design on your other nails.
- Apply top coat.

Valentines Nails Pulse Art
Did you know that you can create perfect valentine nails design with the help of your gel pen?
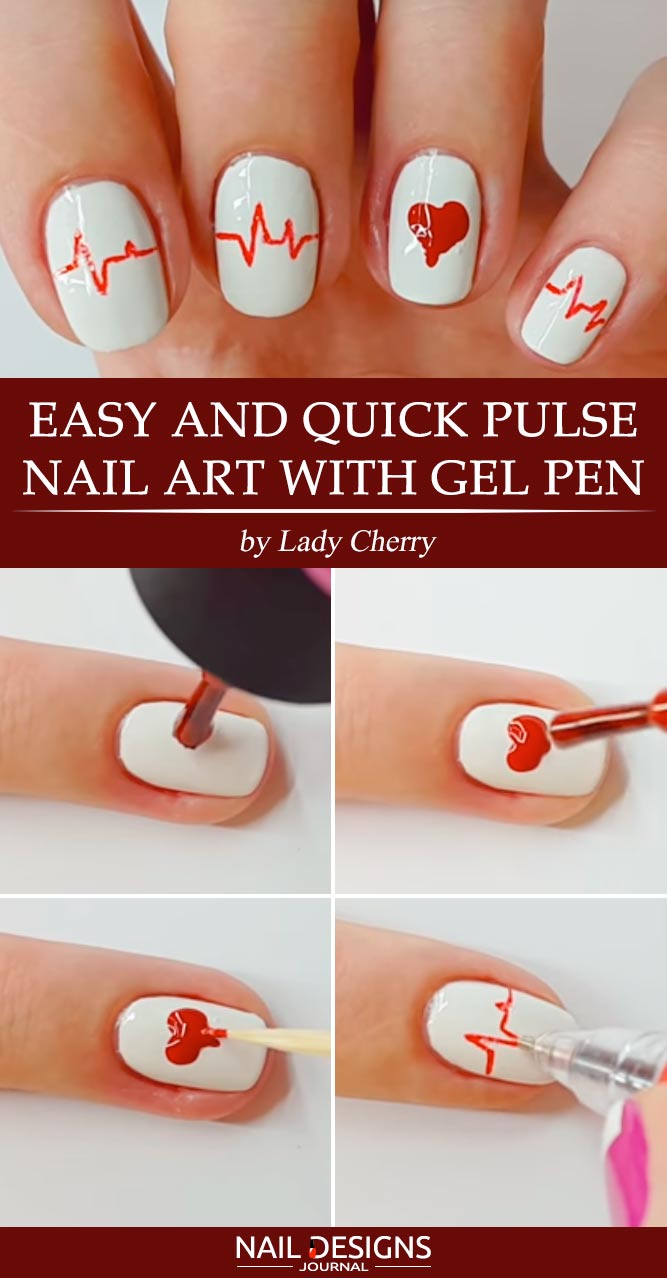
- Apply a base coat.
- Apply white base coat.
- Use your red nail polish and a toothpick to form a heart on your ring finger.
- Use your red gel pen to draw a heartbeat pattern on the white base.
- Apply top coat.
Striped Valentines Day Nails
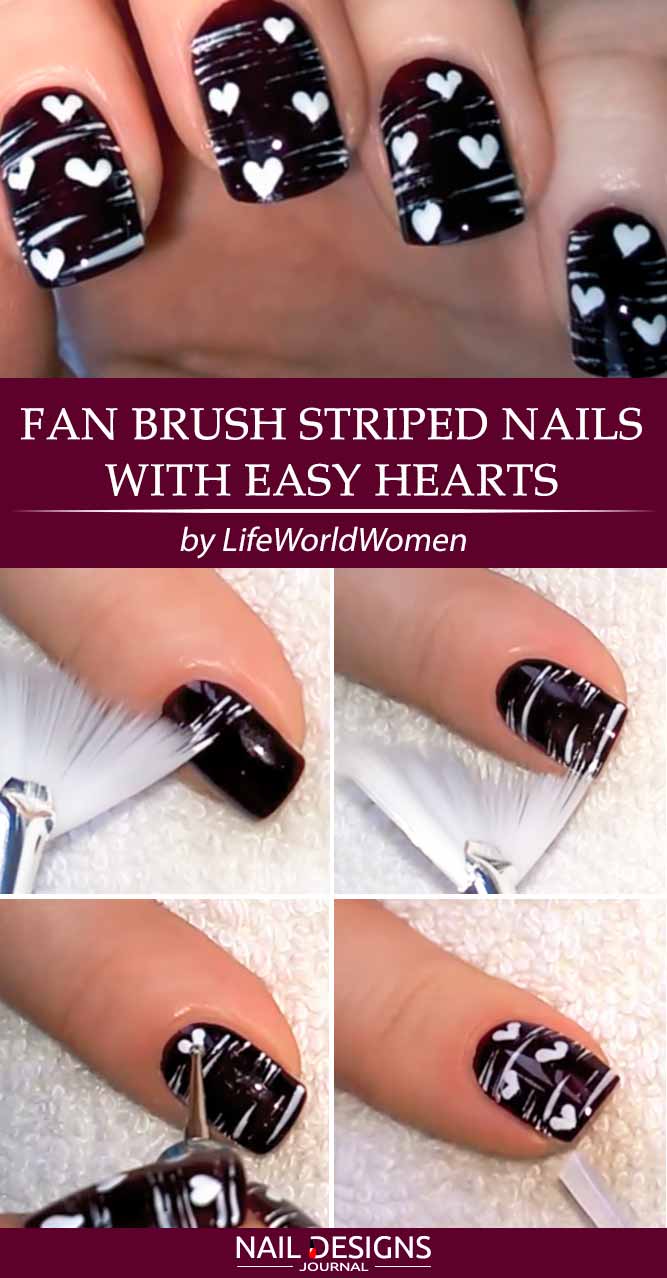
- Apply a base coat.
- Apply a burgundy base coat.
- Use a fan brush and white nail polish to create random messy lines.
- With the help of a small dotting tool and white nail polish add little hearts to the empty spaces.
- Apply top coat.
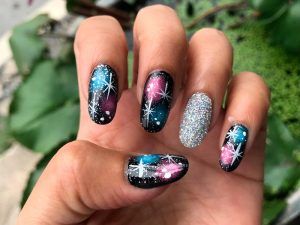
Quick Freehand Hearts Valentines Nails
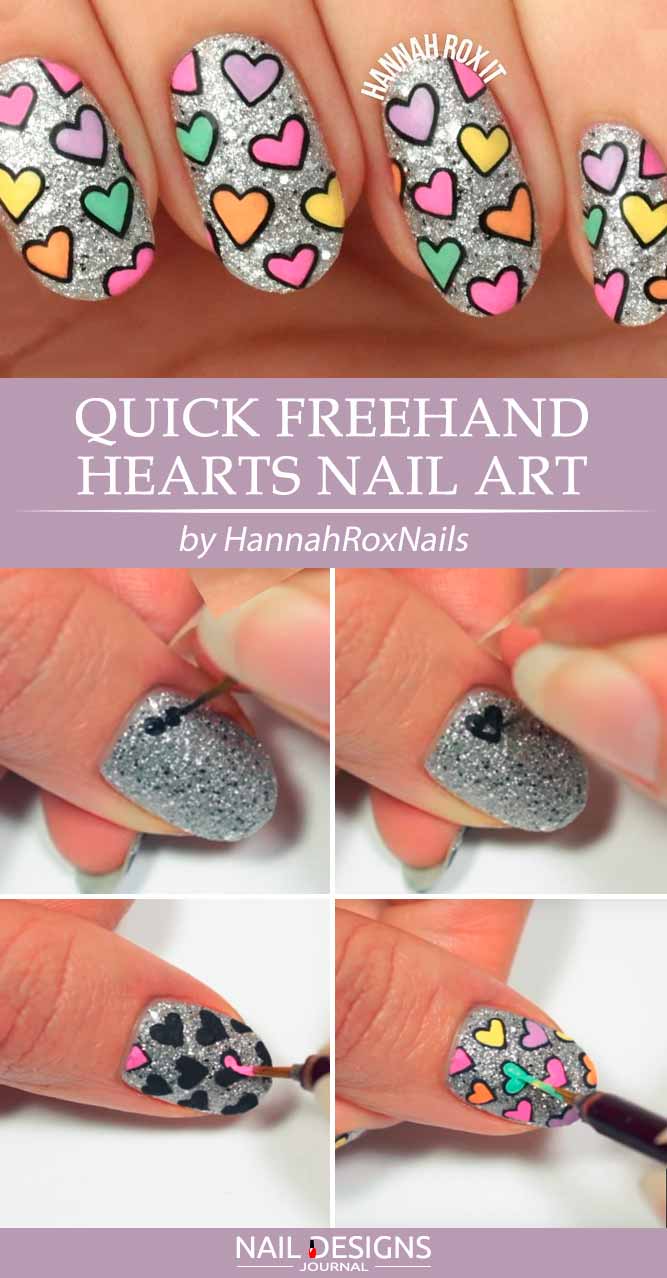
- Apply a base coat.
- Apply silver sparkly base coat.
- Apply top coat.
- With the help of a small brush and black nail polish draw little hearts on the silver base.
- Fill in all the hearts with different colors so that the black outline is still visible.
- Apply top coat.
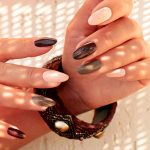
Minimalist Valentines Nails
Valentine nails with simple heart nail designs look charming and sweet. See for yourself!
- Apply a base coat.
- Apply a layer of glitter nail polish to the nail with a cut-out design.
- Apply a red base coat to all the other nails.
- Outline the heart shape with the help of red nail polish and a tiny detailer brush.
- Fill in the outside of the design with red nail polish.
- Apply top coat.
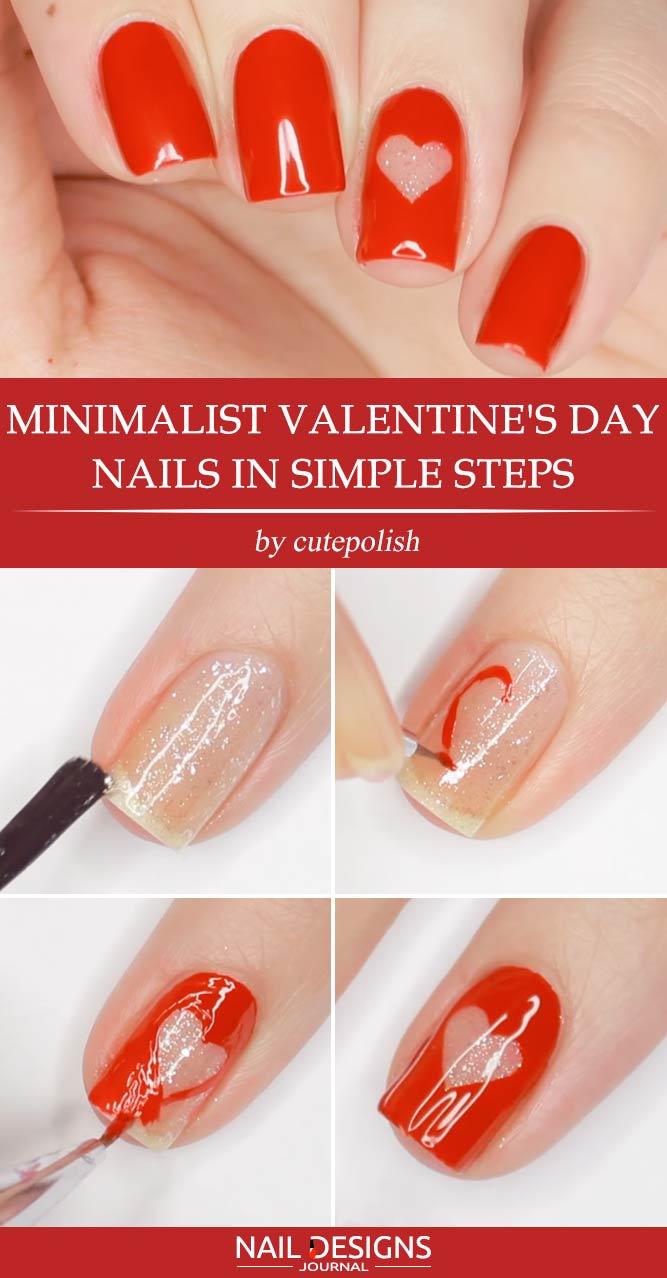
Easy Heart For Valentines Day Nail Art
In case you are still wondering how to make a heart with nail polish so that you achieve that perfect valentines nail design that fashion icons sport – it is easier than easy, and we will prove it to you right now!
- Apply a base coat.
- Apply a white base coat to your index and pinkie fingers.
- Apply a red base coat to the rest of your nails.
- With the help of a dotting tool and red nail polish create little red hearts on a white base.
- Add tiny red dots in-between the hearts.
- Add two different-sized white dots to the red base.
- Apply top coat.
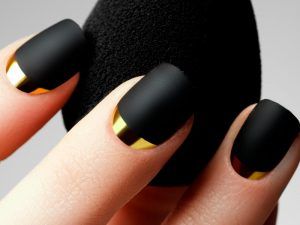
Cutesy Valentines Nails Tutorial

- Apply a base coat.
- Coat your nails with glittery nude base.
- Use some black nail polish to draw half-heart shapes in the corner of each nail.
- Repeat the step with sparkly red nail polish.
- With the help of a think detailer brush and red acrylic paint, create small hearts over your nail.
- Spice the design up with golden outlines and little gold hearts.
- Apply a top coat.
Sweet Valentine’s Day Heart Nails
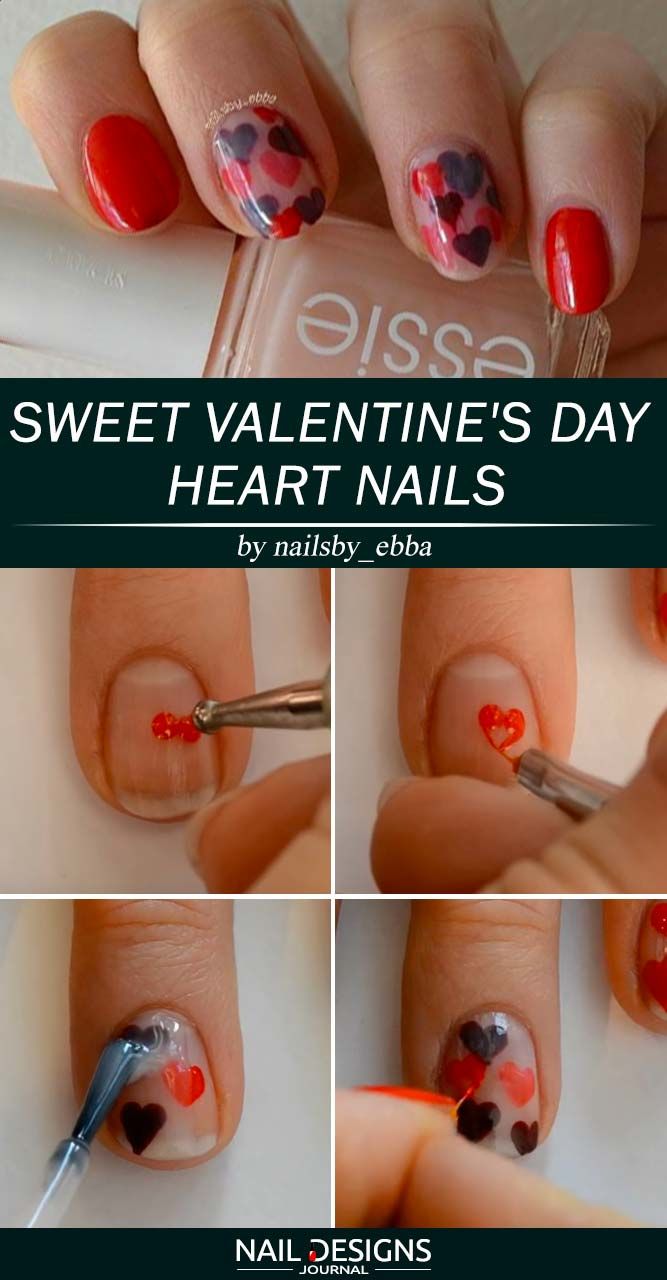
- Apply a base coat.
- Using a large dotting tool and a think detailer brush create same-shaped hearts over your nails.
- Coat your nails with the milky-white base color.
- Repeat the heart-drawing step.
- Coat your nails with a milky white base.
- Add some more hearts to the design.
- Apply a top coat.
DIY Heart Nail Tips You Can Do In 5 Min
Even the simplest valentine nail designs will look gorgeous if you follow our lead!

- Apply a base coat.
- Use wine red sparkly nail polish to create a V shape on the tip of your nail.
- Even out the lines so that they form a perfect heart.
- Apply top coat.

Negative Space Valentine’s Day Nails
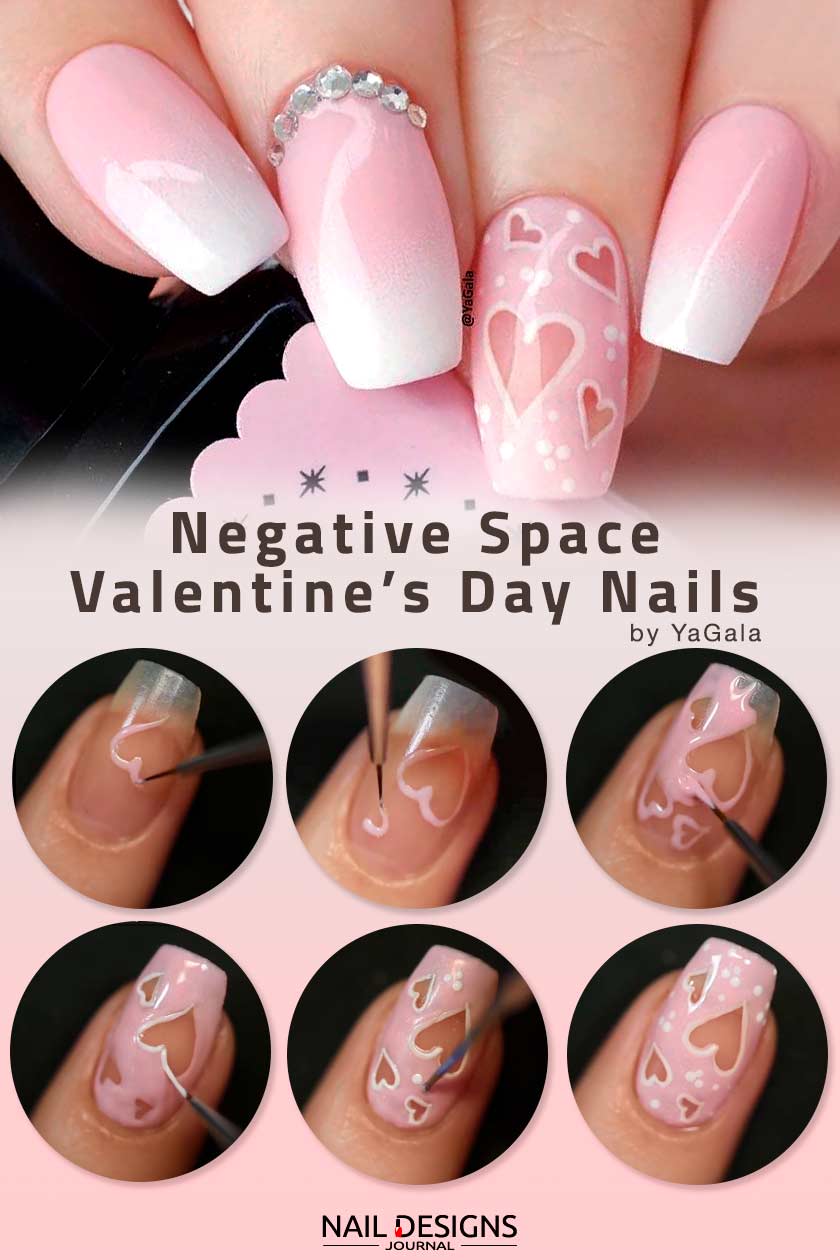
- Apply a base coat.
- Use a thin detailer brush and shimmery pink nail polish to draw hearts on your nails.
- Leave the negative space shapes and fill out the gaps in-between them with the nail polish.
- Outline the negative space hearts with white nail polish.
- With the help of a small dotting tool ad small dots to the design.
- Paint other nails with pink to white ombre.
- Apply a top coat.
Hand Painted Romantic Nails Art
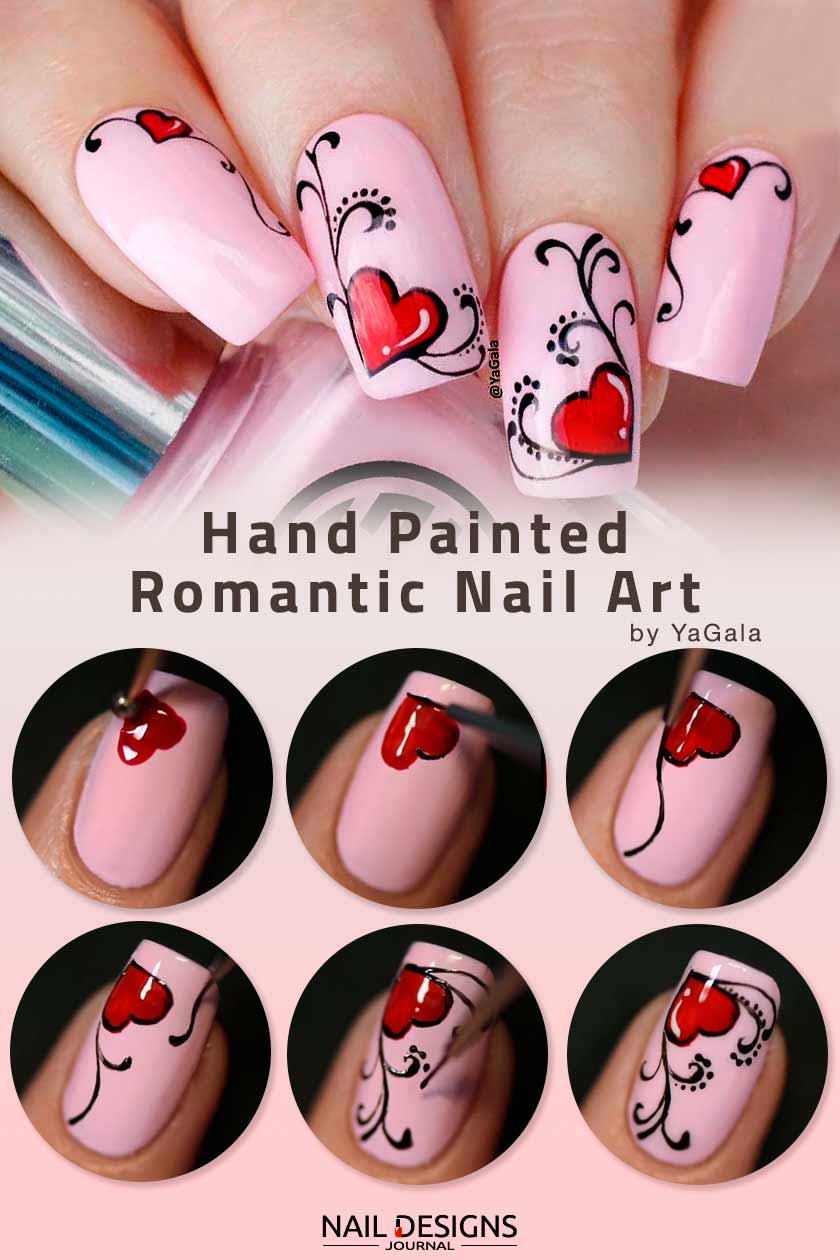
- Apply a base coat.
- Paint your nails with pink base color.
- Use a dotting tool and red nail polish to draw a heart in the corner of your nail.
- Outline the heart with black nail polish.
- Add thin black swirls to the sides of the heart.
- Decorate the swirls with tiny dots.
- Add a white thin question mark shape to the side of the heart.
- Apply a top coat.
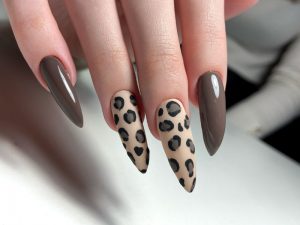
Heart Leopard Nail Art Design
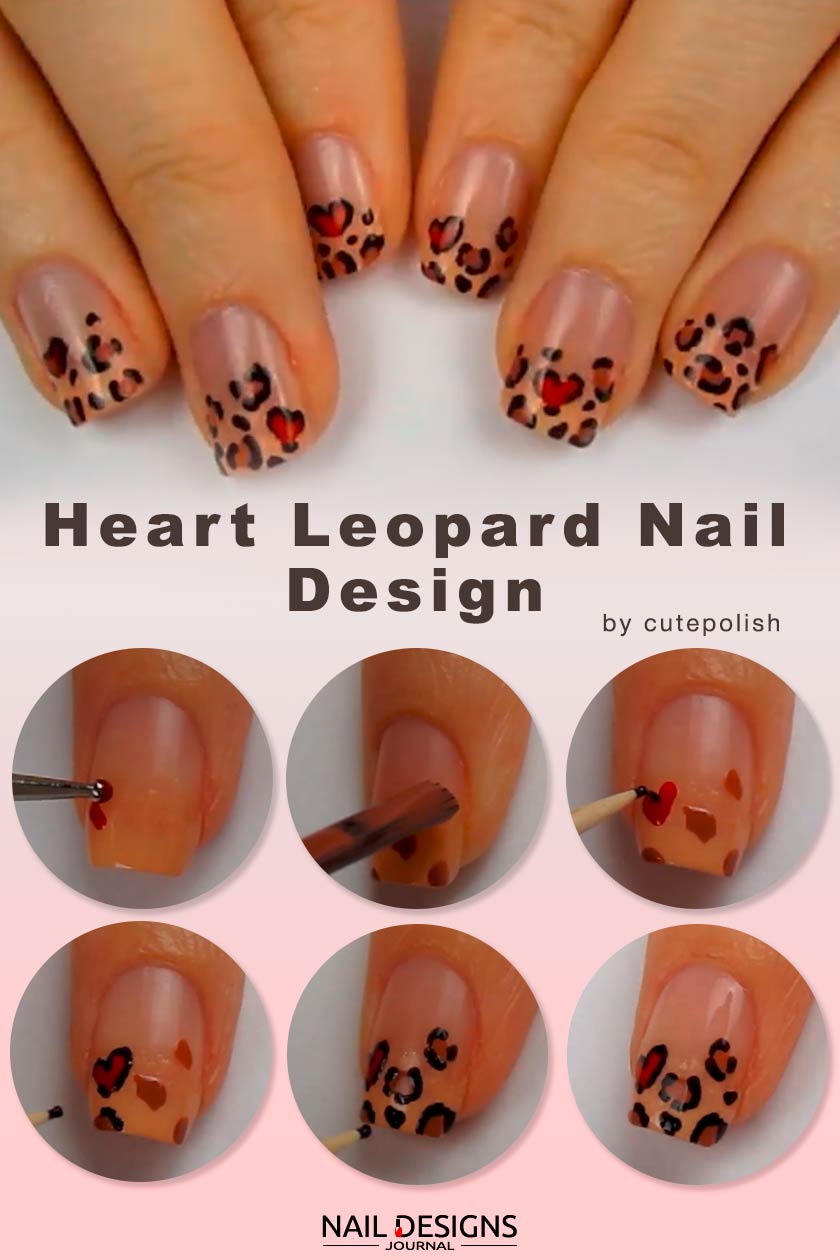
- Apply a base coat.
- Paint tips of your nails with beige base color.
- Use a dotting tool and red nail polish to draw a heart on your nails.
- Add some more brown spots to fill out the tip.
- Outline the heart shape and the spots with black nails polish.
- Add a few black spots to finish off the design.
- Apply a top coat.

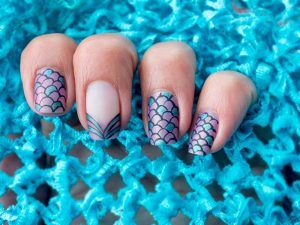
Lovely Water Marble Nail Art

- To succeed with your water marble valentines nails, you need to cut out the shape first. You can use tape as your perfect stencil.
- Apply a base coat.
- Paint your nails with white base color.
- Apply your hand-made heart stencil over the nail.
- Use your favorite bright colors to create the water marble nails effect.
- Drop each nail polish into the cup of room temperature water, one after another until you get the desired density.
- Use a toothpick to create the design you like.
- Place your finger into the water.
- Remove the excess nail polish from the surface and pull your finger out slowly.
- Remove the stencil.
- Apply a top coat.
Chess Heart Nails Design
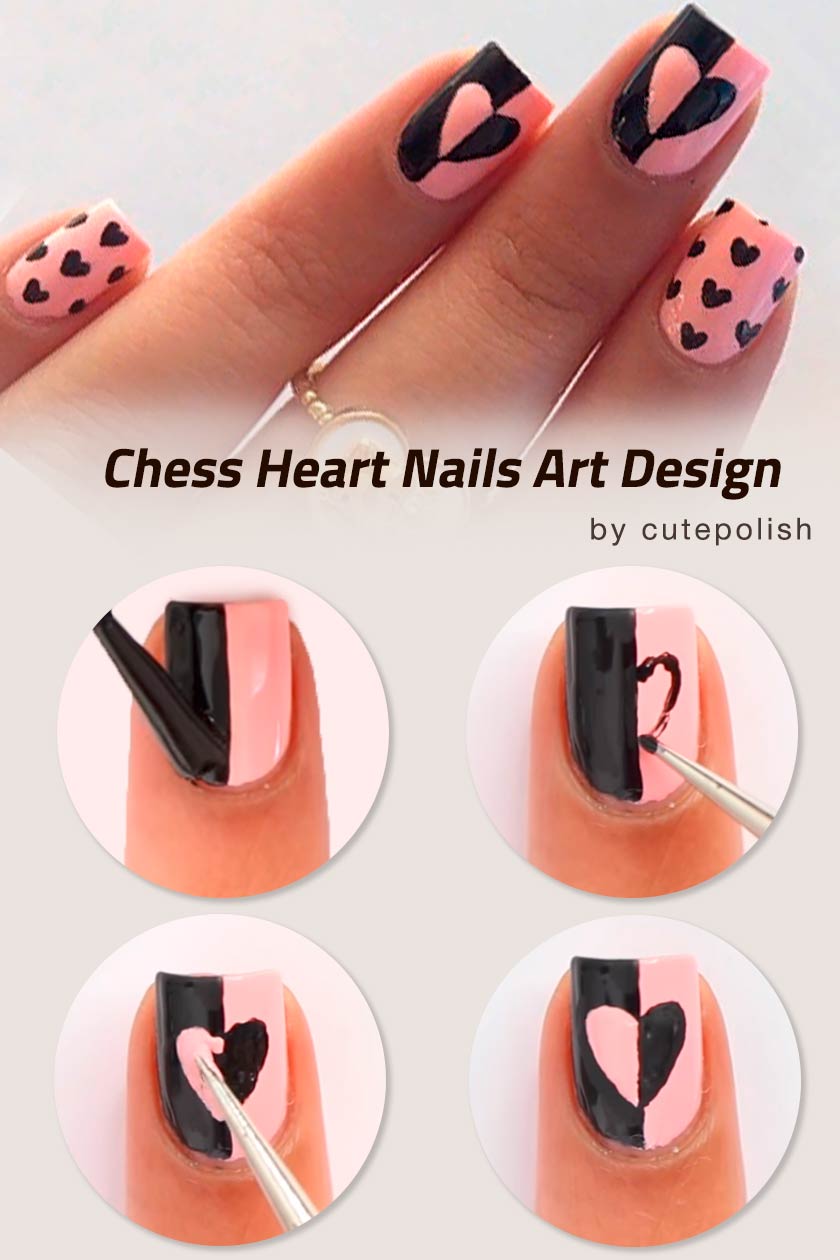
- Apply a base coat.
- Paint half of your nail with the pink base color.
- Paint the other half with black base.
- Draw a black heart on the pink base.
- Repeat the process with the pink heart over a black base.
- Apply a top coat.
Abstracted Hearts For Valentines Nails
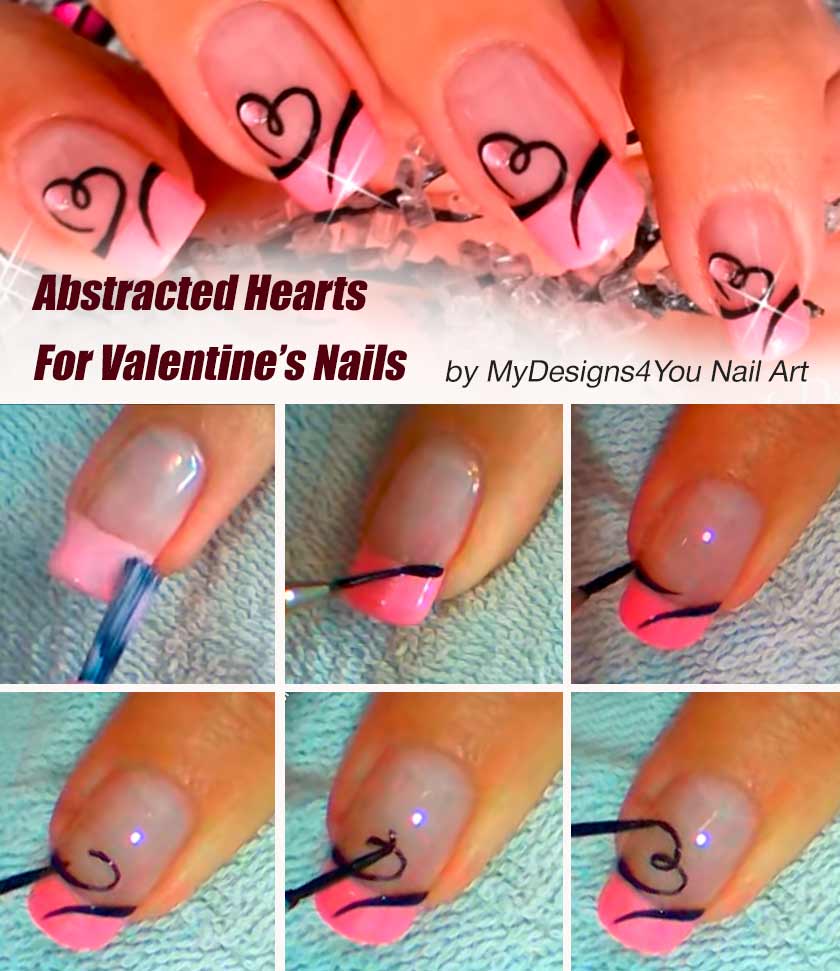
- Apply a base coat.
- Paint the tip of your nail with the pink base color.
- Add some shimmery pink polish to the tip of your nail.
- Use a thin striping brush and black nail polish to draw an abstract swirly heart on your nails.
- Add a pink stud to the corner of your heart.
- Apply a top coat.
Valentine’s Day Heart Nail Tutorial

- Cut out a heart-shaped piece of tape.
- Apply a base coat.
- Coat your nails with a nude base.
- Press the tape stencil onto the nail.
- Combine red, pink, and white nail polishes on a piece of sponge.
- Press the sponge gently your nail so that the ombre is transferred to your nails.
- Peel off the tape.
- Apply a top coat.
Minimalistic Nails Art Tutorial
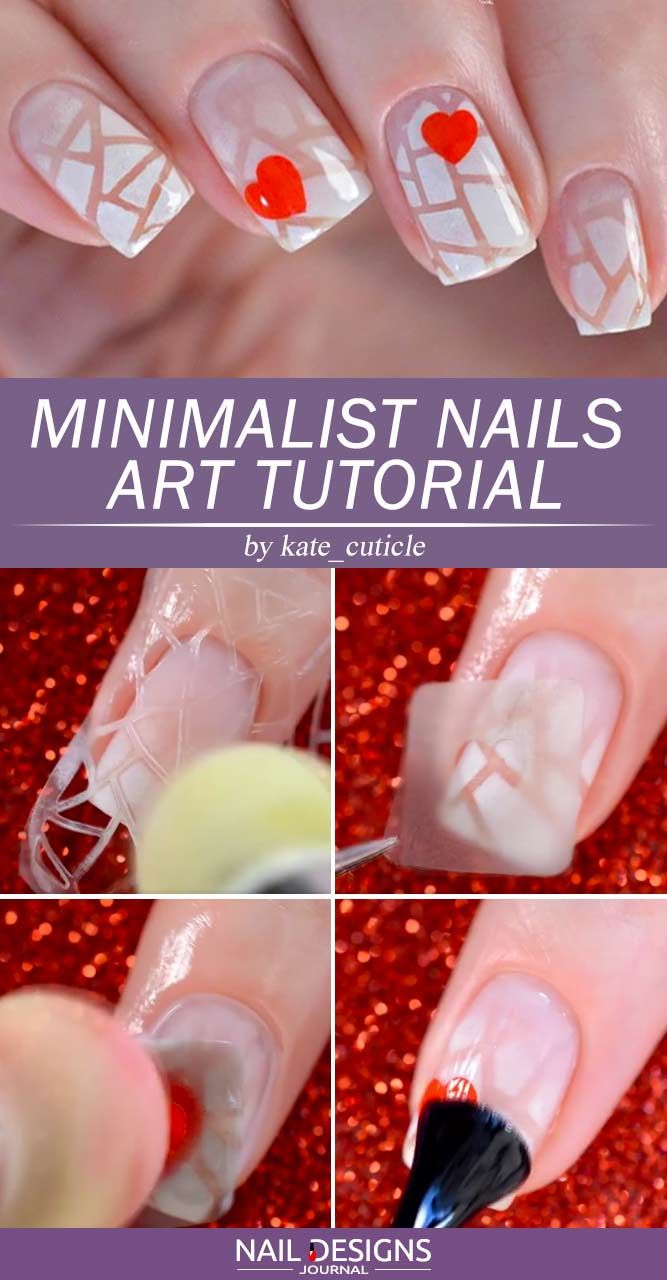
- Apply a base coat.
- Place a vinyl stencil over your nail.
- With the help of an aero puffing brush, apply white nail polish over the stencil.
- Remove the stencil.
- Draw little red hearts on two of your nails, you can use a heart-shaped stencil, or you can draw it using a thin detailer brush.
- Apply a top coat.
From classic red hues to whimsical heart patterns, get ready to dive into a world of creativity and passion as you explore on how to design valentines nails to make your Valentine’s Day unforgettable. With the right tools, achieving these designs are just as easy as they look if you follow the steps provided above. So don’t fret about booking an appointment with an expert manicurist and try any of these designs this valentine season!
REFERENCES:
Was this article helpful?