
The beauty of DIY nails is that they do not have to be super complex to look cute and unique. Thus, every girl can do them without much effort while enjoying the comfort of her home. Besides, can you imagine that soothing feeling of satisfaction when your home-made mani becomes the source of admiration? To get you there, we have prepared some stunningly easy and trendy tutorials. Fear not to stand out!
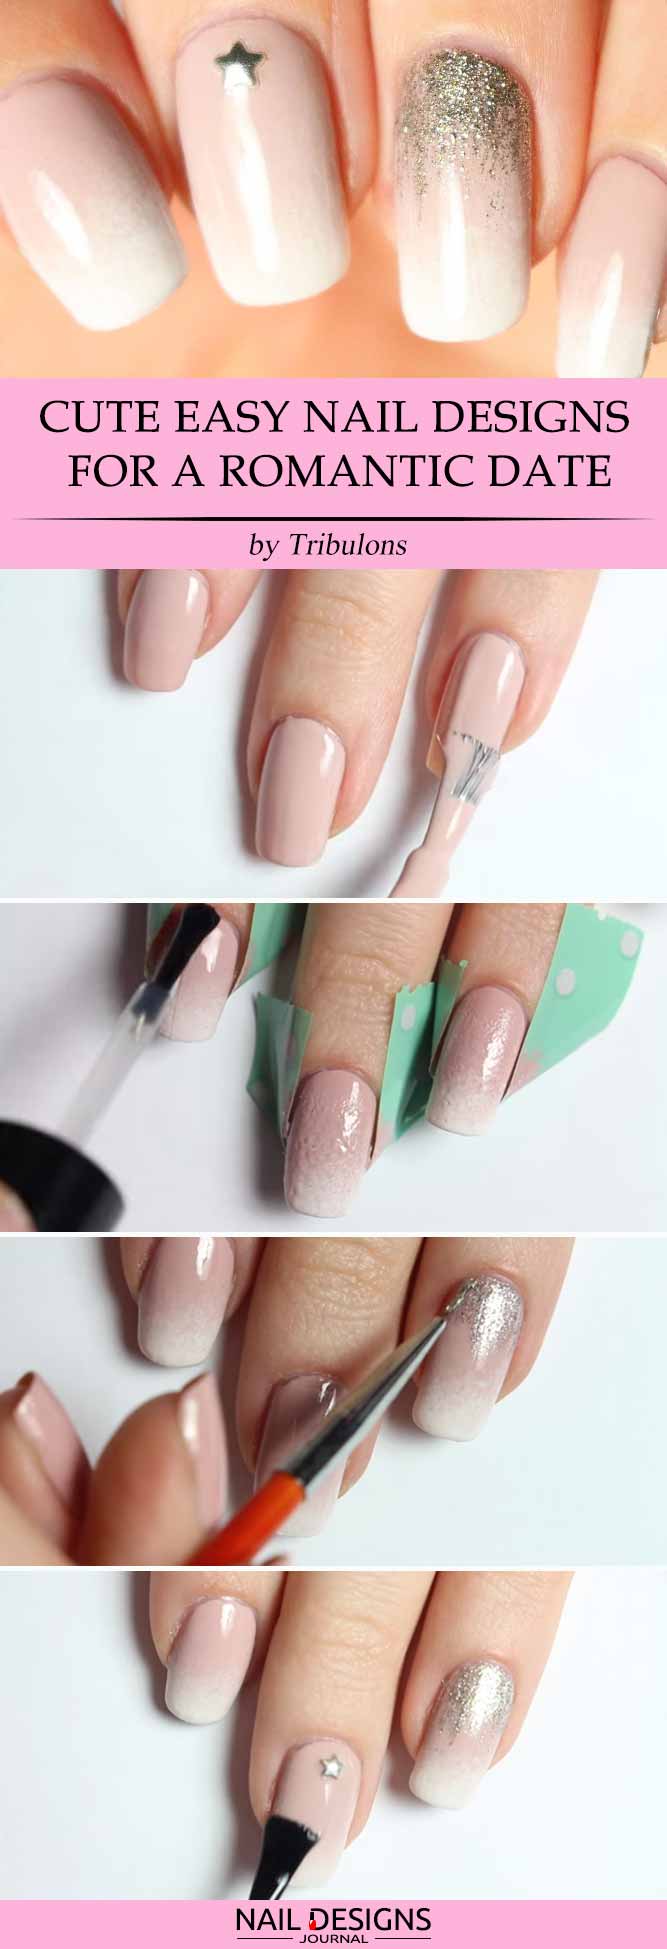
Cute Easy Nail Designs For A Romantic Date
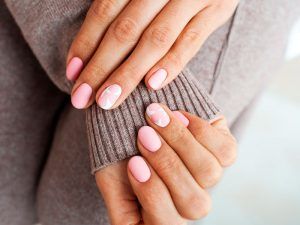
Cute easy nail art designs are always simple. Start with the protective base and follow with the nude-shaded nail polish you like. Now with the help of white nail polish and a sponge create a French-like ombre. Add up a bit of glitter to one of your nails and finish with the star-shaped stud placed on the middle finger. Apply the top coat and it is done. Have you ever imagined something as elegant to be as simple?
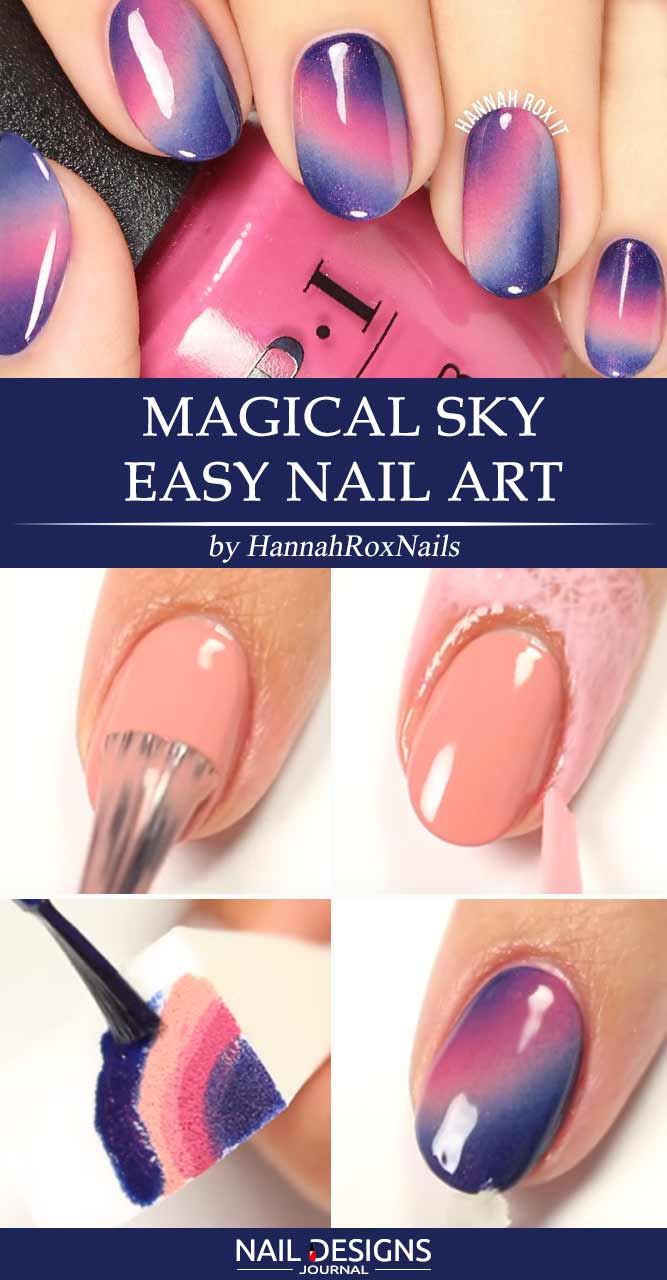
Magical Sky – Easy Nail Art
Galaxy nail art is a real thing right now. And today we will learn how to do it at home. And we start with the base protection and peach-shaded nail polish. Now apply the blue, pink, and nude nail polish to the sponge in order to create the galaxy-like transition. You can repeat the procedure until you get the desired look. Clean up the mess if any and cover your nails with top coat. Yep, as simple as that!
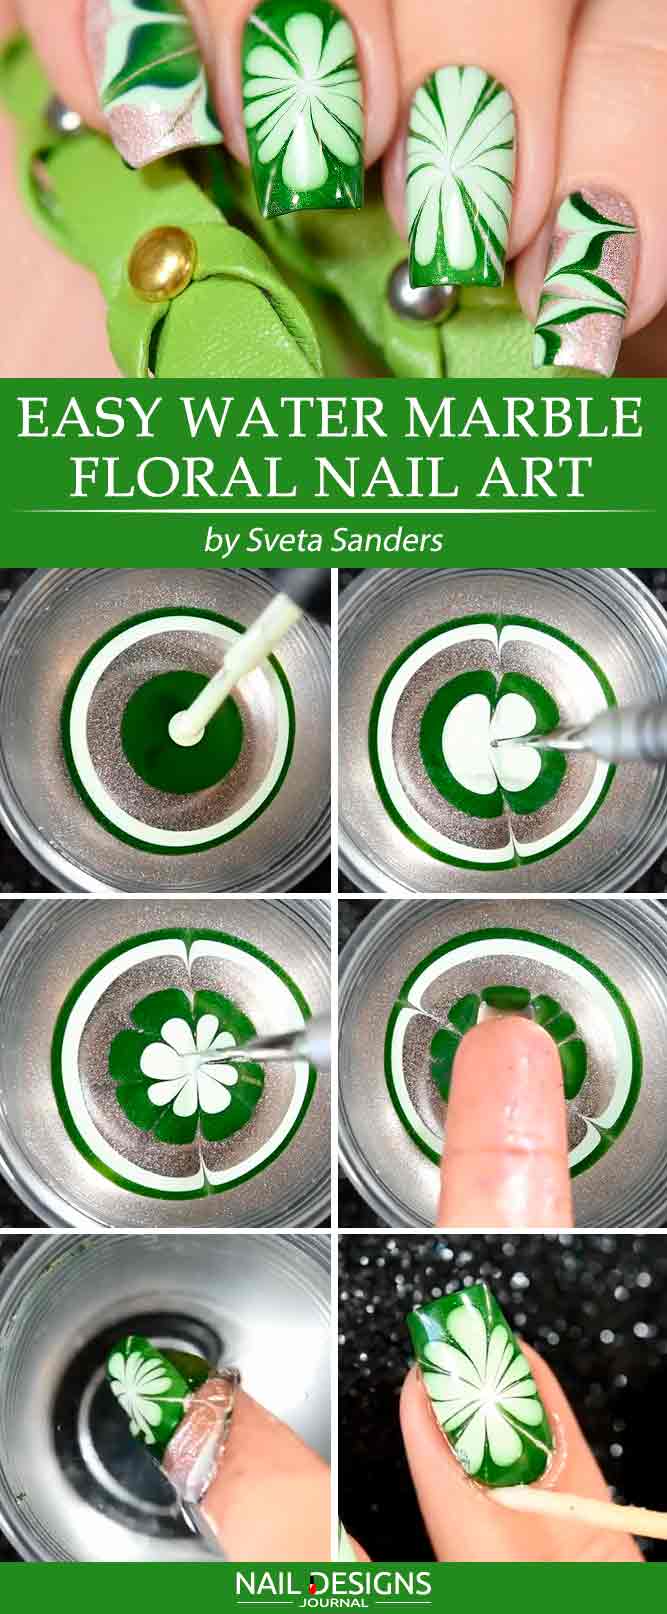
Easy Water Marble Floral Nail Art
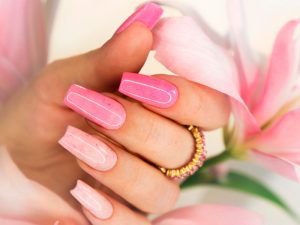
First, you need to start with the base coat to protect your nails. After that, you need to apply a coat of white so that your nail art turns out to be even brighter. Do not forget about the liquid latex to protect your cuticles. Take a glass of room-temperature water and start dropping various-shaded – sparkle silver, green and white – drops into the water until you get the desired intensity. After that, you need to take your dotting tool and to create the pattern you would like to apply to your nails. Slowly dip your nail into the water, clean up all the messes on the surface and slowly pull your finger out. Remove liquid latex and apply a top coat – done!
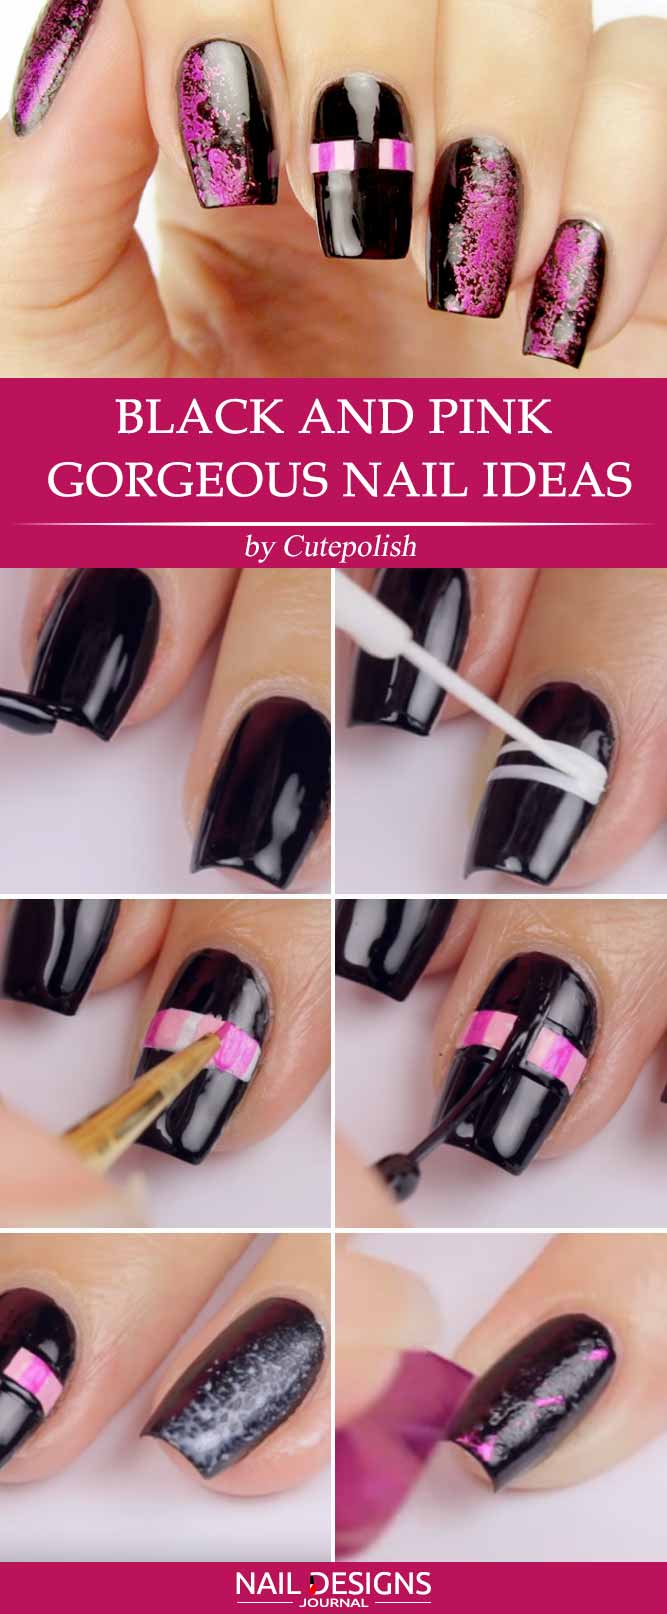
Black And Pink Gorgeous Nail Ideas
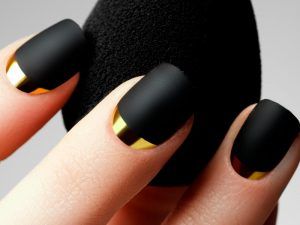
Black and pink go perfectly well together, so why not combine them in one stunning DIY nails design? Start with the black base coat, let it dry and go for a wide horizontal line on your middle finger. Add up some pink-colored cubes to the line and, after they dry out, separate them with the black vertical line. Cover your nails with foil glue and, when it is ready, apply pink nail foil to complete the design. When it’s done, go for the top coat.

Quick Dotticure Nail Art To Do At Home
For this amazing dotted manicure, you need to start off with the base coat to protect your nails and then apply two coat of light yellow nail polish. When you are done with that, you need to add three bigger dots of burgundy shade to various parts of your nail. After that, you need to take a smaller dotting tool and add tiny burgundy-shaded dots around the big ones. Now, take a middle-sized dotting tool and add a yellow dot to the center of each burgundy one. Repeat the procedure with the darker shade of yellow and a smaller dotting tool. Add some dustier green-shaded dots to fill in the empty spaces on your nail. Apply a top coat.

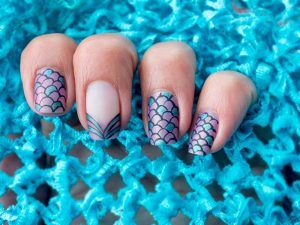
Elegant Burgundy Fishtail Nails
Burgundy nails are super trendy these days and this is what you are going to do:
- Apply a base coat.
- Apply a burgundy base to the nails that are going to remain solid-colored.
- Apply a white base to the nails you are going to use stamping on.
- Apply a top coat.
- Apply stripes in a shape of fishtail to white-colored nails.
- Apply a burgundy coat over stripes.
- Apply a stamping pattern over.
- Remove the stripes.
- Apply a top coat.

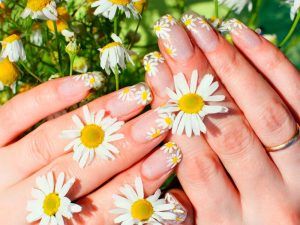
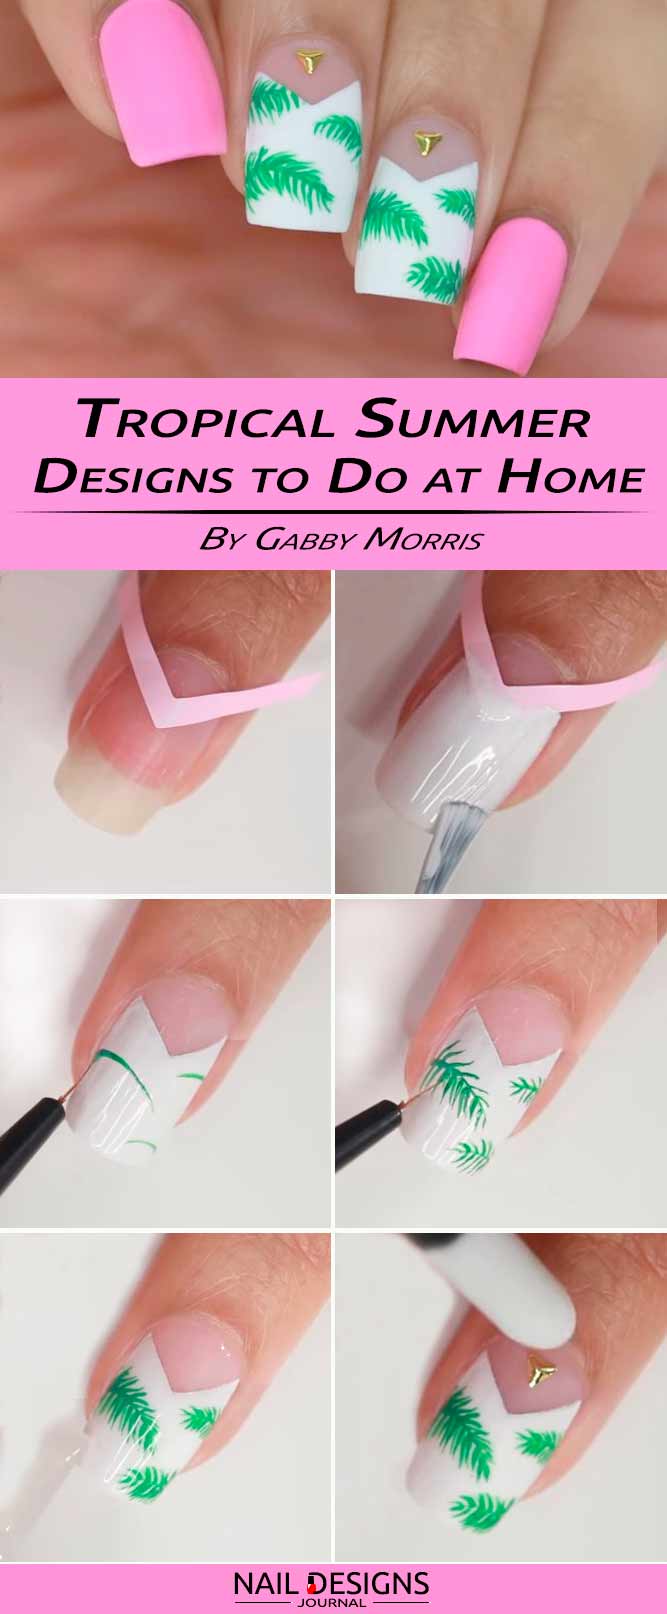
How To Do Nail Designs With Tropical Flowers
- Start with covering your thumb, pointer finger, and pinkie with a light matte pink color.
- Then use a chevron shaped tape to create a triangle at the bottom of your nail, while covering the top of it with white.
- Now paint some palm leaves over your white base: grab the thinnest brush you have and dive in.
- Finish your design with a matte top coat and a gold stud. Voila!
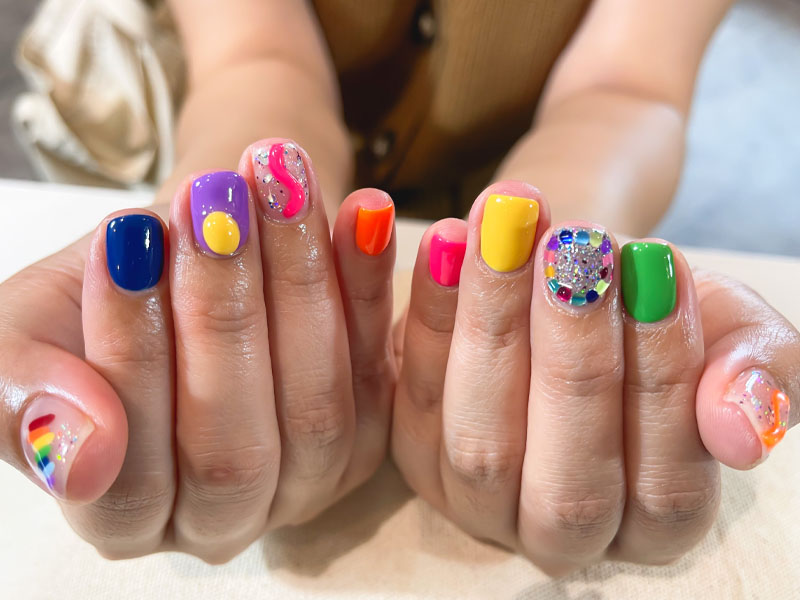
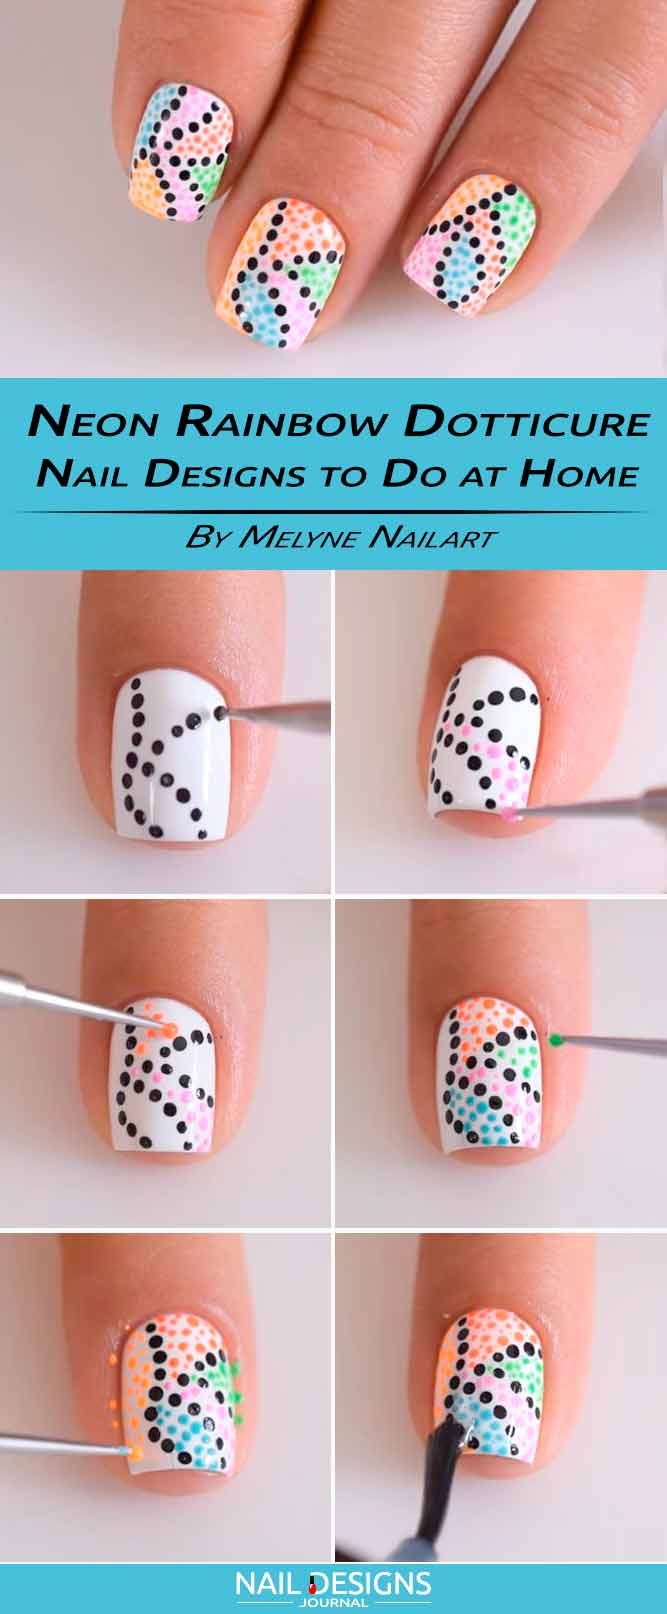
Neon Rainbow Dotticure Nail Designs
- To start with, you are going to need some five brightest nail polishes you have and a black one.
- Cover your nails with a white base and create a dotted design with a black nail polish.
- Spaces that are still free from black dots should be covered in the brightest shades you have at your disposal.
- Finish with the top coat and now you know the answer to how to do nail designs at home!
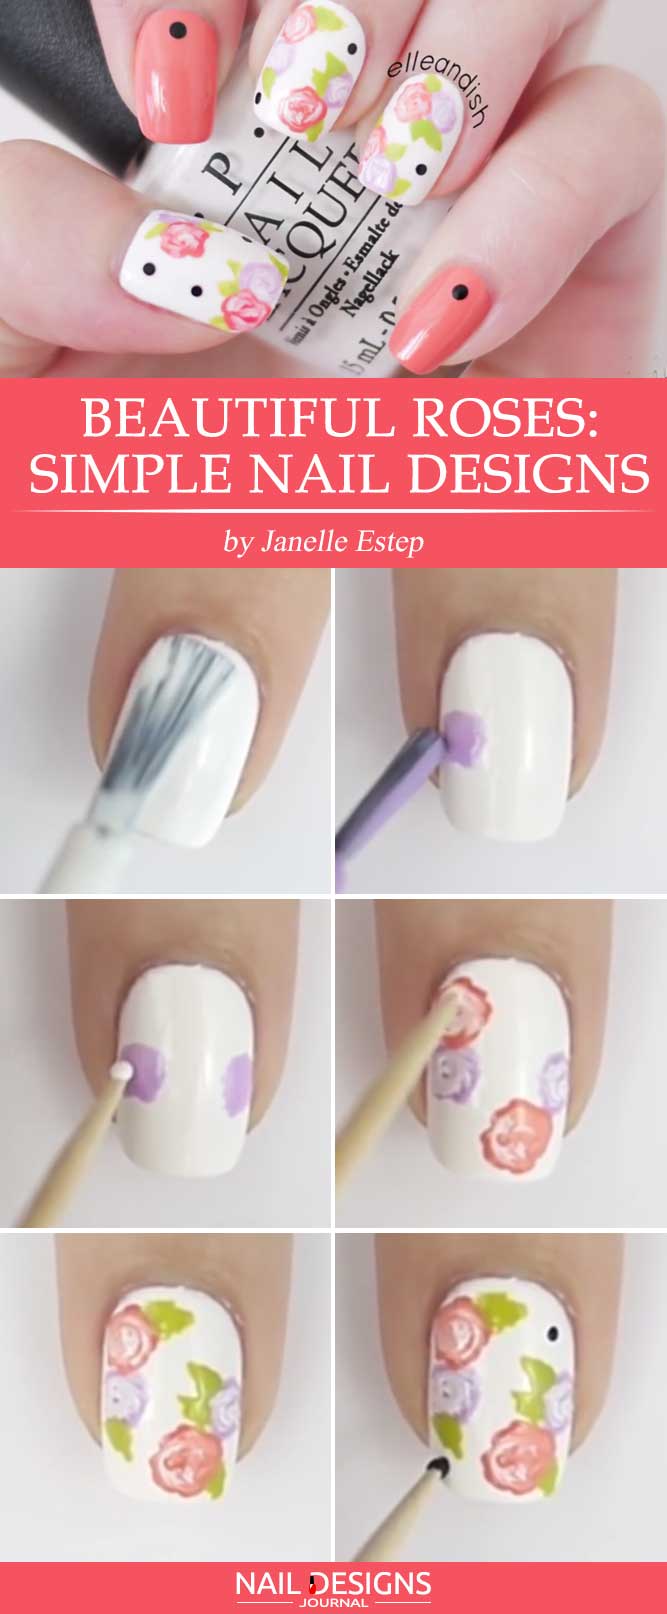
Beautiful Roses: Simple Nail Designs With A Toothpick!
- Start with the usual base coat.
- Then apply a coat of coral nail polish to your pointer finger and pinkie finger.
- Add up a tiny black dot with the help of a toothpick or a dotting tool.
- Cover all of the remaining nails with the white base.
- When it dries out, opt for few purple dots and combine them with white again, in swirling moves, so that the roses are created.
- Repeat the procedure with the coral nail polish mixed with white and add up a few green leaves to the design.
- You can add a few black dots for the design to look even more intricate.
- After everything dries out, just apply the top coat.
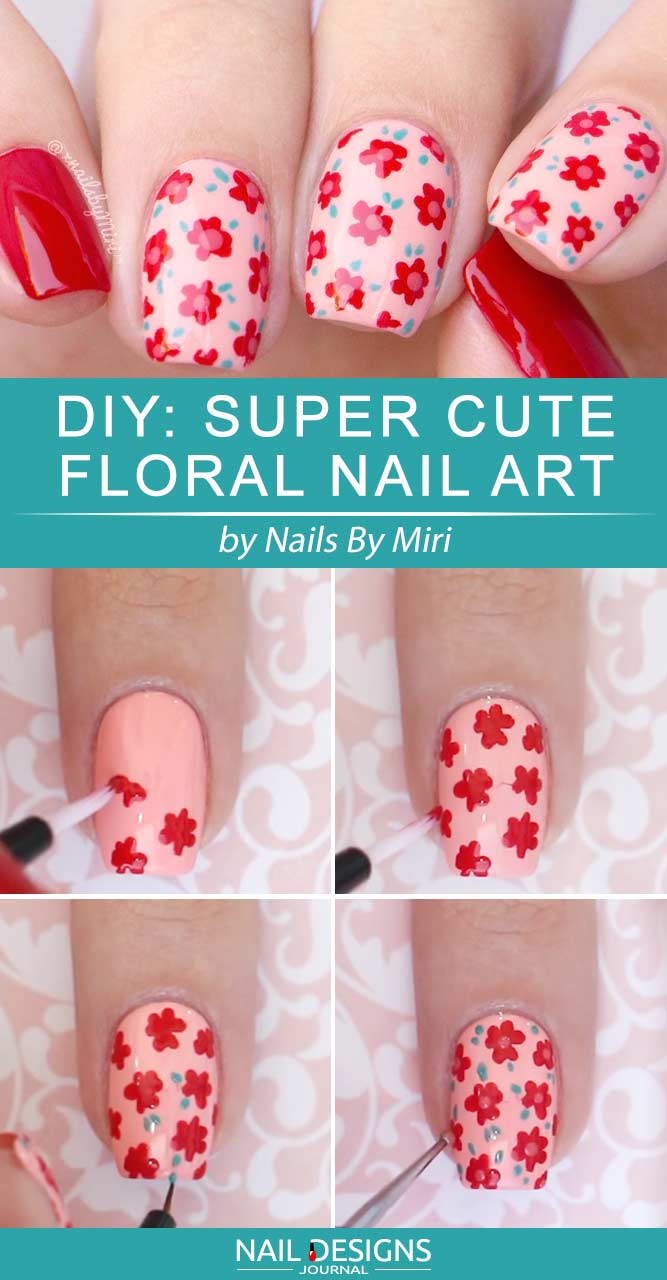
Super Cute Floral Nail Art
- Apply a base coat.
- Apply red and baby pink base colors to your nails.
- Use a tiny brush and some red nail polish to draw flowers on a pink base.
- Use a detailer brush and mint green nail polish to add some ‘leaves’ to your flowers.
- Add pink centers to your flowers.
- Apply top coat.
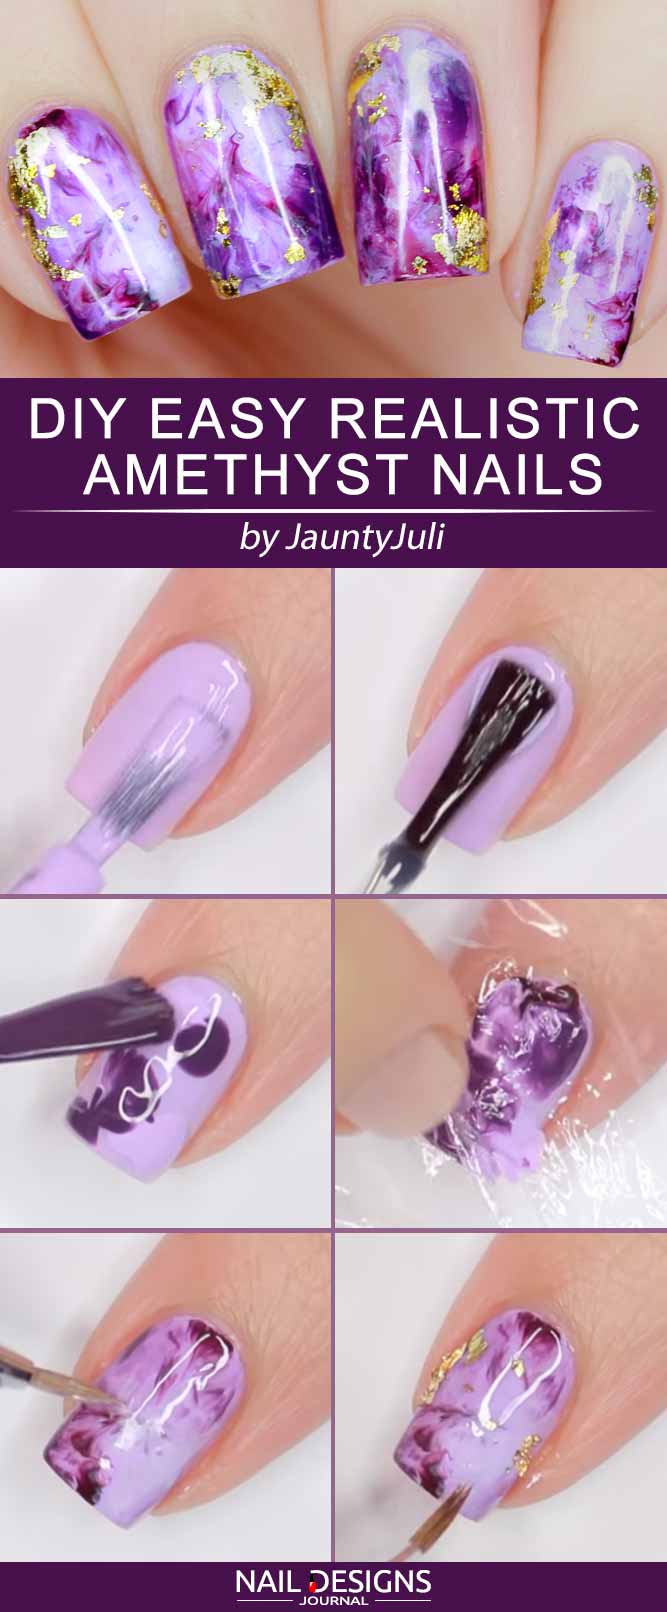
DIY Easy Realistic Amethyst Nails
What a design we have found for you! Look at how pretty it looks on the nails. Are you ready to rock it? Then do it yourself easily with us, following our easy steps.
- Apply a light purple polish in one coat to your nails and add some top coat.
- Quickly add some medium purple nail polish and dark plum one to the top coat in little dots. A top coat will spread the colors making the watercolor effect appear.
- Grab a piece of a plastic wrap, carefully put it onto the nail, lightly press it and pick it up. An effortless marble effect is achieved!
- Blend a bit of a top coat with the main colors we used and apply it over the marble design we have made. A colorful foggy effect should be there afterwards.
- Put on some gold foil to the edges of the design, smooth it to avoid a bumpy texture and apply a top coat all over it. Repeat on all of the nails.
It looked much harder than it really was, didn’t it?
Plaid Nails Tutorial
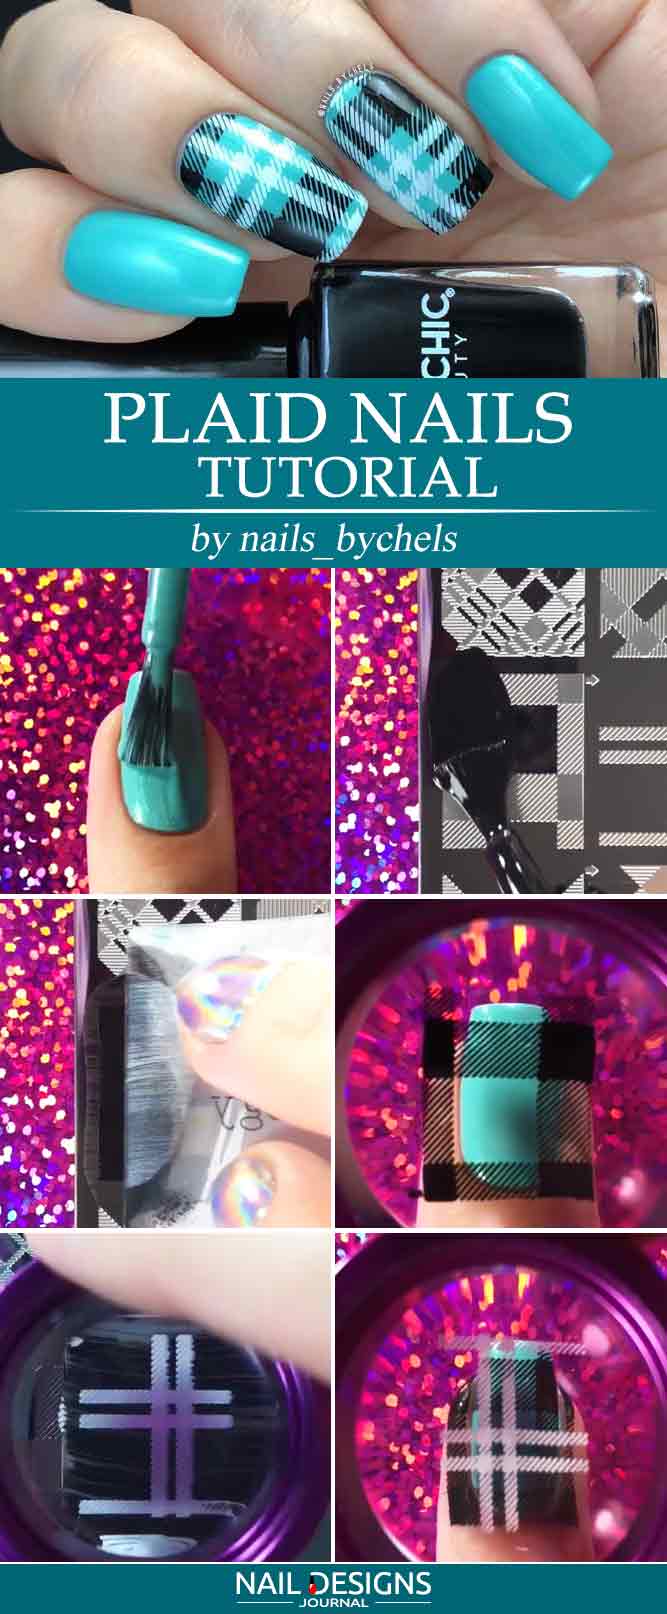
- Apply a clear base coat.
- Cover all of your nails with a turquoise polish.
- Apply liquid latex to protect the cuticles.
- Using a nail stamping plate with a plaid pattern, apply a black nail polish to it.
- Scrape across the plate with a scraping tool to remove excess polish from the plate and transfer the pattern to the stamp.
- Press on the stamp to the nail to transfer the pattern.
- Apply a white nail polish to another plaid pattern, scrape off the excess, pick up the design with a stamp and transfer the pattern to the nail.
- Repeat steps 4-7 for another nail.
- Apply a clear nail coat overtop to finish off your DIY nails art.
Camouflage Nail Art Tutorial
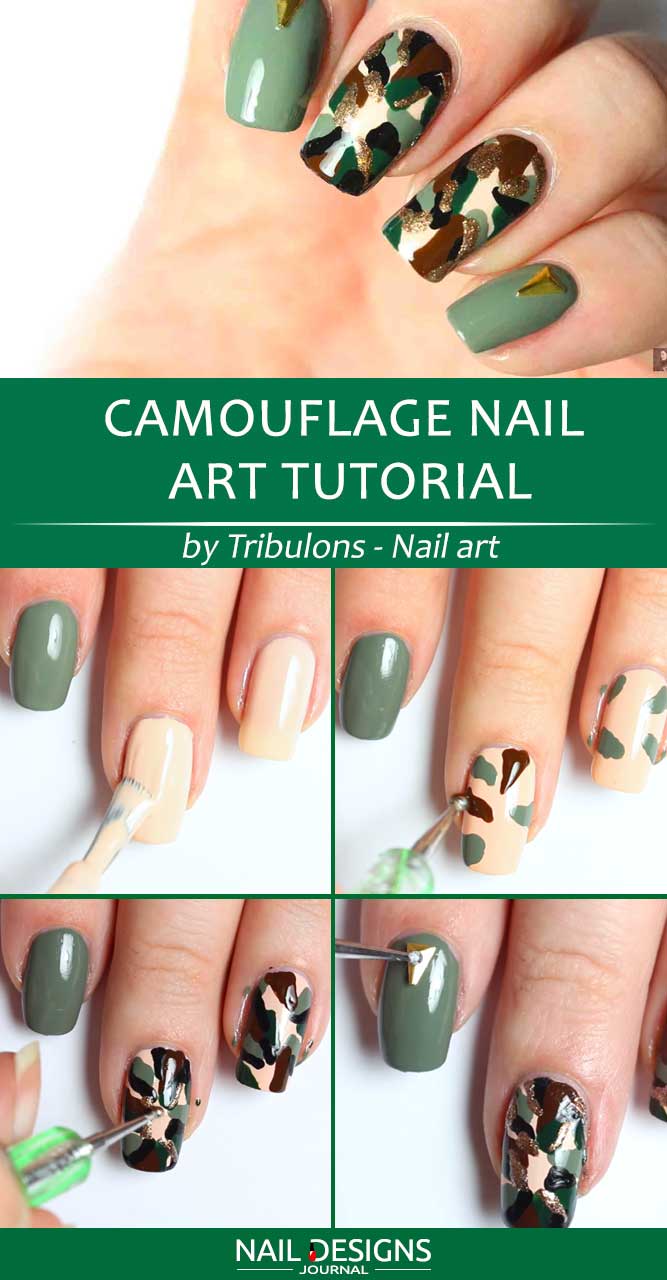
- Apply a clear base coat.
- Cover the index and pinkie finger nails with a khaki nail polish.
- Apply a beige nail polish to the middle and ring finger nails.
- Using a dotting tool as well as brown, golden and khaki nail polishes, draw random spots over the beige nail base until there is no free space left.
- Embellish the index and pinkie finger nails with golden nail vinyls.
- Apply a clear nail coat overtop.
Red Flowers Nail Art
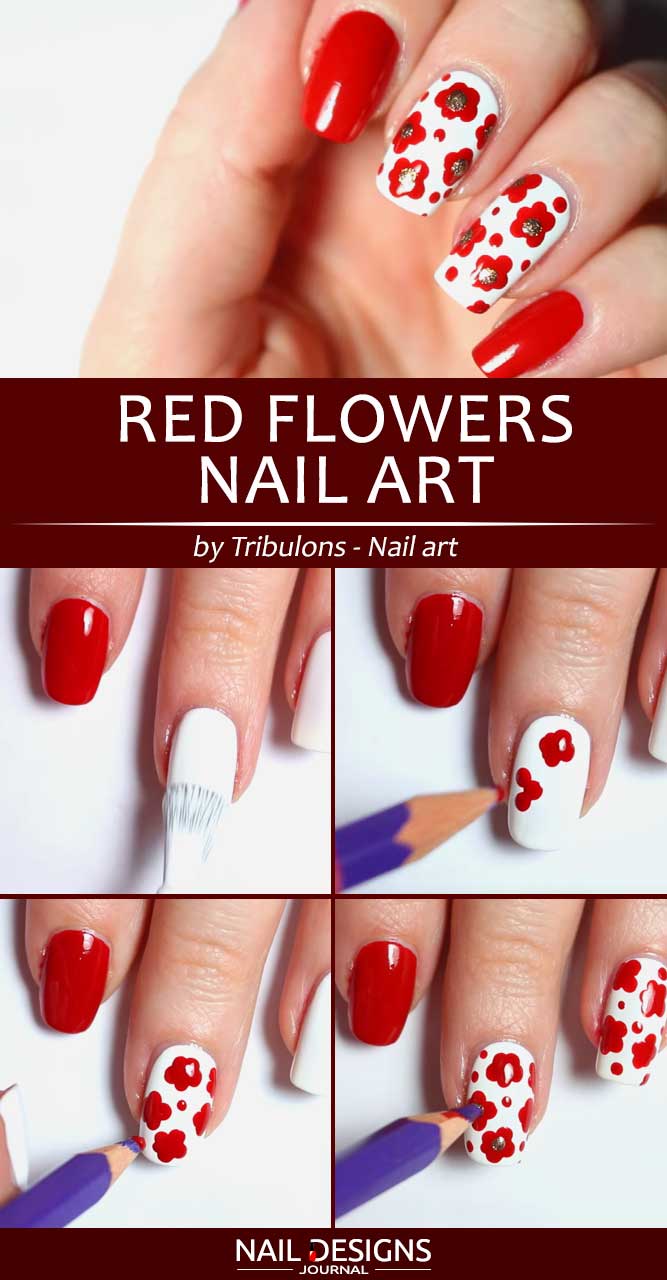
- To get these cute easy nail designs, start with a thin layer of a clear base coat.
- Apply a white nail polish to the middle and ring finger nails.
- Cover the index and pinkie finger nails with a red nail polish.
- Using a dotting pen, a pencil or any other pointy tool and the red nail polish, draw flowers on the middle and ring finger nails.
- Add the core to each flower with the help of the same tool and a golden nail polish.
- Apply a clear nail coat atop each nail.
Black Nails With Gold Stripes
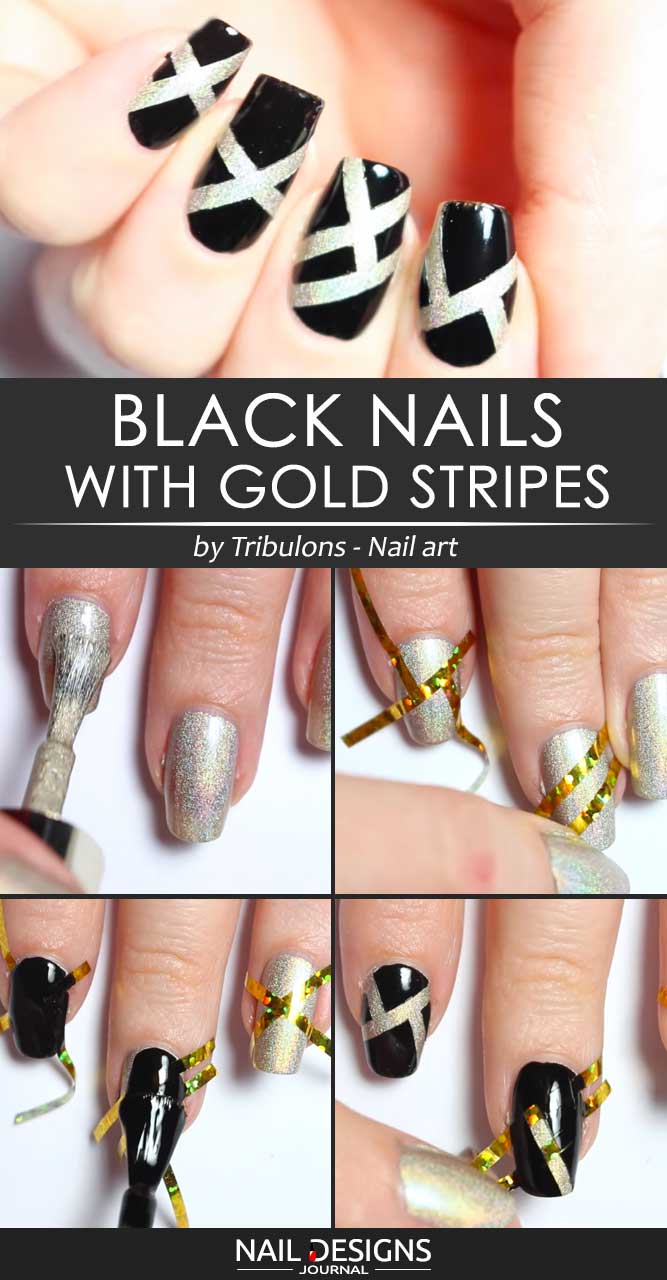
- Apply a clear base coat.
- Apply a gold holographic nail polish to each nail.
- Place nail striping tape over each nail to form the pattern like that in the photo.
- Apply a black nail polish to your nails and before it is dry, remove the striping tape.
- Apply a clear nail coat overtop.

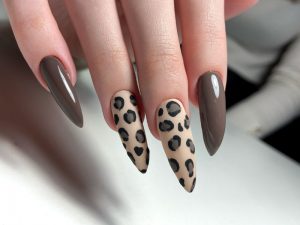
Perfect Nails With Animal Print
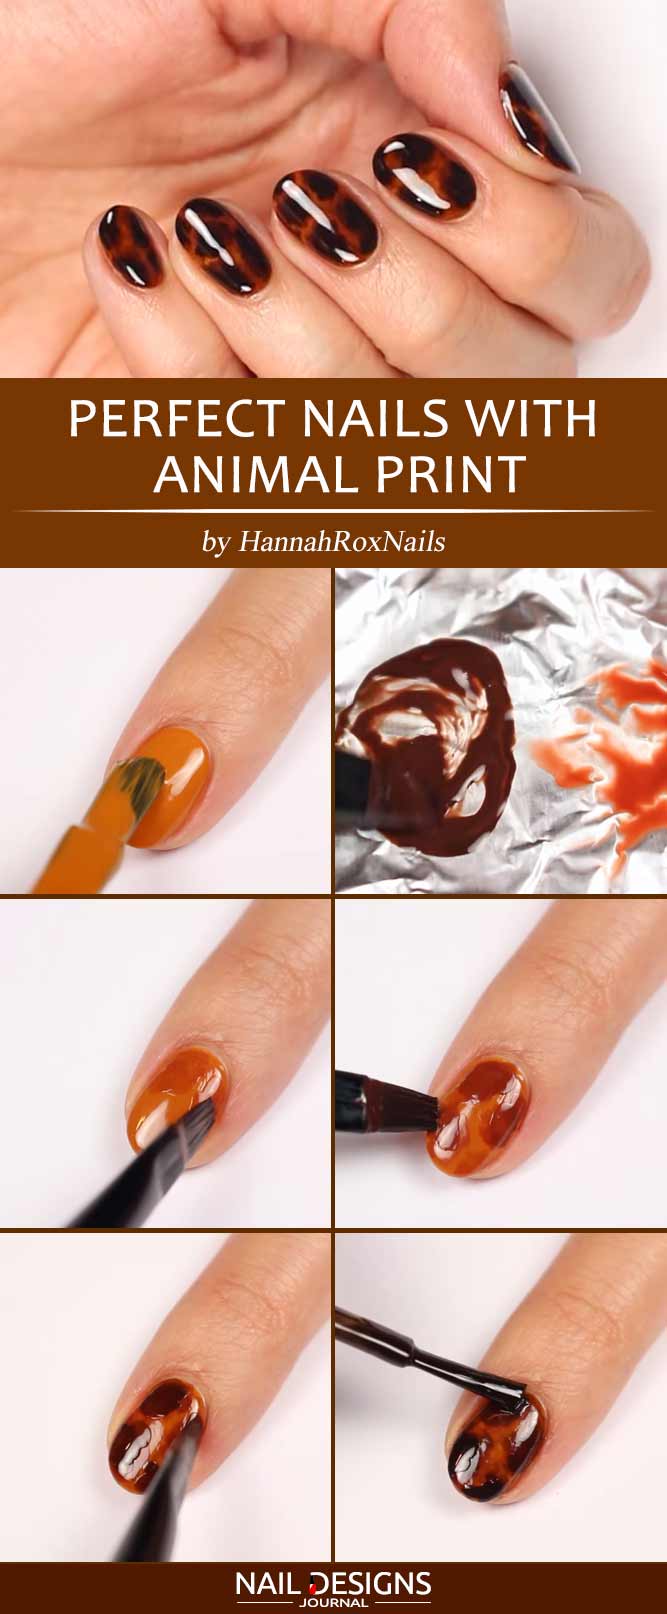
- Like most nail tutorials, we start with a clear base coat.
- Cover your nails with a caramel nail polish.
- Mix a blob of a terracotta nail polish with a droplet of nail polish thinner or acetone on some foil to make the formula sheer.
- Dip the brush into the mixture and dab it at each nail randomly.
- Mix the terracotta nail polish with a dark brown nail polish and the nail polish thinner on the foil.
- Apply the mixture over the previous spots so that they are peekaboo around the edges.
- Apply a clear nail coat overtop.
- Thin out a dark brown nail polish using the nail polish thinner or acetone.
- Repeat step 6.
- Apply the dark brown nail polish to the spots while indenting from the edges.
- Apply another layer of the clear nail top coat.
Blue Nails With Silver Glitter Accent
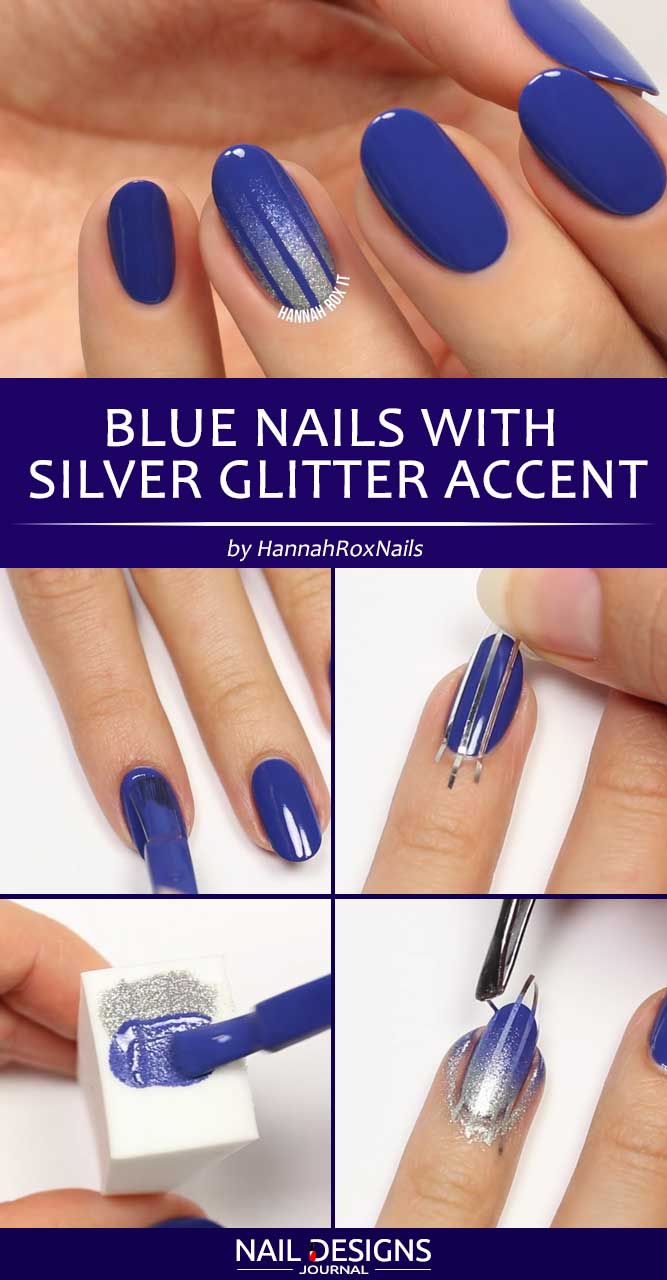
- Apply a clear base coat.
- Apply a blue nail polish to your nails.
- Protect your ring finger cuticle with liquid latex.
- Place three pieces of thin striping tape along your ring finger nail.
- Apply the blue nail polish and a silver nail polish to a sponge next to each other.
- Press on the sponge to the ring finger nail so that the silver nail polish transfers to the base of the nail.
- Remove the striping tape as well as liquid latex and apply a clear top coat.
Simple Matte Ombre Nails

- Apply a clear base coat.
- Apply a red nail polish to your nails.
- Apply liquid latex to protect the cuticles.
- Apply the red nail polish and a black nail polish to a sponge next to each other.
- Press on the sponge to each nail so that the black nail polish transfers to the tip of the nail.
- Remove the liquid latex and apply a matte top coat as a final touch to your DIY nails.
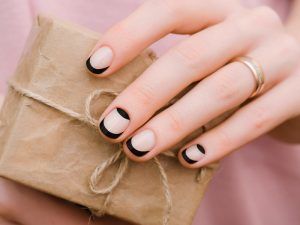
Super Easy Half Moon Nails Art
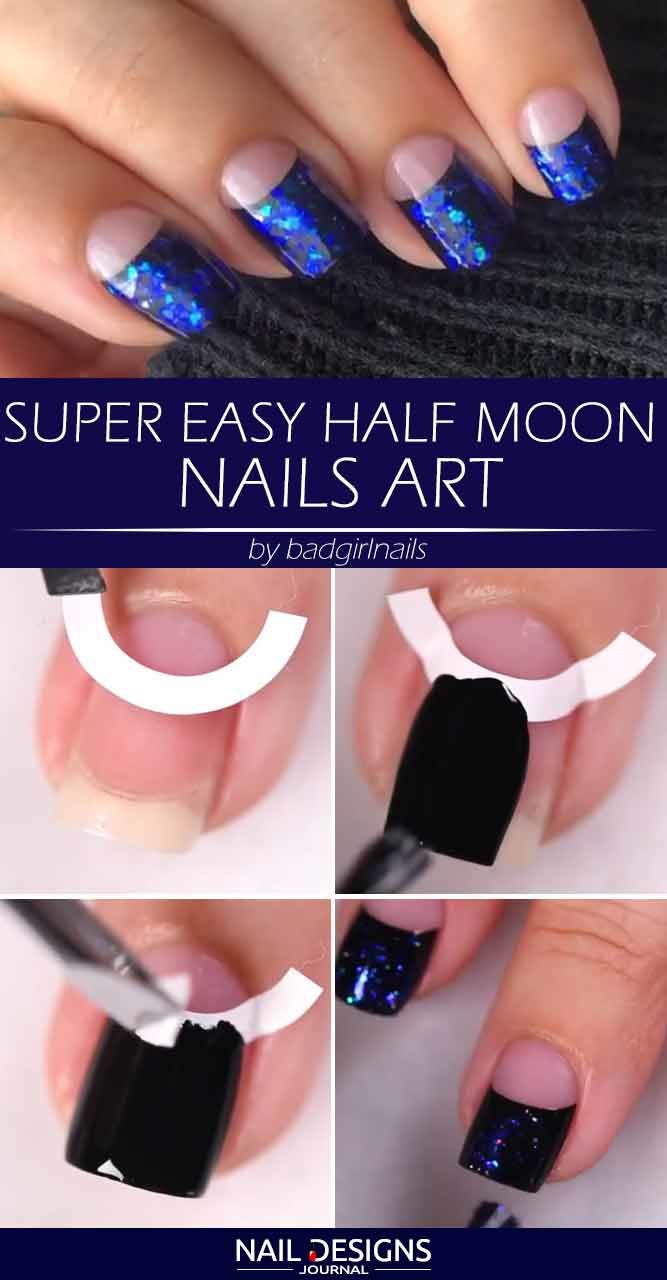
- Begin your at home manicure with a layer of a clear base coat.
- Place half moon nail vinyls over each nail.
- Apply a black nail polish to each nail, working from the nail vinyls toward the tip.
- Remove the nail vinyls and apply a glitter top coat over the black base.
- Apply a clear nail top coat over your DIY nails design.
Glitter Purple Nails Tutorial
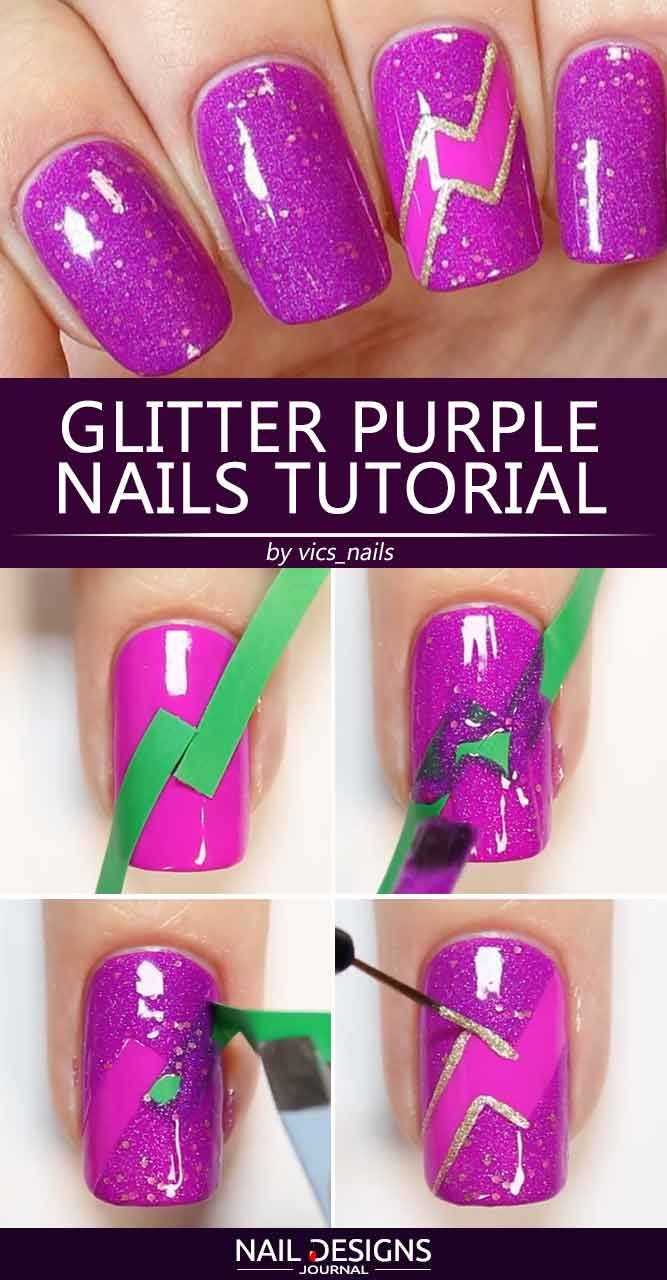
- Apply a clear base coat.
- Apply a shimmery purple nail polish to each nail except for the ring finger one.
- Apply a solid purple nail polish to the ring finger nail.
- Place nail vinyls over the ring finger nail so that they form a lightning bolt.
- Apply the shimmery purple nail polish to the ring finger nail and remove the vinyls.
- Using a gold shimmery nail polish and a thin detailer brush, outline the lightning bolt.
- Apply a clear nail coat overtop.
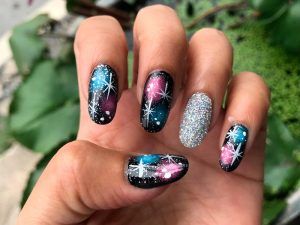
Amazing Galaxy Gradient Nails
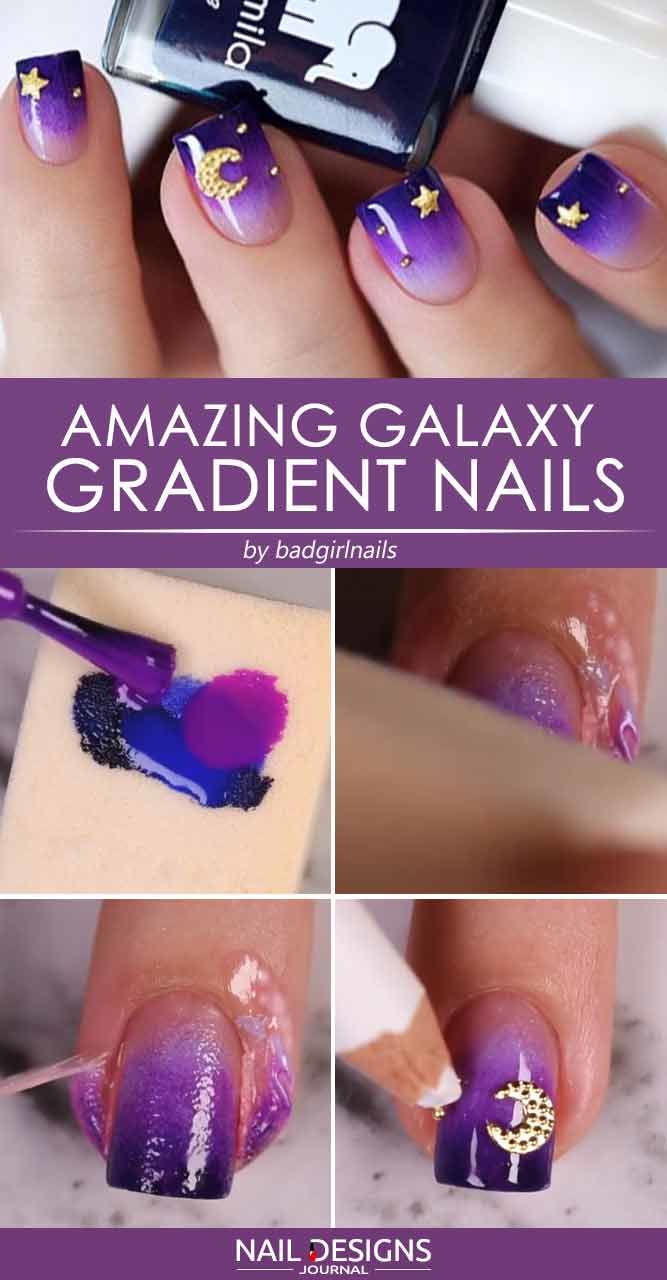
- Apply a clear base coat.
- Apply liquid latex to protect your cuticles.
- Apply four different shades of purple from lighter to darker to a sponge next to each other so that they form a gradient effect.
- Apply a clear top coat.
- Apply a drop of a clear nail polish to your ring finger nail and stick a half moon stud to it.
- Repeat the previous step with star studs for the rest of the nails.
- Apply another layer of the top coat.
Quick Geometric Nail Art With Negative Space
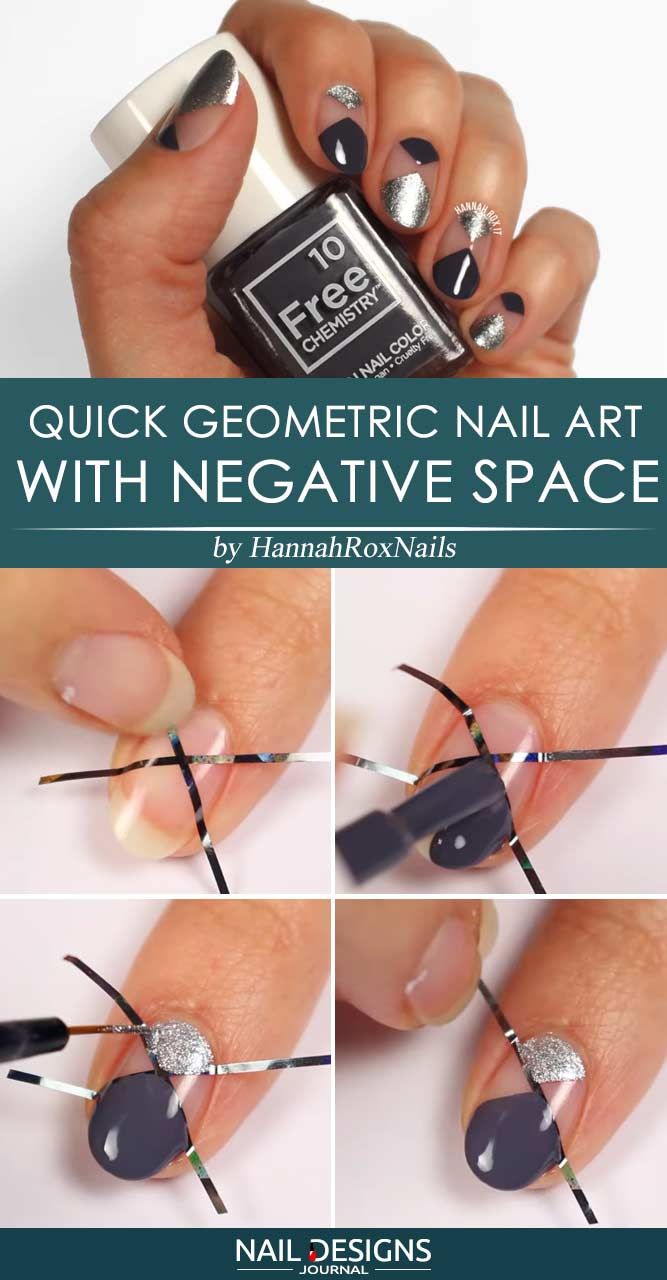
- Apply a clear base coat.
- Stick two stripes of nail art tape to every nail so that they form an X letter.
- Apply a dark gray nail polish to the tip of the index finger nail to fill in all the space surrounded by the striping tape.
- Apply a silver gray nail polish to the base of the same nail to fill in all the space surrounded by the striping tape.
- Repeat steps 3-4 with the rest of the nails, alternating the colors.
- Apply a clear nail coat overtop.
Two-toned Nails Tutorial
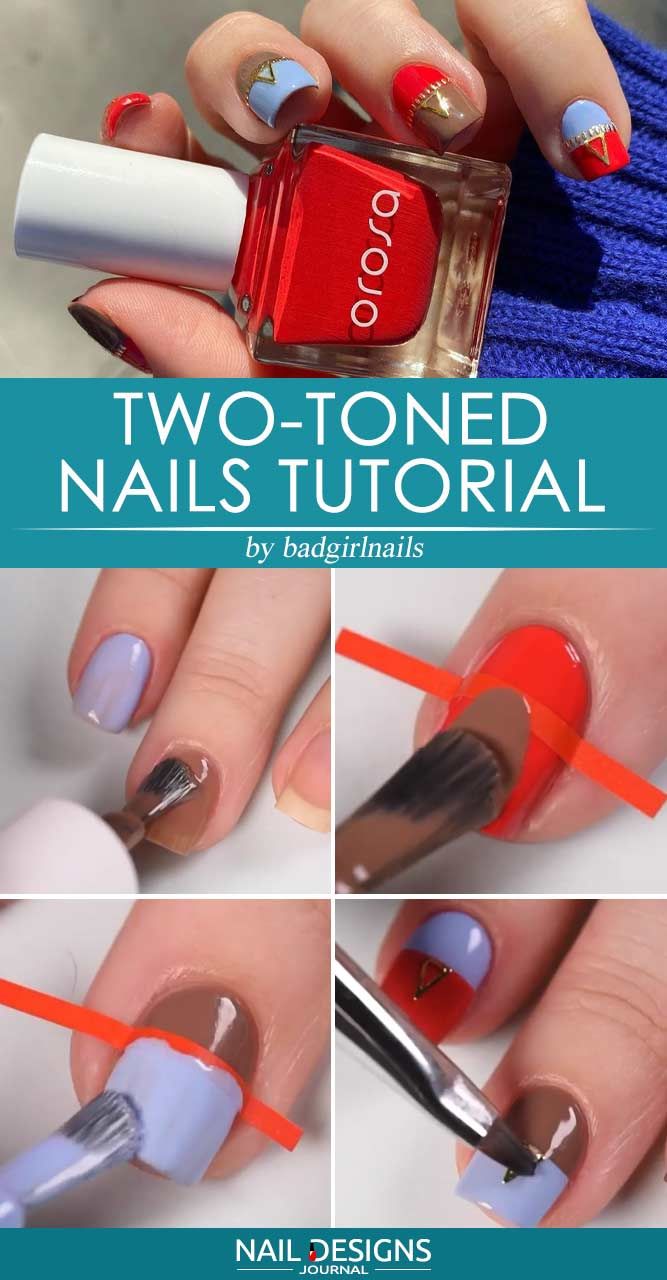
- Apply a clear base coat.
- Apply a lilac nail polish to the index and pinkie finger nails, a brown nail polish to the middle finger nail and a red nail polish to the ring finger nail.
- Place a piece of striping tape across every nail.
- Apply the red nail polish to the tips of index and pinkie finger nails, the lilac nail polish to the tip of middle finger nail and the brown nail polish to the tip of ring finger nail.
- Adorn each nail with nail vinyls to your taste.
- Apply a clear nail coat overtop.
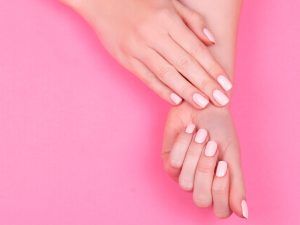
Pretty Nude Nails Tutorial
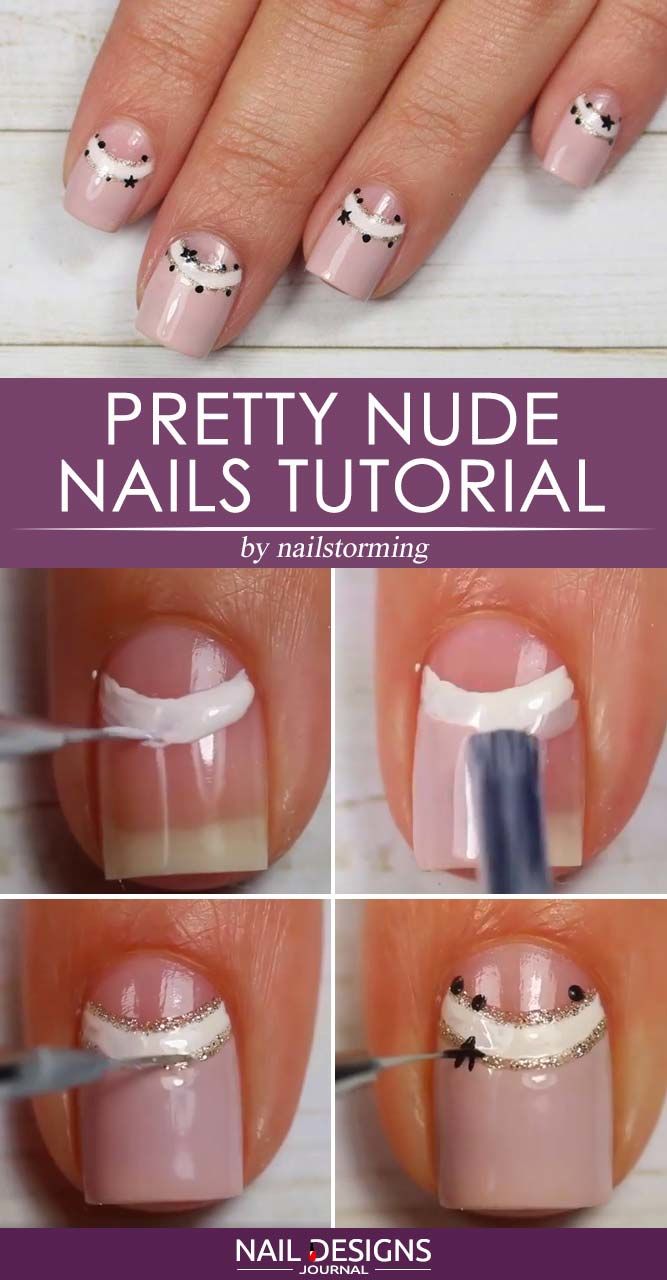
- Your home manicure begins with the application of a clear base coat.
- With the help of a thin detailer brush and a white nail polish, draw a crescent at the base of each nail.
- Apply a nude nail polish to each nail, working from the crescent toward the nail tip.
- Using the thin detailer brush and a gold shimmery nail polish, draw the outline of the crescent.
- With the same brush and a black nail polish, draw a star and random dots along the crescent.
- Apply a clear nail coat overtop.
As you can tell, DIY nails are not that difficult to master, especially when you have such detailed nail tutorials like those we provided in our guide. All you need to do is to stock up on the required material and follow the steps carefully. So if you are still looking for ideas on what to do while stuck at home, your search stops here.
Was this article helpful?