
There are lots of fall nail ideas out there on the web. The thing is that not all of them are perfectly doable at home. That is why we set a goal in front of us to find something perfectly fresh and easy to replicate at the same time. In our opinion, the aim was achieved, what do you think? Would you dare trying one of these nail designs?
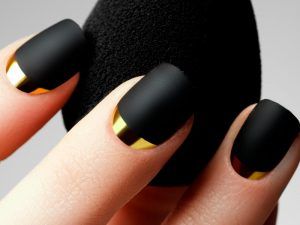
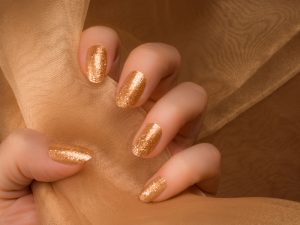
Autumn Leaves with Golden Glitter
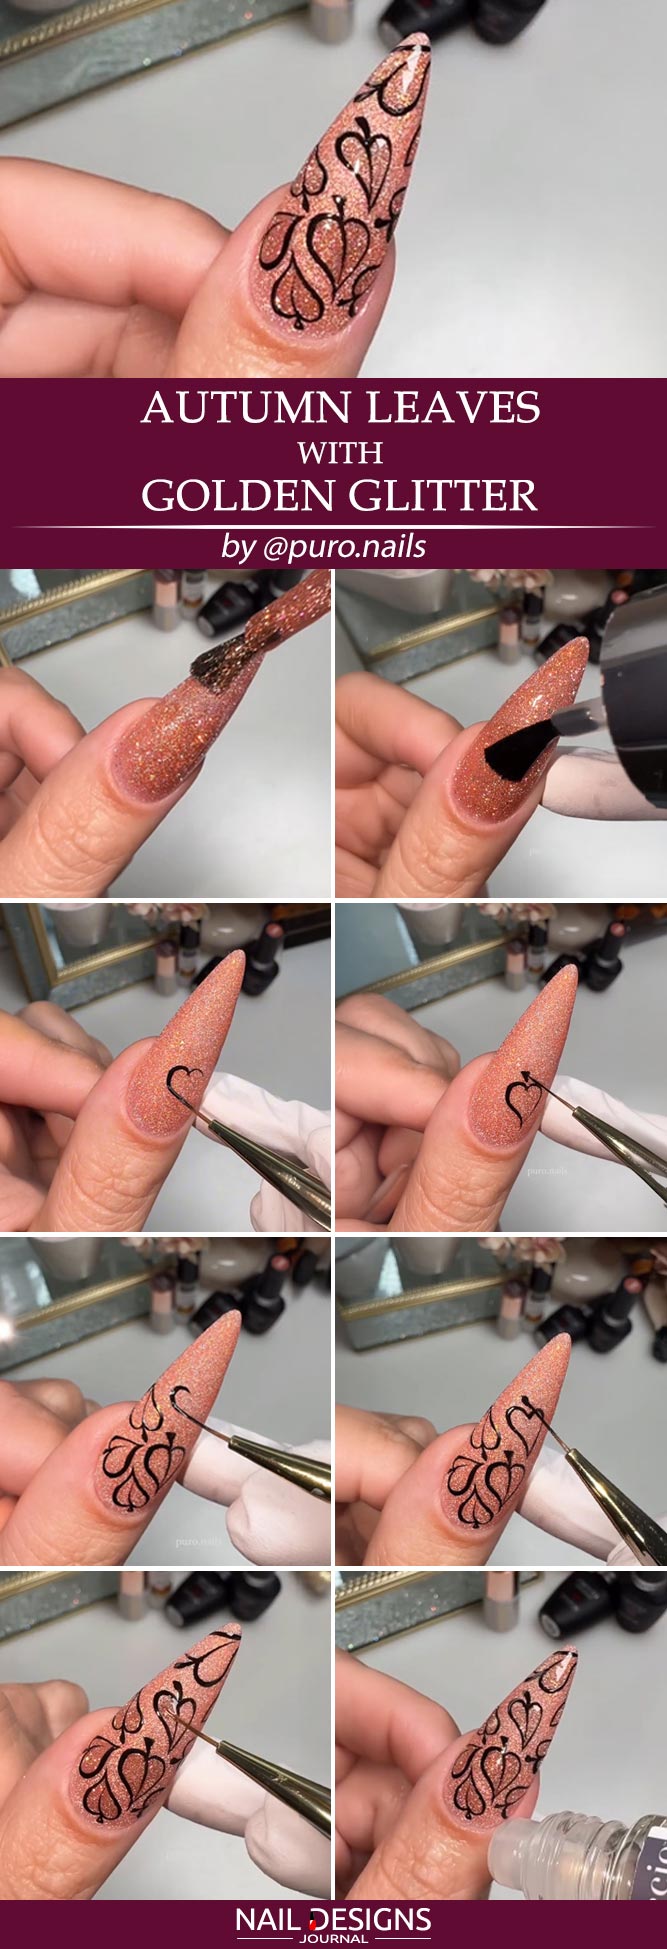
by @puro.nails
- Apply base coat with sparkling gloden-orange glitter polish.
- Fix it with a clear top coat.
- Paint heart-shaped tree leaves with a black paint gel polish and ultra-thin nail brush.
- Cover the base of each leaf with a clear top coat. In this way they will look a bit shaded.
- Apply Cuccio revitalizing cuticle oil to the area around each nail.
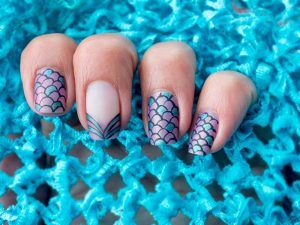
Autumn Flowers With Silver Glitter
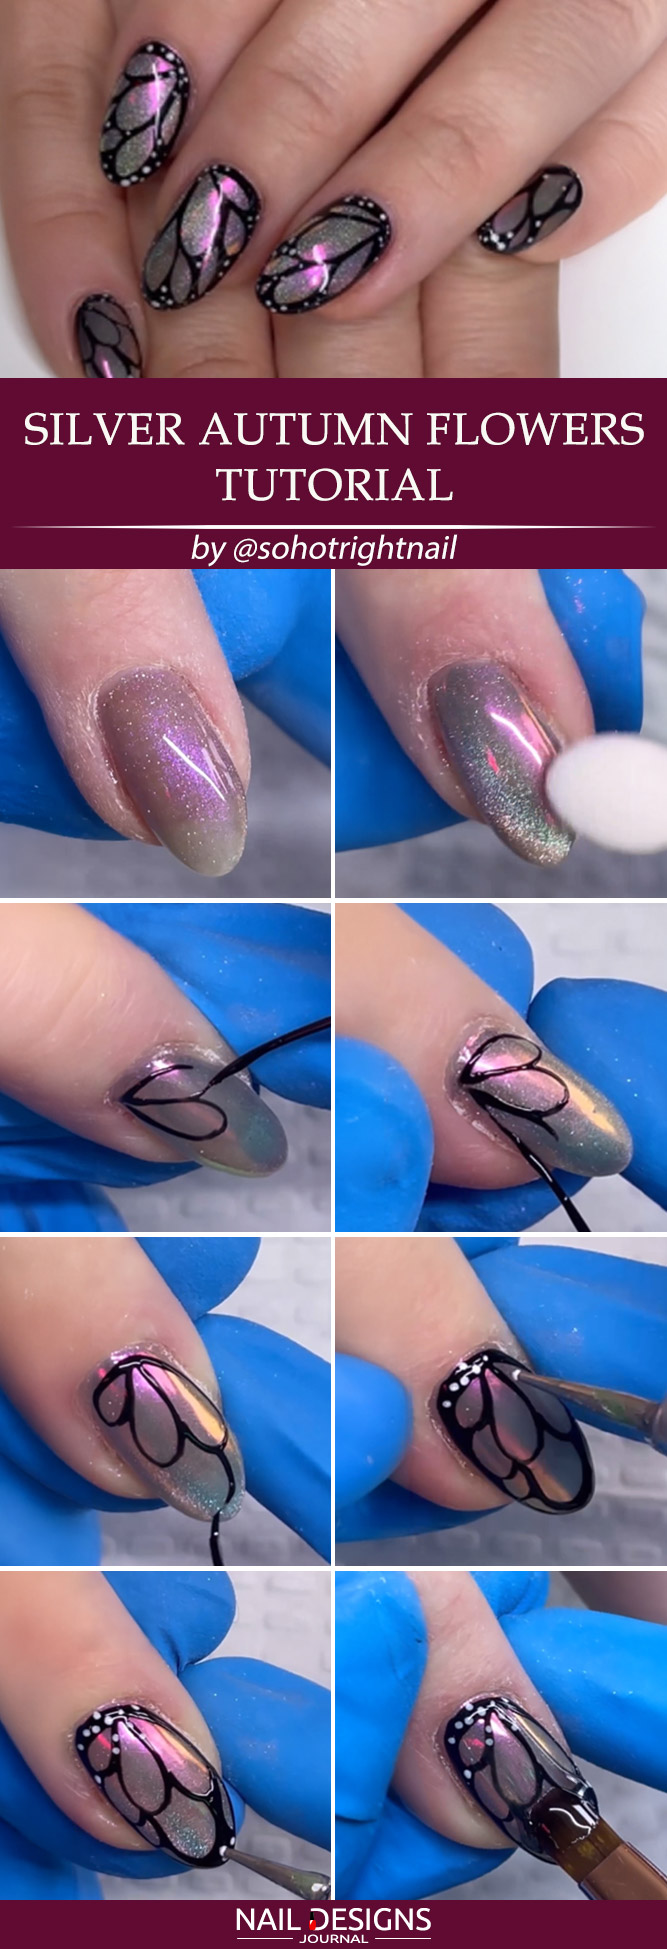
- Apply shimmer gel and let it dry. The one used here is Dramatic Magnet DR-04 by KOKOIST USA.
- Apply Powder Top gel by ICEGEL.
- Treat the nail with glow powder by ICEGEL. The one used here is Maldives Sunset.
- Make outlines of flower petals with OVER DRIVE black paint gel polish by Young Nails Inc.
- Complete the pattern with small dots that you can make with white top coat.
- Cover the nail with clear texture top coat.
- Add glitter, according to your taste.
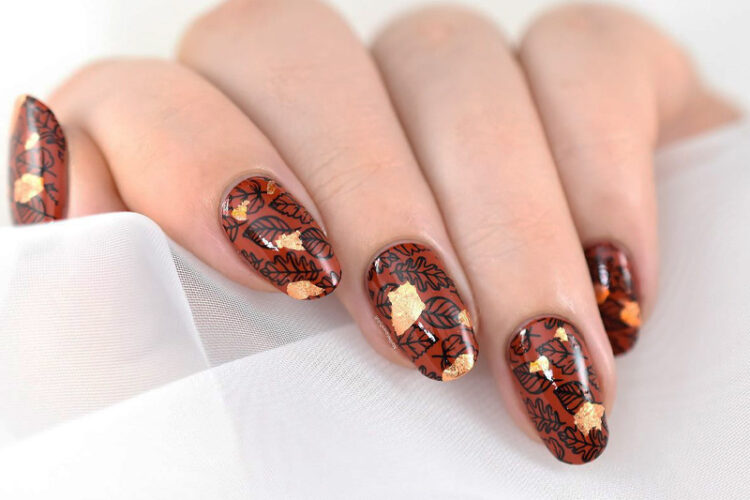
Flaked Chrome with Aura Nails
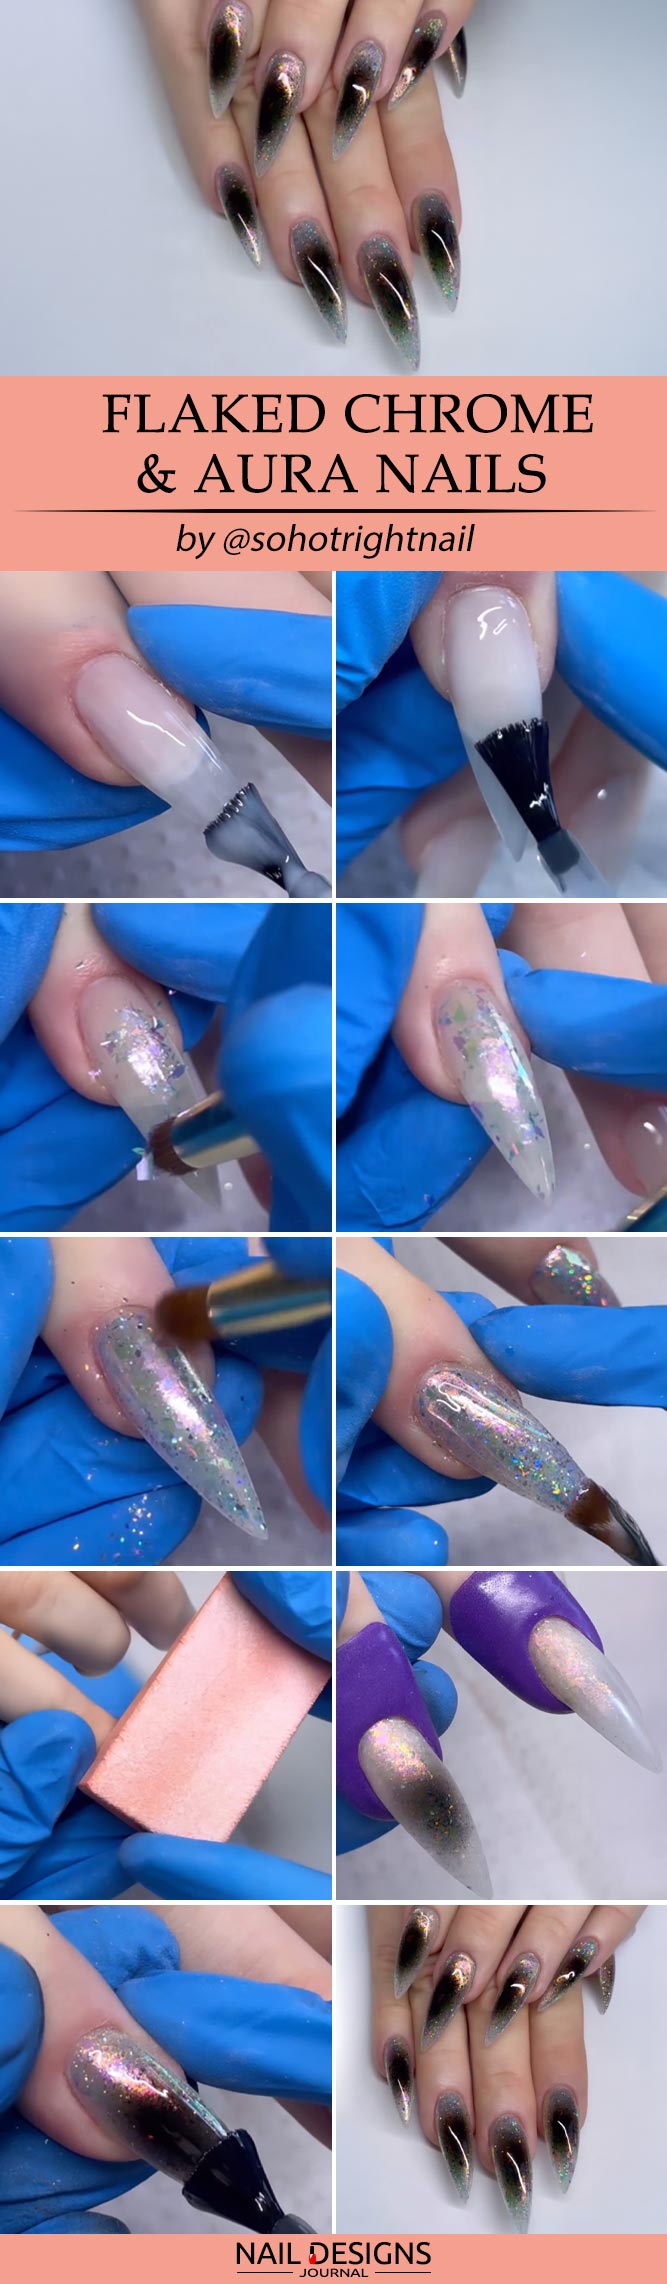
- Apply milky-white base top coat.
- Apply chrome foil flakes and dab them thoroughly onto the tacky layer. You can find some in the Holo Taco and FUMIHIT collections.
- As you rub them into the nail, they get smoother, giving your manicure a festive glittery look.
- Cover the foil flakes with a layer of clear builder gel.
- Buff the nail with a nail file to make it perfectly smooth.
- Make an aura sitch in the center of the nail with an airbrush. Try the Portable Rechargeable Airbrush Kit by Daakro or the Rechargeable High-Pressure Non-Clogging Airbrush Kit by K KERNOWO.
- Apply a thin layer of clear top coat.
3D Chrome Nails
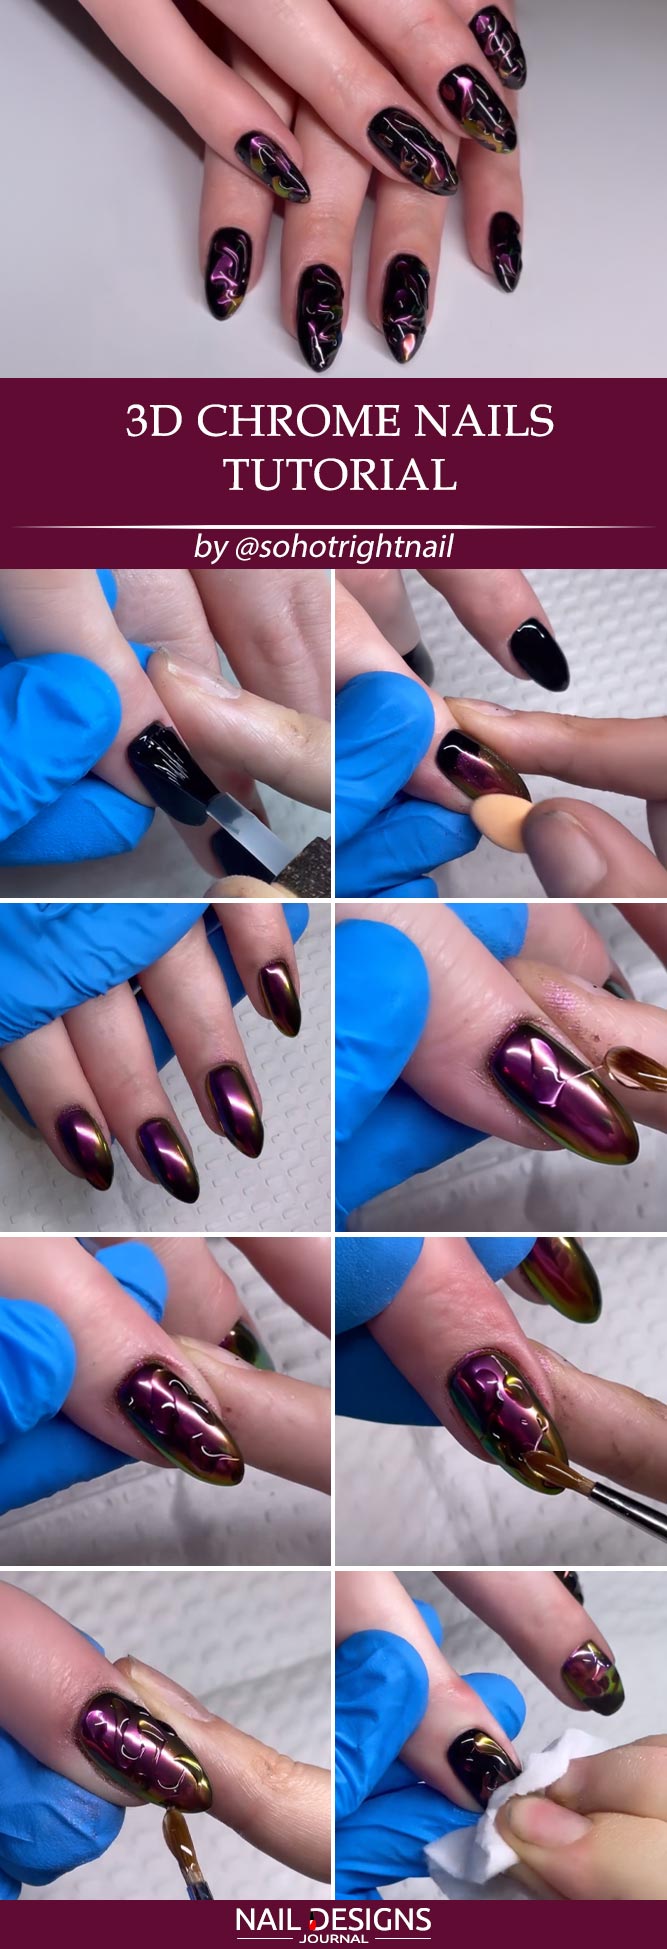
- Apply black base top coat. Let it dry.
- Apply dark violet or burgundy chrome powder and rub it well into the nail. You will find some really amazing shades in the 6-Colors Aurora Nail Powder Mirror Luster Charm Effect Chrome Nail Powder Kit by Gadcrystal.
- Apply clear builder nail gel in large drops.
- Professional Nail Art Brush (Size 8) by YCYAN will help you create gorgeous 3D designs.
- Feel free to use any base color and any chrome powder.
- Apply top coat and feel free not to wipe the chrome away.
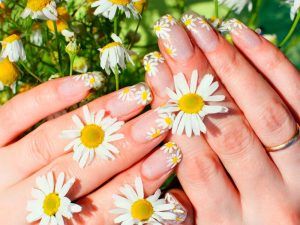
Easy Fall Nail Art with Leaves and Dots

by @Jenny Claire Fox via Youtube
There are no fall nail art that can go without the leaves involved.
- Start the design with the nude base.
- With a dotting tool, make the outline of the leaf.
- With a dotting tool, add up few polka dots that will transform into berries later on.
- Add up some yellowish smaller leaves to the nail.
- Apply lighter orange to the biggest leaf.
- Add up some small stem to the leaf.
- With a small dotting tool, add up few brown and bright yellow polka dots to the design.
- Apply a top coat.
Watercolor Fall Tree Nail Tutorial
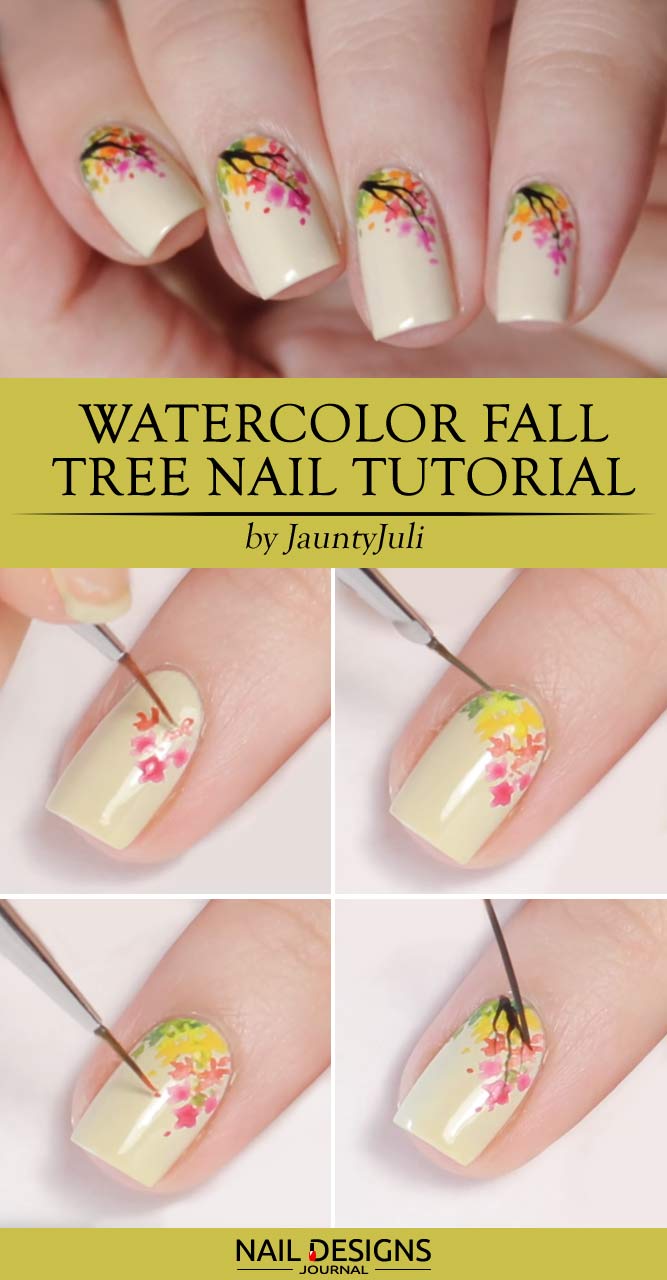
Fall is here! use your fav fall nail colors to be queen!
- Apply base coat.
- Apply cream-colored base.
- Prepare the colors you are going to use, make sure they are pretty watery.
- Start drawing red-shaded star-shaped leaves.
- Continue with an orange shade.
- Opt for yellow star-shaped leaves.
- Finish off the leafy pattern with a light green shade.
- Using dark brown, paint the branches.
- Apply top coat.
DIY: Classy Fall Leopard Design
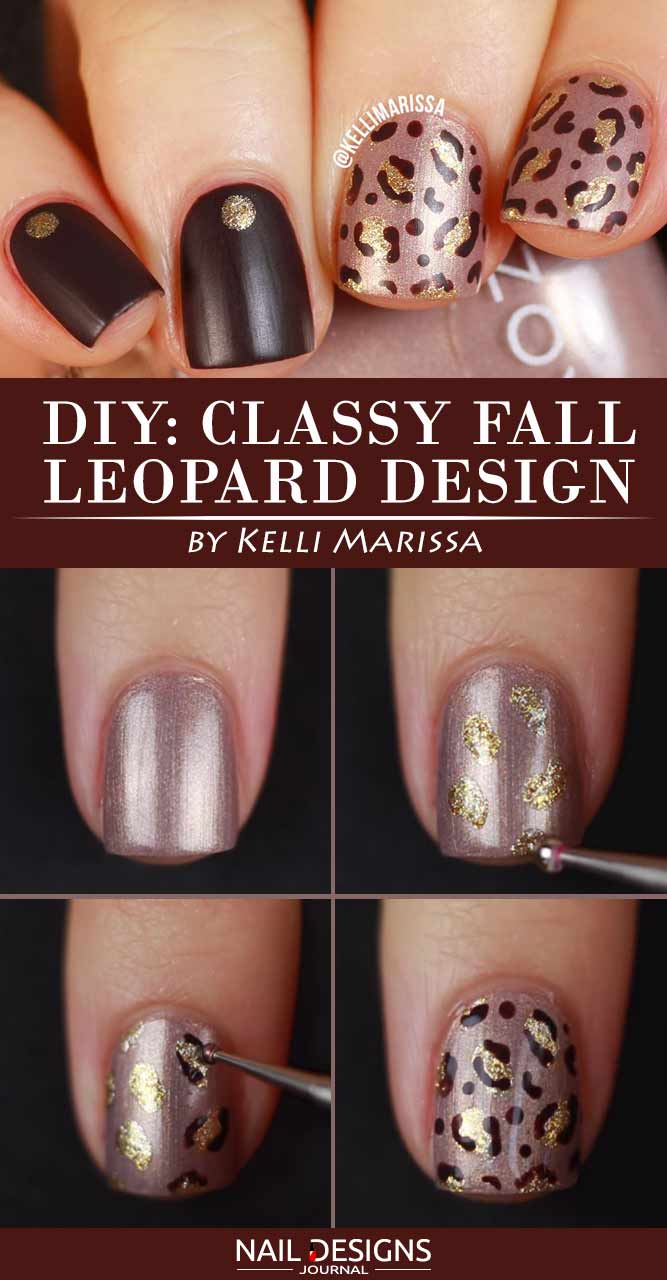
- Apply base coat.
- Add a nude-sparkling shade to two of your accent nails.
- With a help of a dotting tool, add some gold irregular circular shapes to your base.
- Outline the gold shapes with dark purple nail polish.
- Apply top coat.
- Add a dark purple base to the remaining nails.
- Add a gold dot to the top center of your nail.
- Apply either glossy or matte top coat.
Dry Marble Autumn Nail Art

by @Moonlight Nail Art via Youtube
- Apply a base coat.
- Apply a white base coat to your index and ring finger.
- Apply brown base to all the other nails.
- With the help of a dotting tool add three dots of brown nail polish to the white base.
- Add sparkly silver dots on top of brown ones, the same way.
- Using a thin striping brush drag thin lines from the center of dots p and down.
- Using different- sized dotting tools add various dots to the design.
- Add some sparkly nail polish to the top of the design.
- Apply a top coat.
Burberry Plaid Nail Art
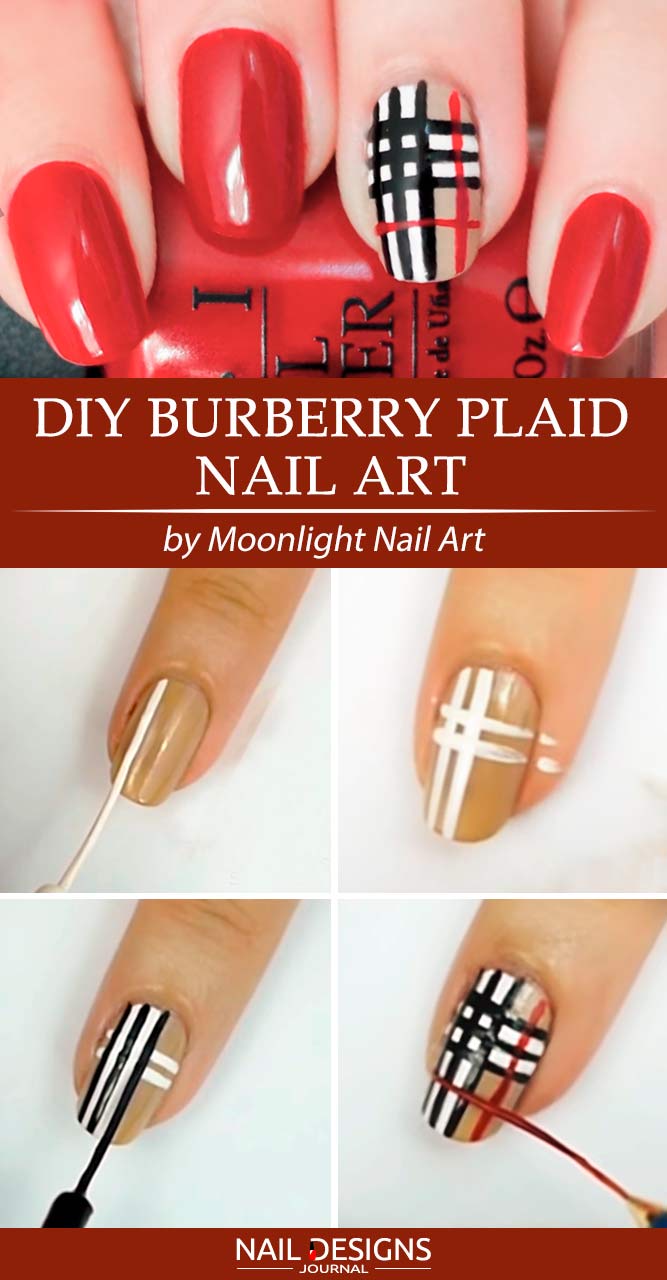
by @Moonlight Nail Art via Youtube
- Apply a base coat.
- Apply a red base coat to all fingernails but ring one.
- Apply a nude base coat to the ring finger.
- Add two white thin vertical lines to the nude base with the help of a thin striping brush.
- Add two thin horizontal lines using the same tool and nail polish.
- Add a thin black line in between the white ones.
- Add two more black lines on each side of white ones.
- Repeat the procedure in the horizontal direction.
- Add a red line closer to the untouched part of the nail and repeat the procedure in a horizontal direction closer to the tip of the nail.
- Apply a top coat.
Autumn Nail Design With Leaves
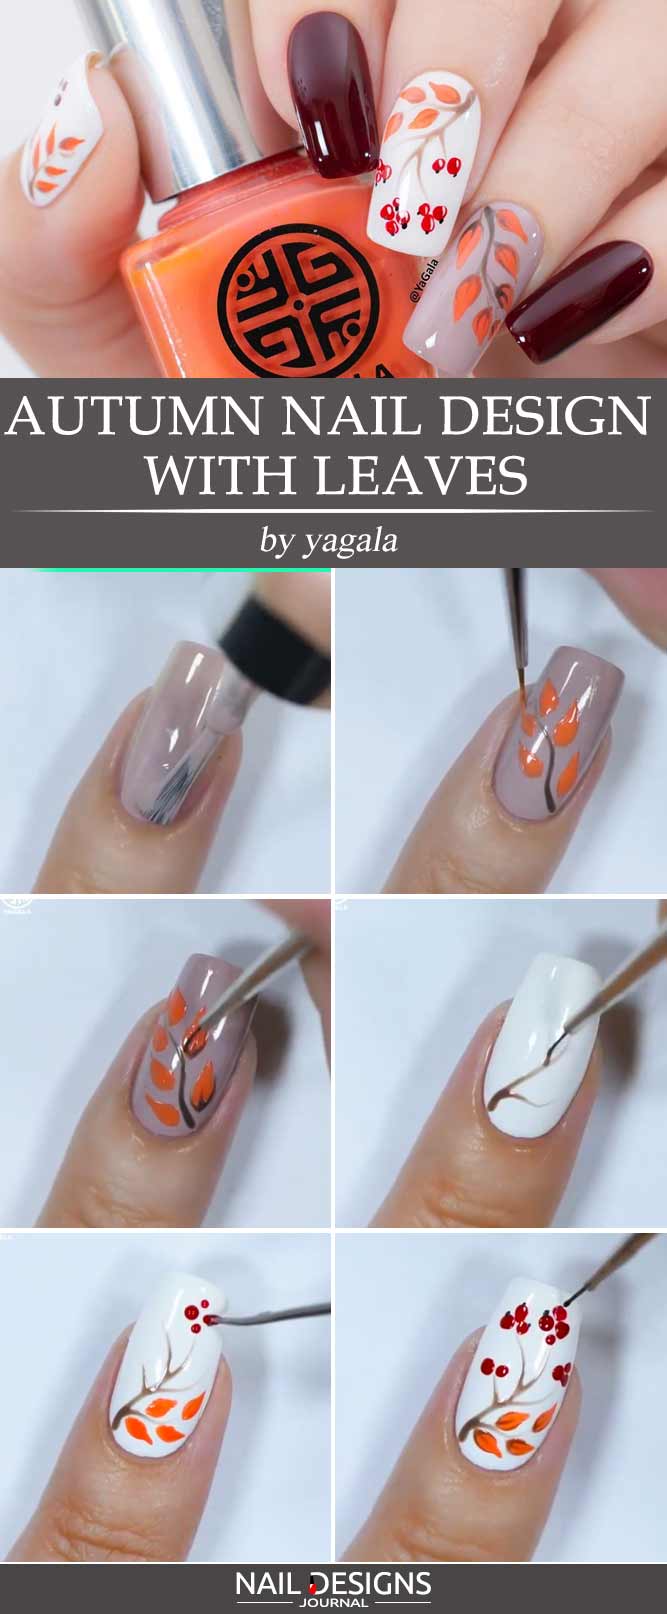
by @yagala
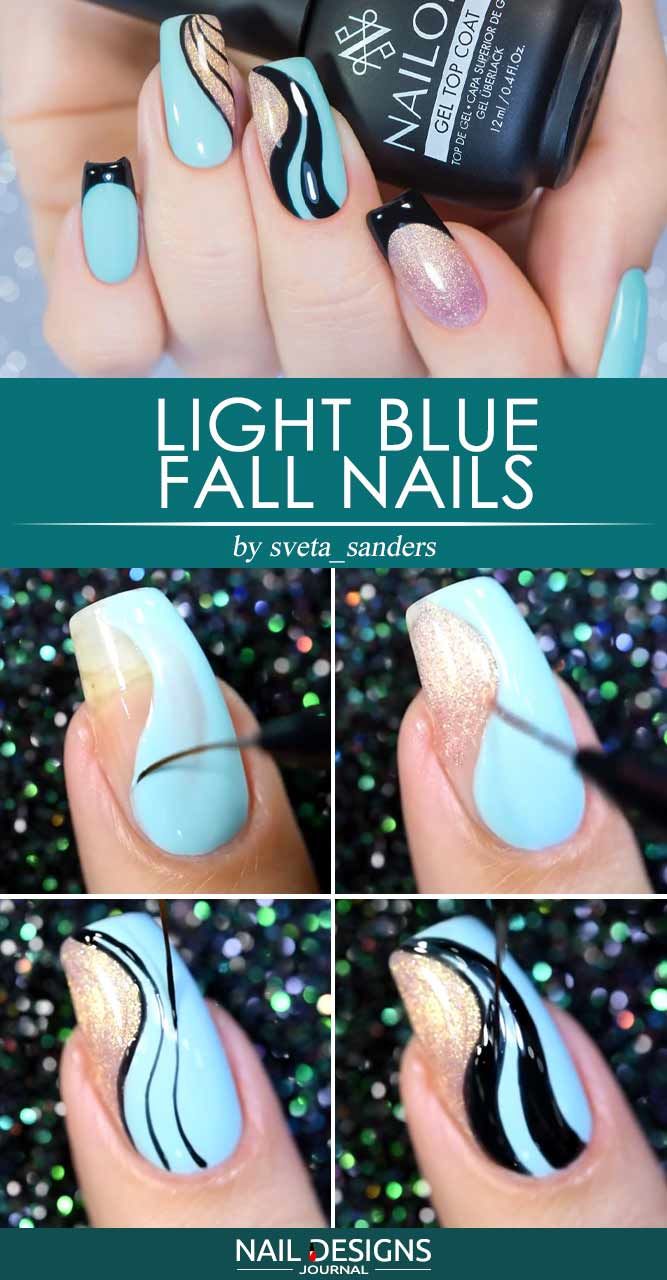
Light Blue Fall Nails
Olive Color For Fall Nails
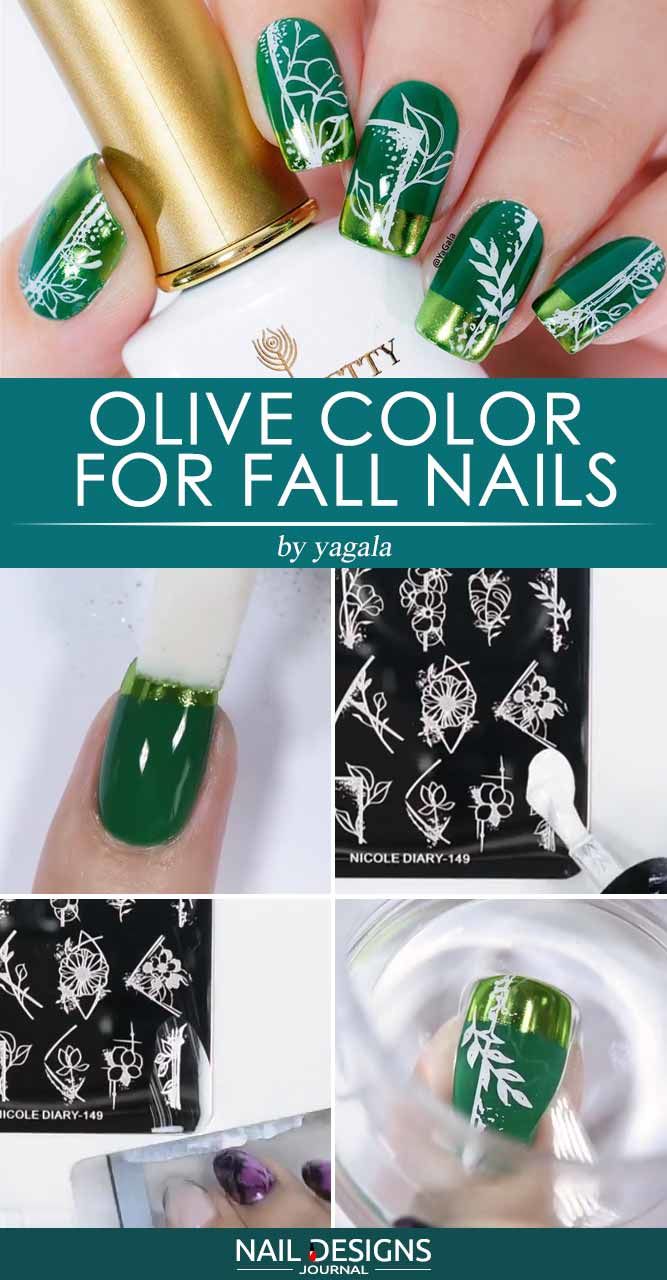
by @yagala
Fall Nail Ideas With Golden Flowers
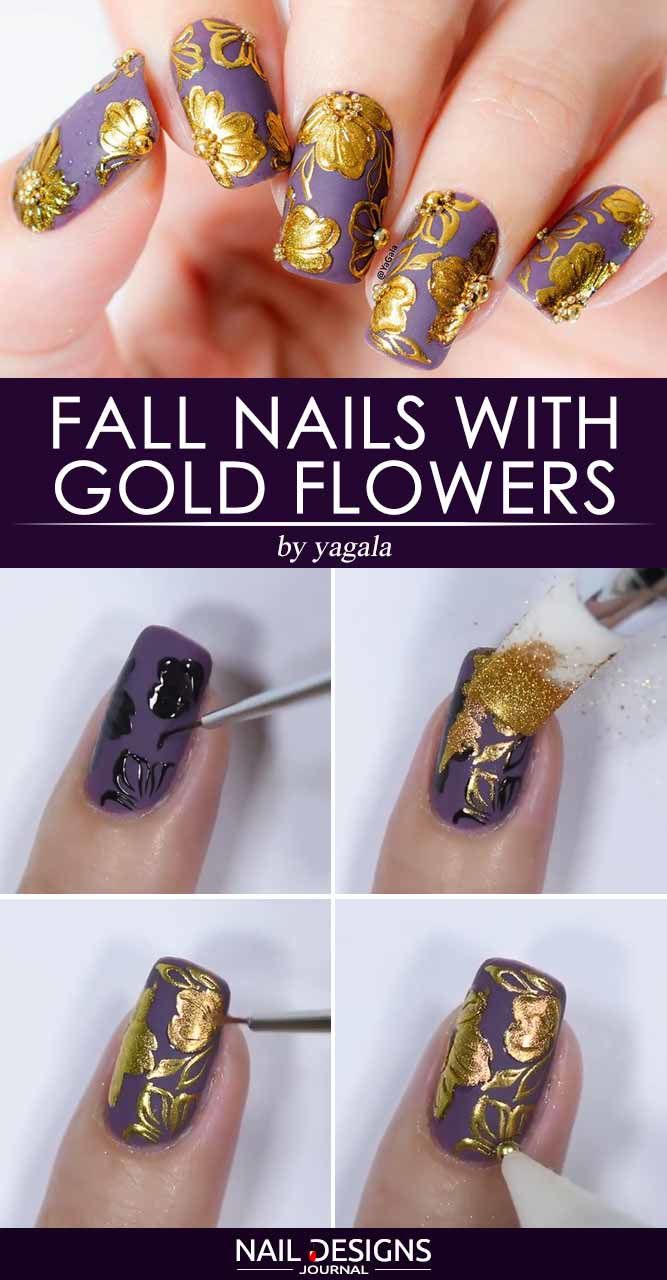
by @yagala
- Apply matte dark gray top coat to each nail (try “Grey-dreaming #14 by Sally Hansen).
- Draw the contours of flowers with an ultra-thin nail brush and a black paint gel.
- Apply gold-colored chrome powder to the flowers. Rub it well.
- Glue a pearl rhinestone into the flower сore.
- Glue several smaller rhinestones around it.
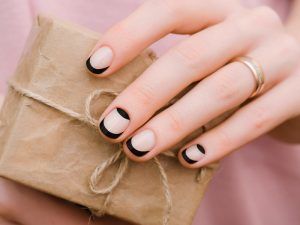
Minimalist Autumn Nails Design
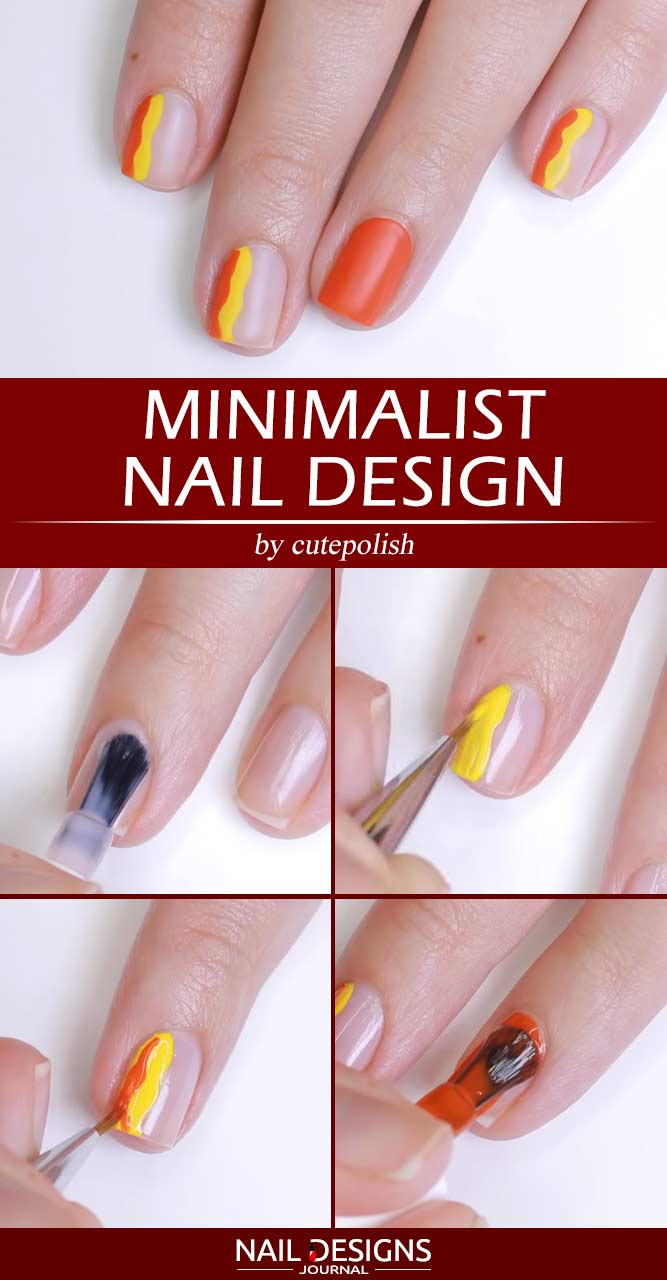
- Apply milky white base coat to each nail.
- Cover one half of the nail vertically with yellow polish and an ultra-thin nail brush. Let it dry.
- Apply bright orange polish on top. Let it dry
- Paint your ring finger with the same bright orange polish.
- Apply top coat (optional).
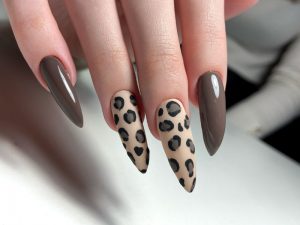
Animal Print In Fall Nails Colors
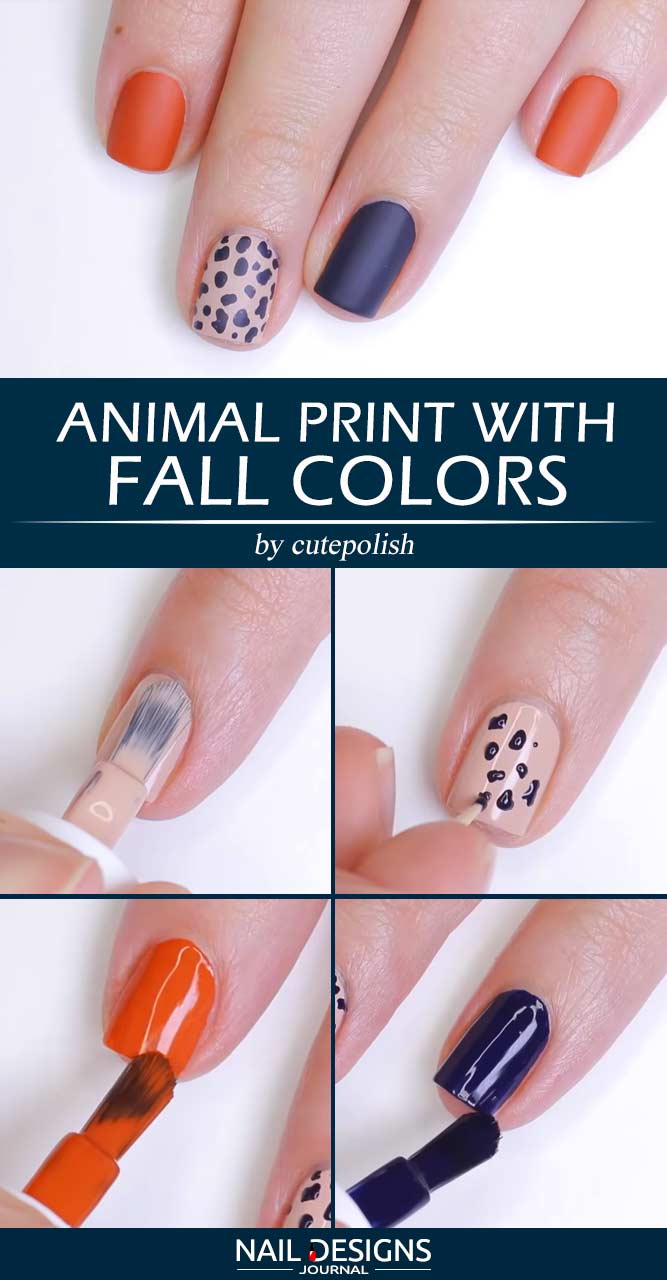
- Paint your index finger and little finger with matte mustard nail polish (like the Glow in The Dark Nail Polish by Moon Glow).
- Paint your ring finger with dark navy blue polish (try the “Yoga-ta Get This Blue!” Nail Lacquer by OPI.
- Apply nude beige base coat to your middle finger. Let it dry.
- Using an ultra-thin nail brush and a black paint gel polish, add small dots shaped like leopard spots.
- Apply clear top coat on each nail (optional).
Matte Fall Nails With Dotted Ombre

by @Simple Nail Designs via Youtube
- Apply glossy burgundy-colored polish on the index finger.
- Apply clear base coat on the middle finger.
- To make dots, it’s better to use Double Ended Nail Art Brushes Set and Nail Dotting Tools by Magic Armor.
- Make 5 dots with a black nail polish.
- Add some more dots with a dark burgundy nail polish.
- Add some more dots with a gray nail polish, entering the boundaries of the nearby points.
- Apply top coat (optional).
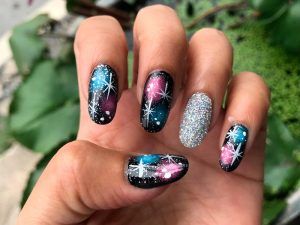
Fall Tree Nail Art
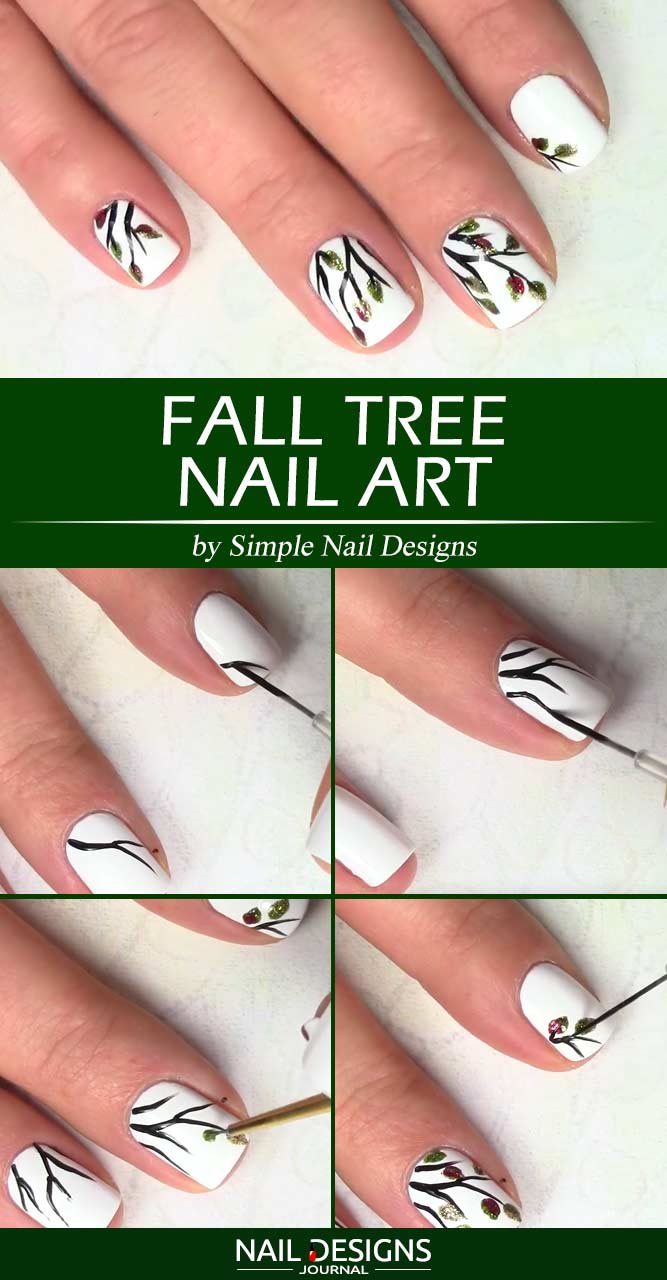
by @Simple Nail Designs via Youtube
- Apply white base coat.
- Draw tree branches with black paint gel polish and a thin nail art brush. The nylon Painting Art Design Brush Set by ZEOHBETY will cope with this task perfectly.
- Add leaves to the branches using green, silver and burgundy glitter polish and the same thin nail brushes.
- Apply top coat for a more glossy finish.
Abstract Fall Nails Design
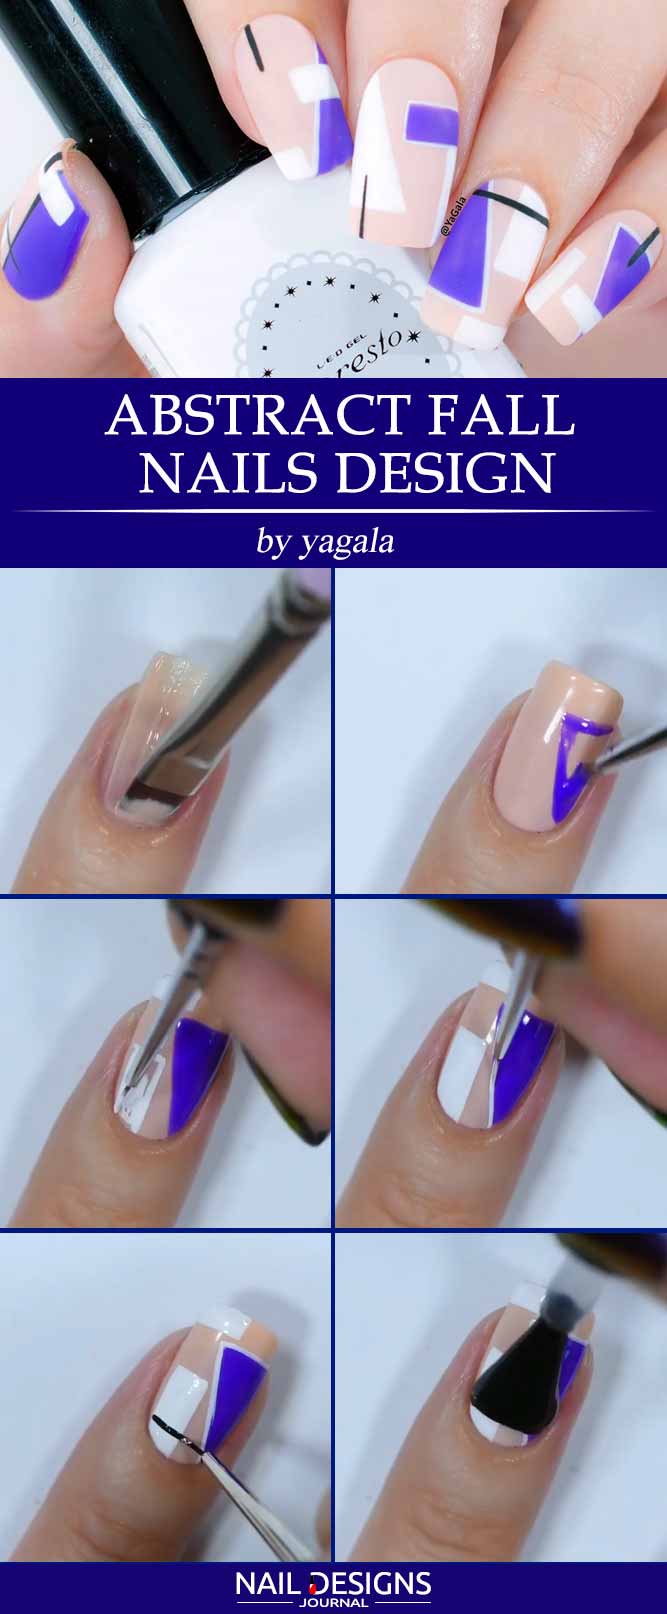
by @yagala
- Apply Clear base coat.
- Draw a triangle on one side of the nail with a blue polish and an ultra-thin nail brush.
- On the other side of the nail, paint a rectangular with white polish and the same ultra-thin nail brush.
- You can also try painting half the tip of your nail with white polish.
- Apply top coat
Was this article helpful?