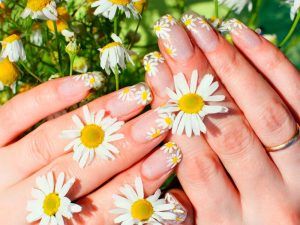

How many of you dream of some cute nails designs to replicate but all you can find are those complex tutorials, for pros only? Well, it is time to rejoice, since we have easy tutorials for you.
While so many designs for nails seem impossible to do at home, we will prove you wrong with these examples.
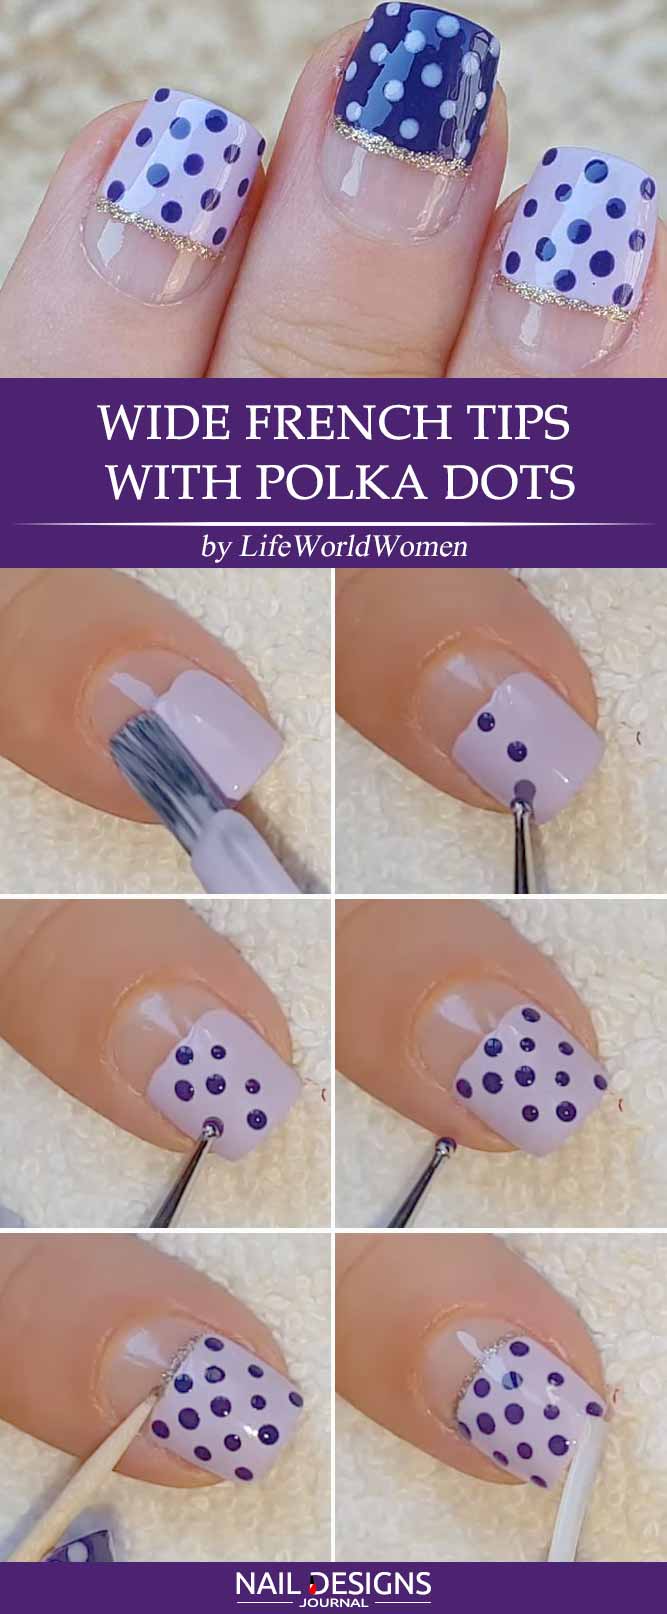
French Tip Nails With Polka Dots
Tired of regular French tip nails art designs? We have something fresher for you. This wide French manicure is already different-colored. Instead of a usual white shade, go for purple shades and cover the half of your nail with it. Once the index and little fingers are covered with light purple and others with dark purple nail polish, it is time for using a small dotting tool. Add light purple dots to the darker base and vice versa. To finish this the design, use a tiny brush or a toothpick to create a sparkly gold underline. It looks majestic, don’t you think? To enhance your nail design skills, we recommend reading our comprehensive nail brush guide. It will provide you with valuable insights and help you choose the right brushes for flawless results.
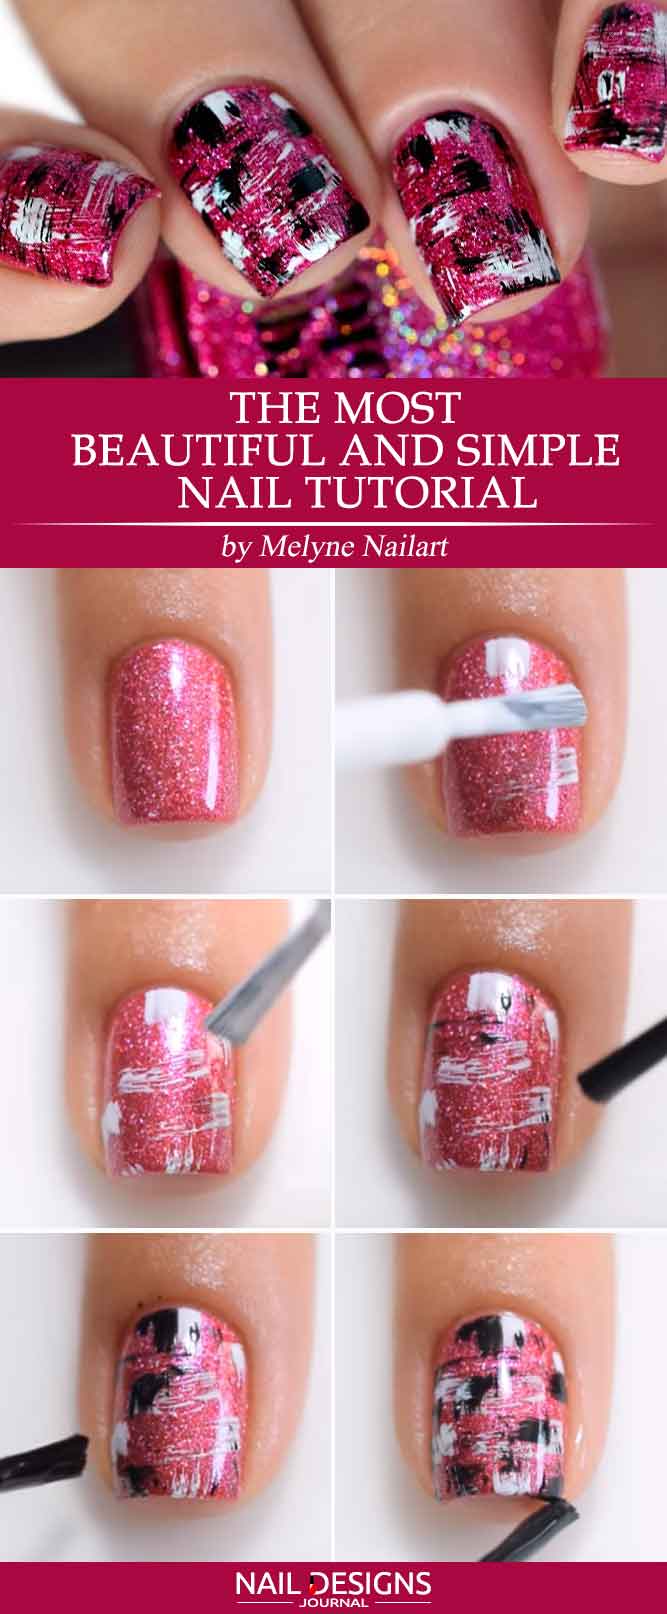
Simple Glittery Nail Tutorial
Really, you’ll see that it’s one of the simplest and nail tutorials. To start, you will need to choose three nail polish colors, in our case, these are white, black, and glittery pink. Cover your fingernails with a pink base first. With the white polish make some easy strokes in different directions. Repeat the procedure with the black nail polish. If needed, you can add up some more white nail polish. If not, simply coat your nails with top and – voila!
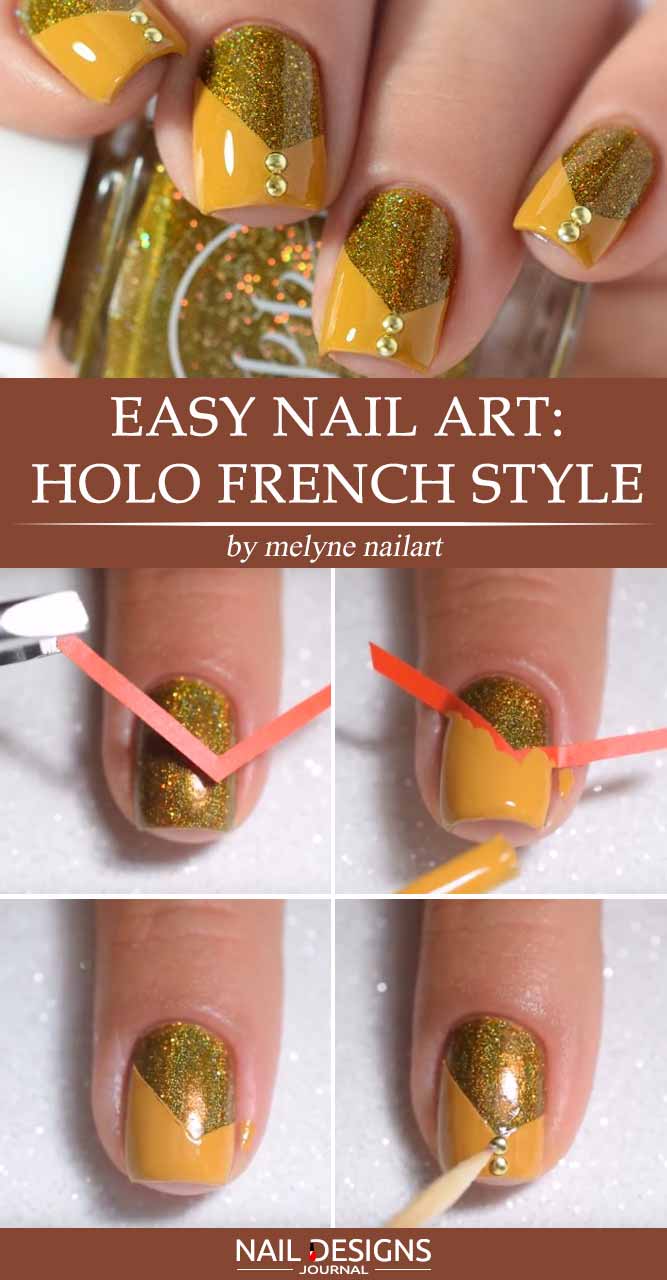
Cute Nails Designs: Holo French Style
This is what you are going to do:
- Apply a base coat.
- Cover your nails with any holo nail polish you like.
- Put on nail vinyl, shifting it a little to the side.
- Fill the bottom part of your nail with cream-shaded nail polish.
- Remove the vinyl straight away.
- Add up two tiny studs to the center of a cream-colored part.
- Apply a top coat.
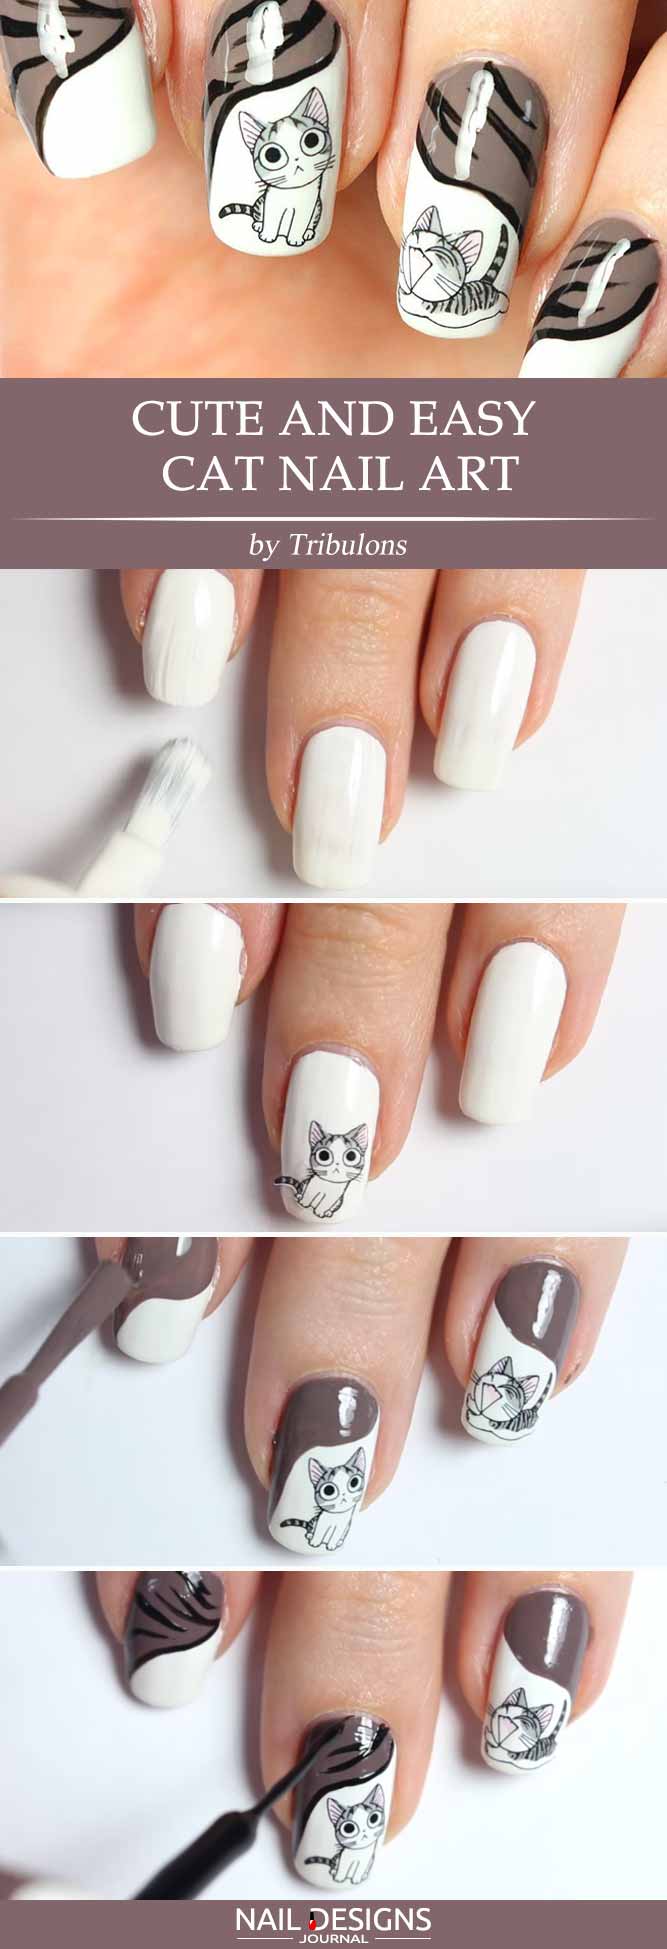
Easy Cat Nails Art
This nail art is designed specifically for those who adore those awesome creatures named cats. Start with the white base color. When it dries out, pick the cat stickers you like the most and place them onto your finger nails. To make your kitties stand out, create a brown background. Add up a black outline as well as few stray black lines, and your design is ready.

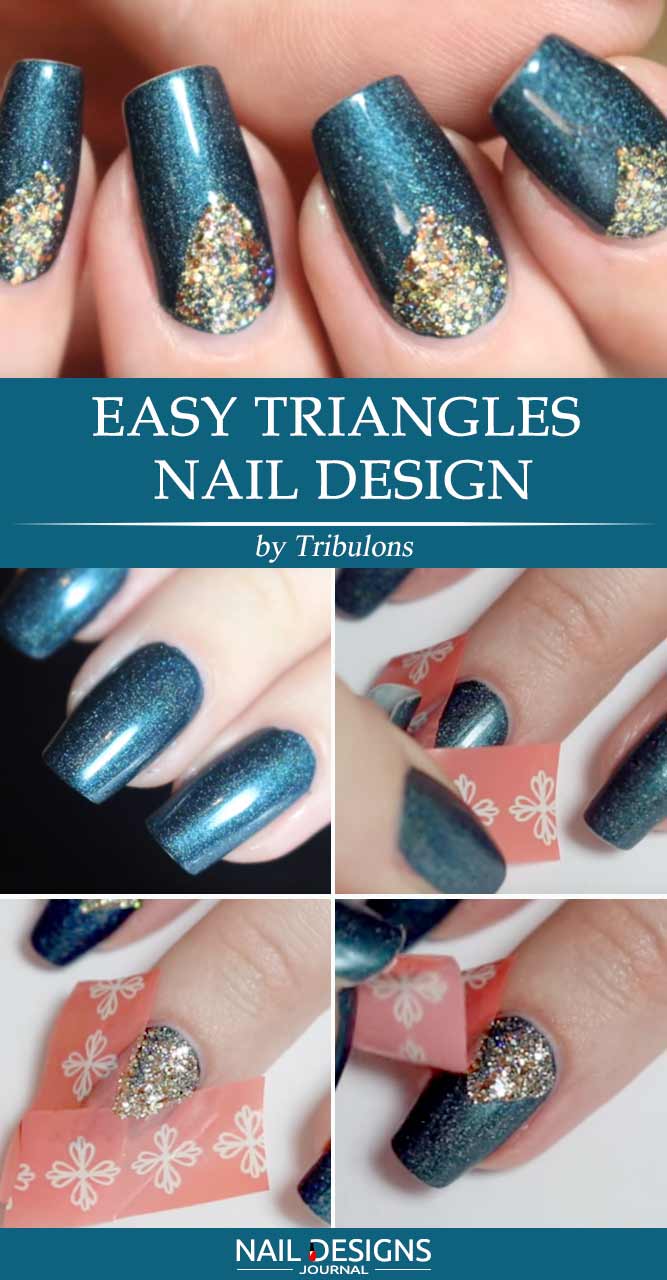
Triangle Nail Design Without Any Specific Tools
Sometimes to create something beautiful, you may not require some special tools. Steel-colored glittery nail polish is the perfect base for something as unique as this design. With the help of scotch tape create the triangular shapes on your nails and fill them in with gold glitter nail polish. Add up the top coat and your gorgeous mani is ready!
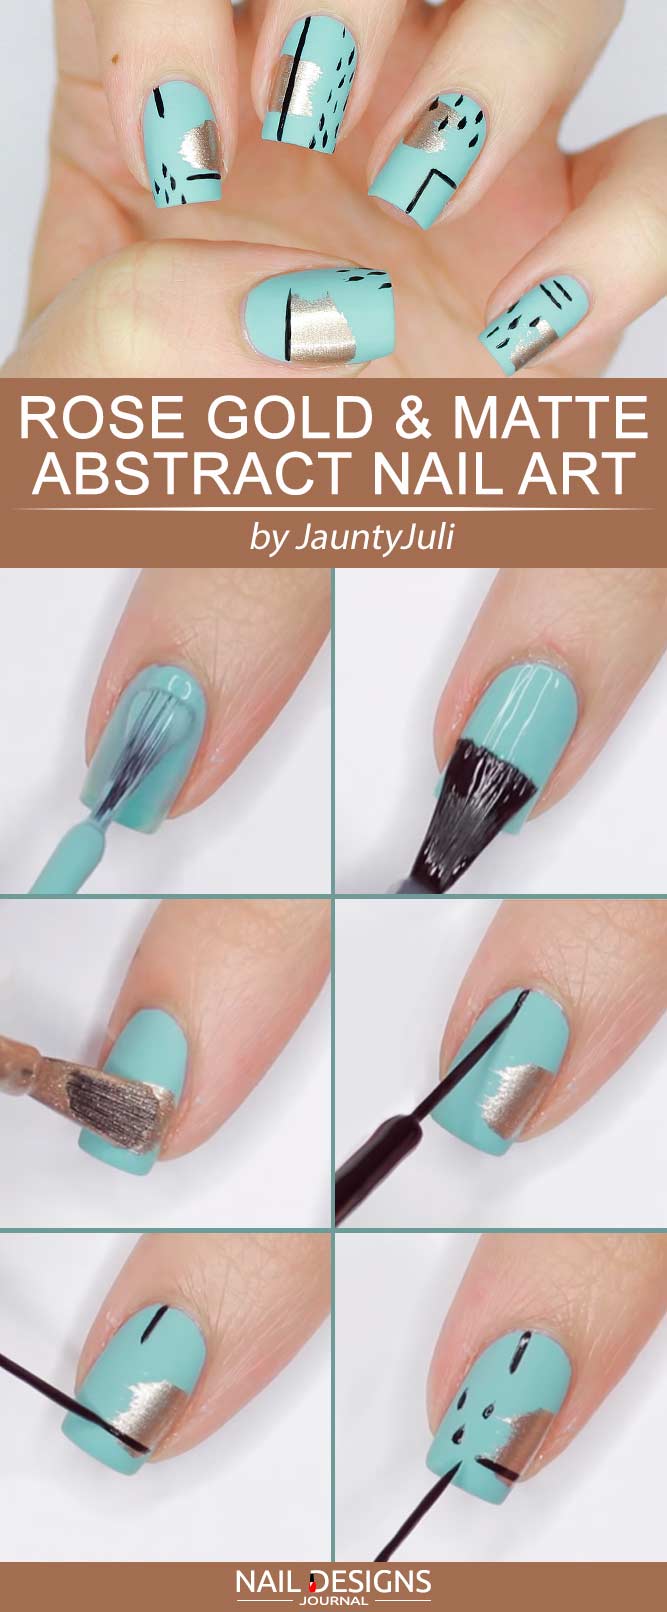
Cute Blue Nails Designs
Precise and even lines are difficult to come up with when it comes to nail art especially if you are just a beginner. Although, it does not mean that you can’t create something outstanding on your own. For example, the combination of matte blue base and some rose gold abstract touches adorned with black outline looks exceptionally gorgeous while is super easy to pull off on your own. Try it!
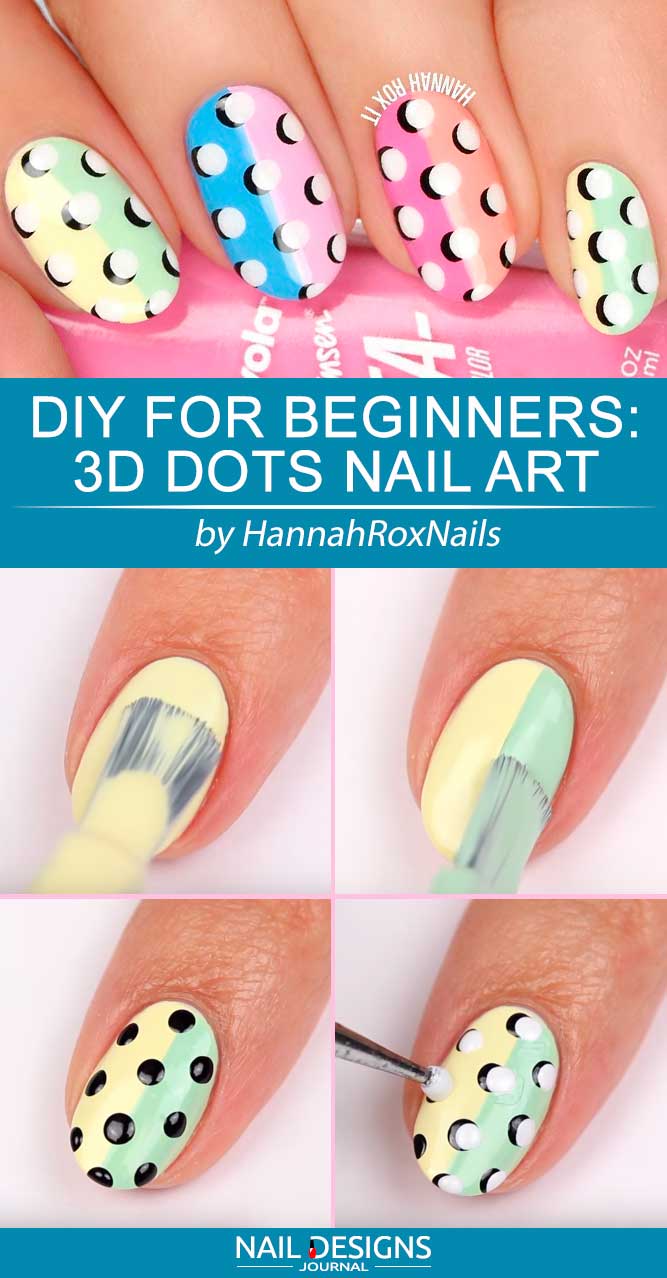
DIY For Beginners: 3D Nail Art
Creating 3-D nail art is a lot easier than you think. All you need to do is to come up with a proper color block for your bright base and then start creating the masterpiece with the help of white and black nail polish and a dotting tool. The process is simple, but the outcome is fabulous!
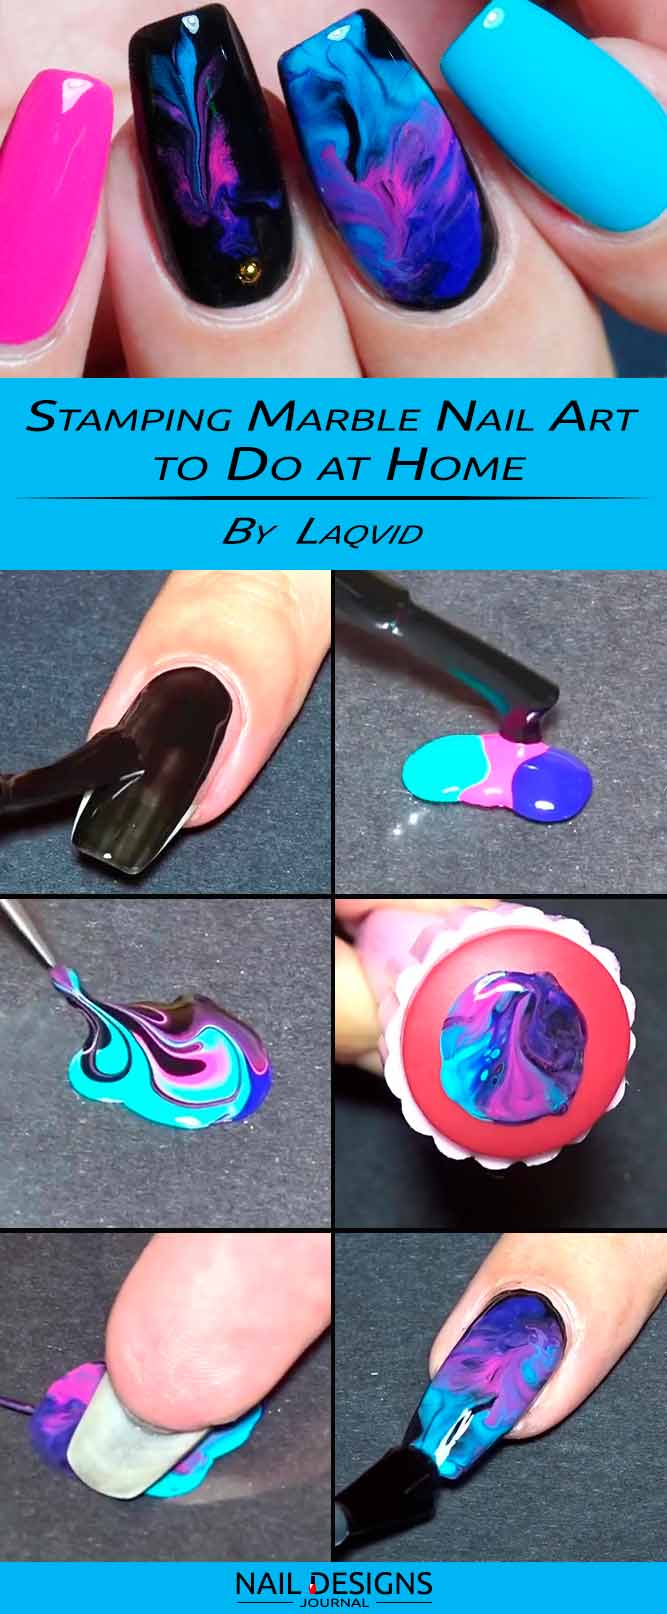
How To Do Nail Designs With Stamping Marble
- To start, go for a black base.
- Now mix a few drops of black, pink, blue and lilac polishes with the help of cellophane and a doting tool.
- Use your stamping plate to apply the pattern to the nail.
- Now cover the nail with top coat, and your stunning manicure is ready.
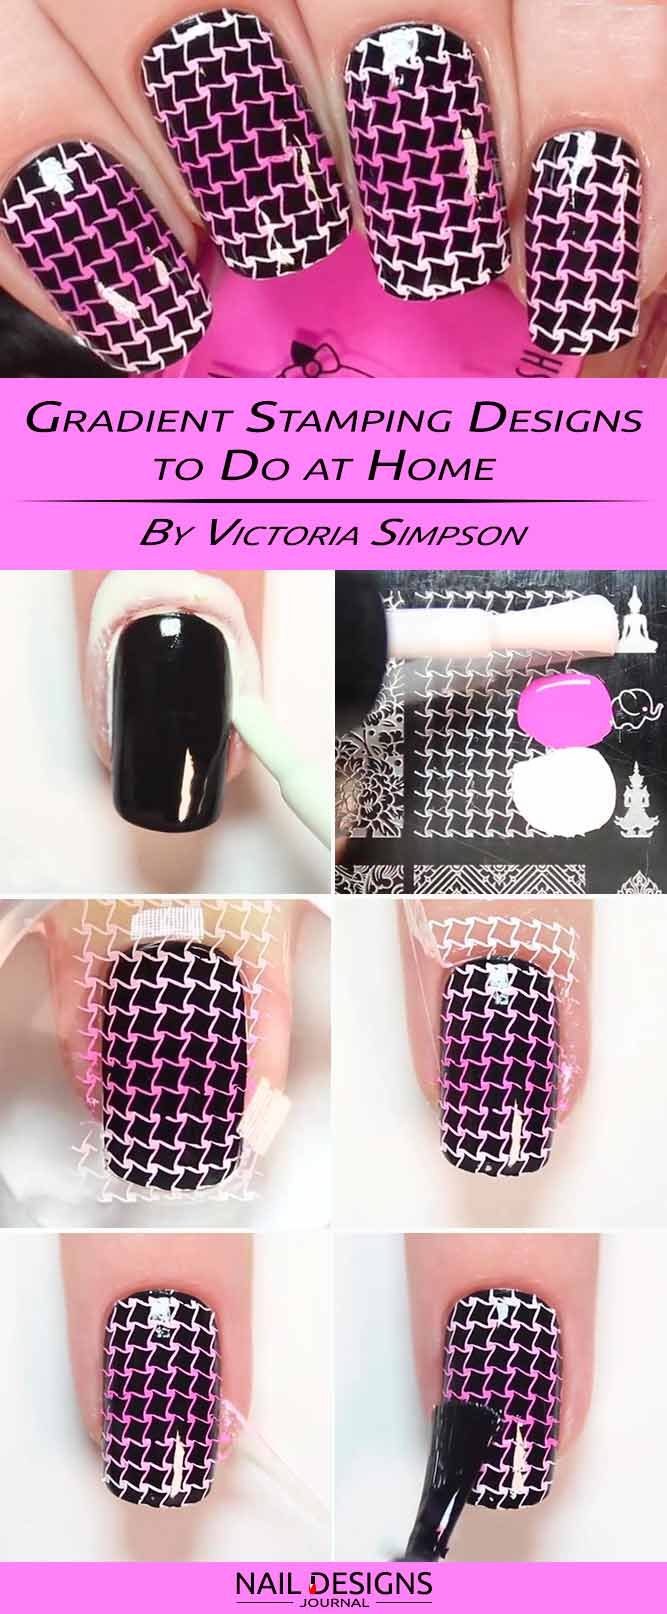
Gradient Stamping Nails Design
- Cover your nails with a black base.
- Do not forget about the liquid latex to avoid the messy stains around your nail.
- Pick the stamping plate pattern and add three drops of the nail polish, strictly in a given order – white, pink, white.
- Do the stamping the way you usually do it and get ready to enjoy the gradient pattern on your nails.
- All that is left to do is to get rid of all the unnecessary remains and add top coat. Done!
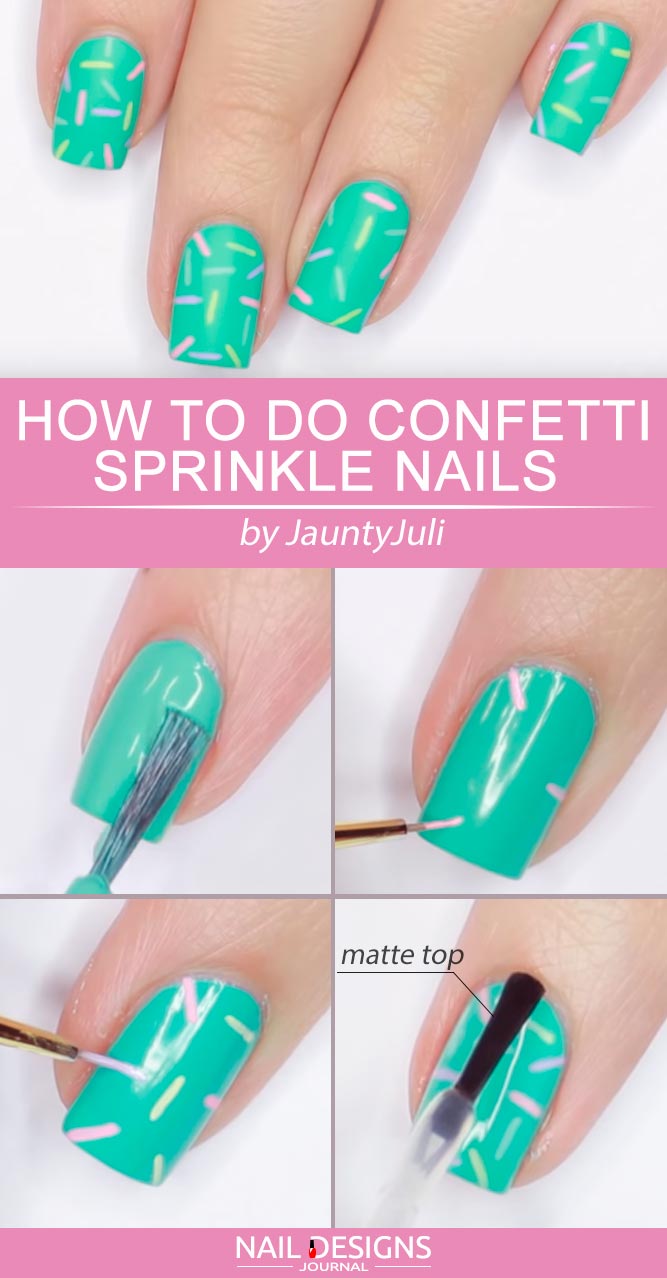
Cute Confetti Sprinkle Nails
Confetti is fun, and you do not need to wait for a holiday to strike to enjoy it. Everything that you should do is to add some of it to your nails. Just pick the favorite base and upgrade it with different-shaded thin lines which resemble the confetti. There you go!
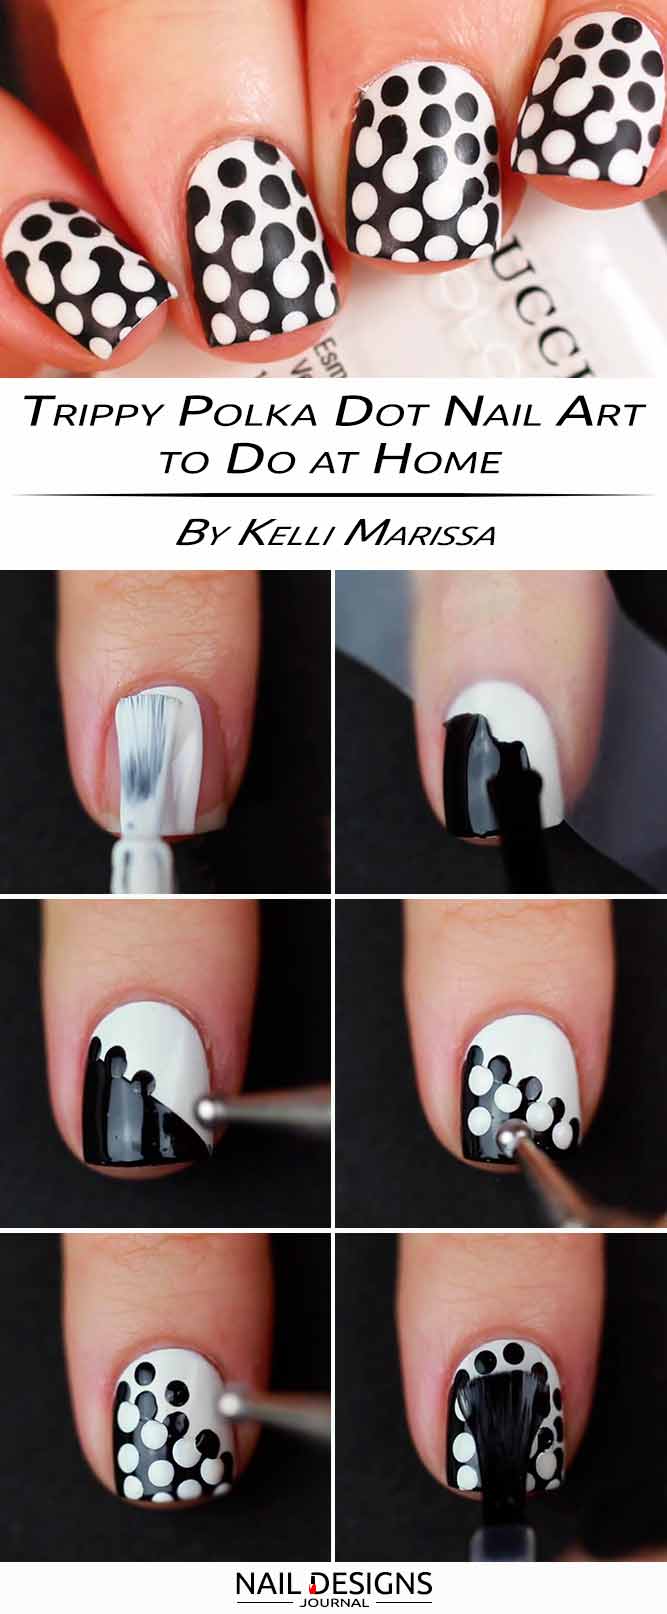
Trippy Polka Dot Nail Art
- No mani starts without a base coat, a white base coat follows right next.
- With the help of a scotch tape, create a diagonal black half.
- Use your dotting tool and create the polka dots.
- Let your design dry and cover with the top coat – done!
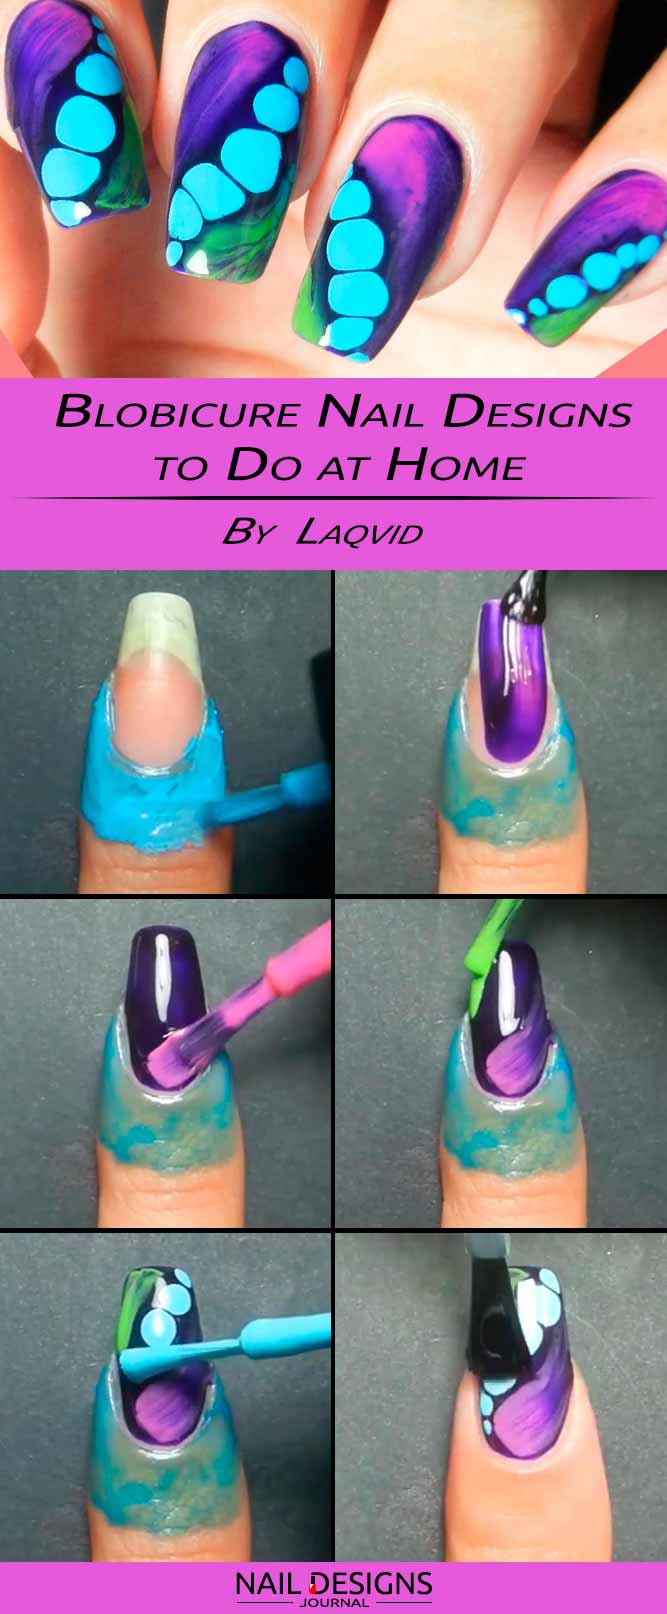
Blobicure Nails Designs
- How to do nail designs like a pro? Start with the application of liquid latex.
- Covering your nails with jelly purple polish will be your next step.
- Before it dries, add two diagonal contrasting strokes of pink and green neon polish from each side of your nail.
- In-between the strokes, put a few drops of blue nail polish.
- When the polish dries, get rid of the liquid latex and finish the design with a top coat.

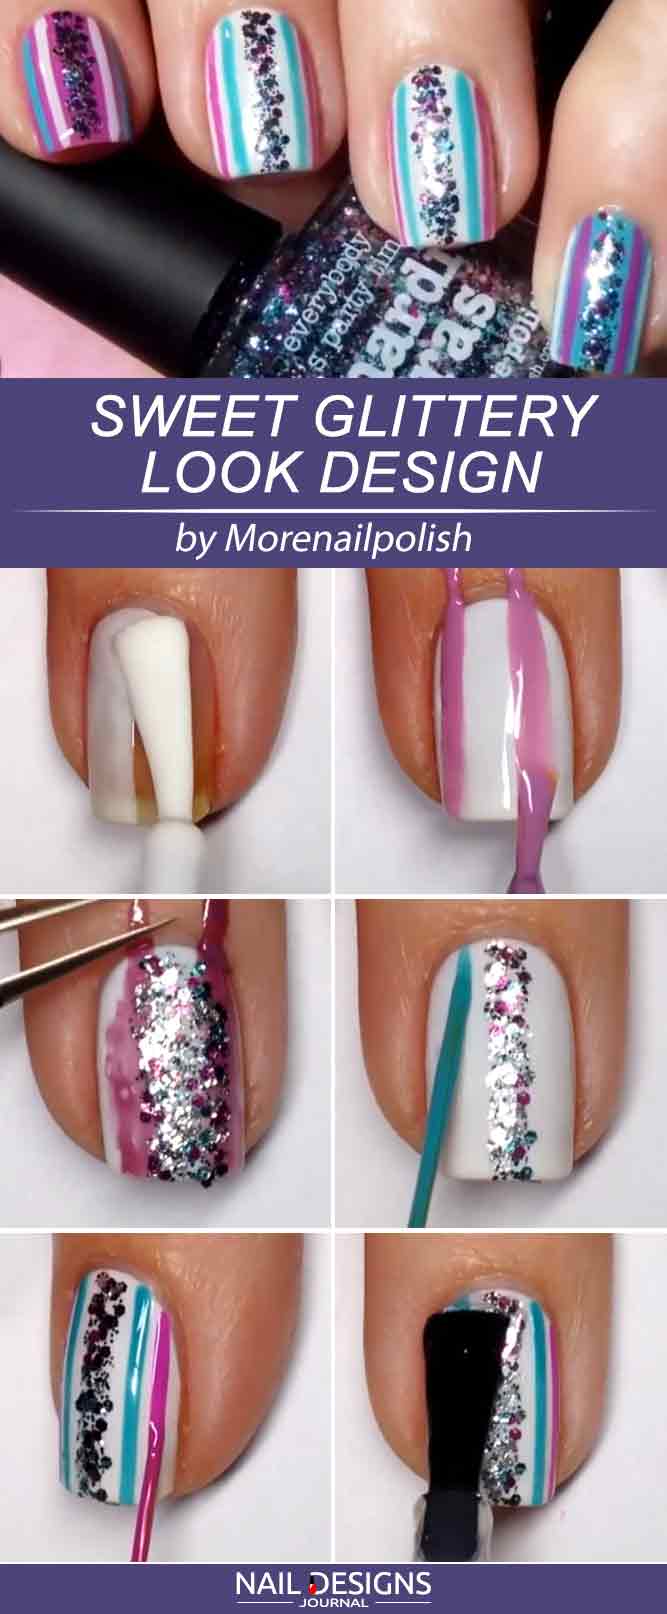
Cute Nails Designs: Sweet Glittery Look
- Apply a white base coat.
- Add two lines of liquid latex on either side of the nail.
- Apply some glittery nail polish to the sponge and press it over free of liquid latex area.
- Remove liquid latex.
- Add two thin teal lines on each side of the glittery stripe.
- Repeat the same with purple nail polish.
- Apply a top coat.
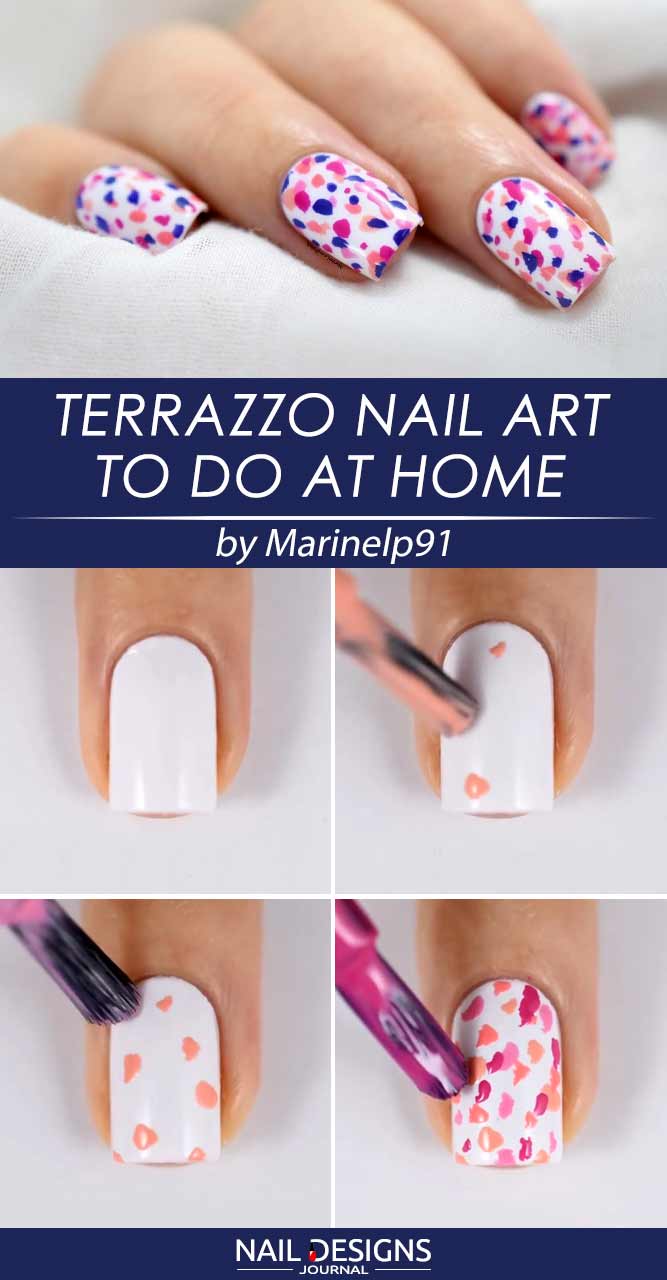
How To Do Nail Designs Step By Step – Easy Terrazzo Art
- Apply a base coat.
- Apply white base coat.
- Use your peachy-shaded nail polish to add some light strokes all over the nail.
- Repeat the procedure with light pink, fuchsia, coral and blue nail polishes.
- Apply a top coat.
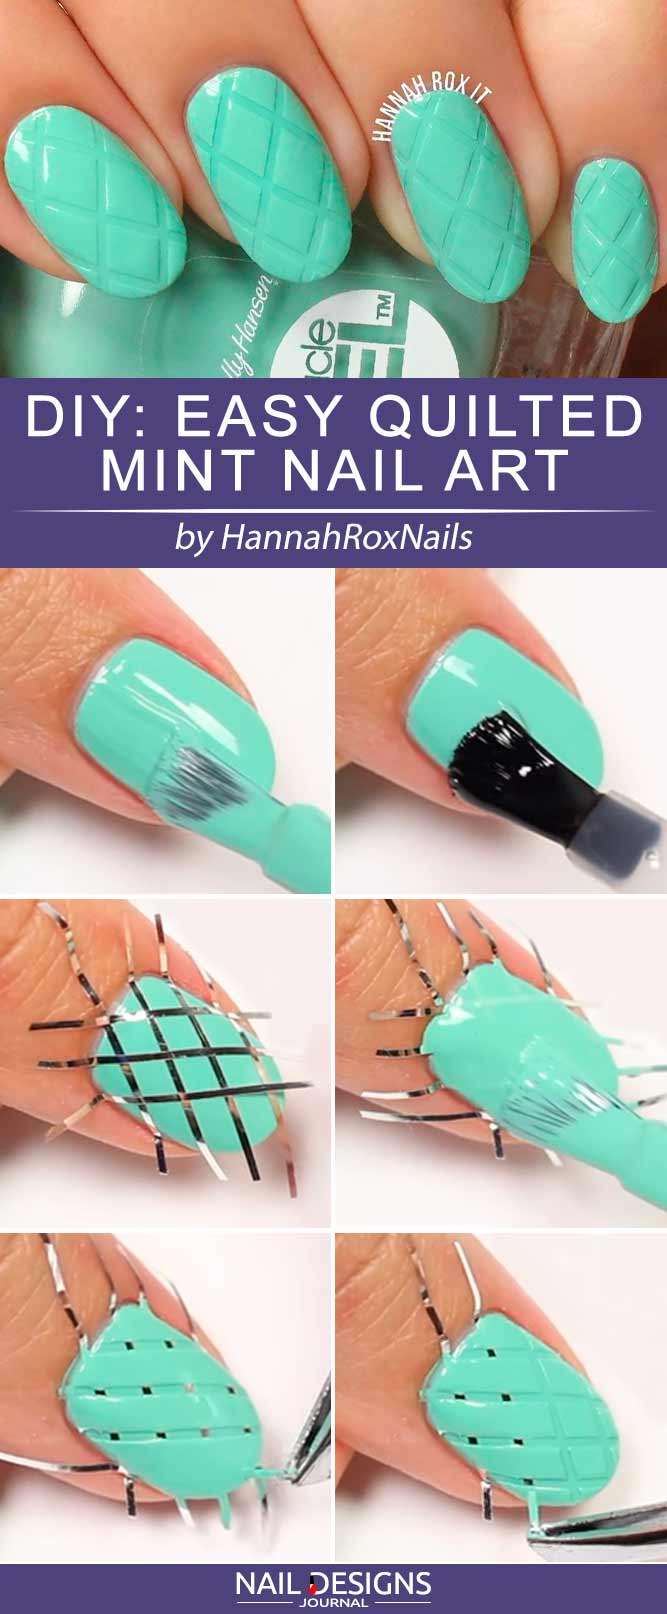
Easy Nail Designs With Quilted Texture
- Apply a base coat.
- Apply mint green base coat.
- Apply top coat.
- Apply top coat.
- Apply more pieces going the other way to form a crisscross pattern.
- Apply mint green base coat again.
- Remove the tape.
- Do not apply a top coat because the quilted effect will disappear.

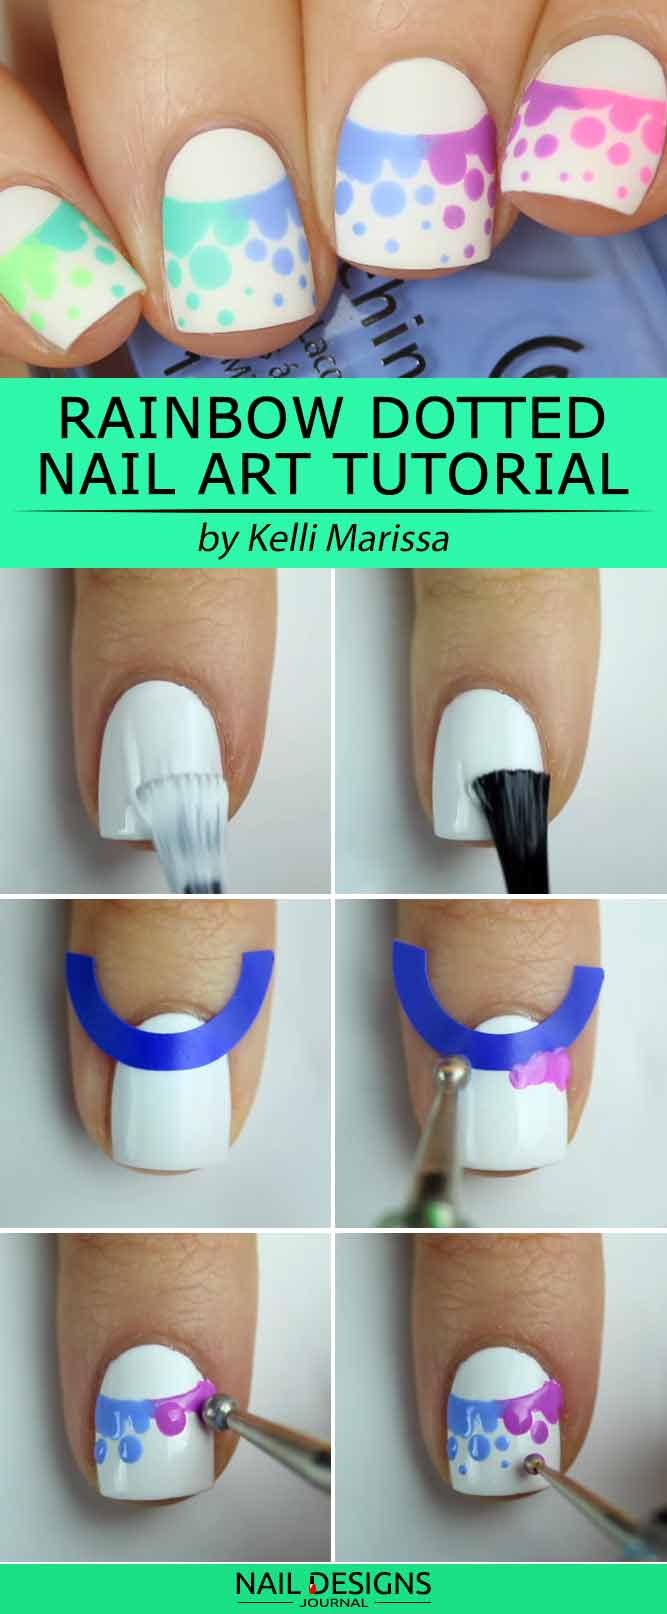
Rainbow Nails Art Tutorial
- Apply a base coat.
- Apply white base coat.
- Apply circular vinals to the bottom of your nail.
- Use your dotting tool to add purple and blue dots right above the vinyl, so that the shades meet in the middle.
- Peel of the vinyl.
- Add different-sized dots as you move up the nail.
- Repeat the procedure with the colors of the rainbow you like on your other nails.
- Apply a matte top coat.
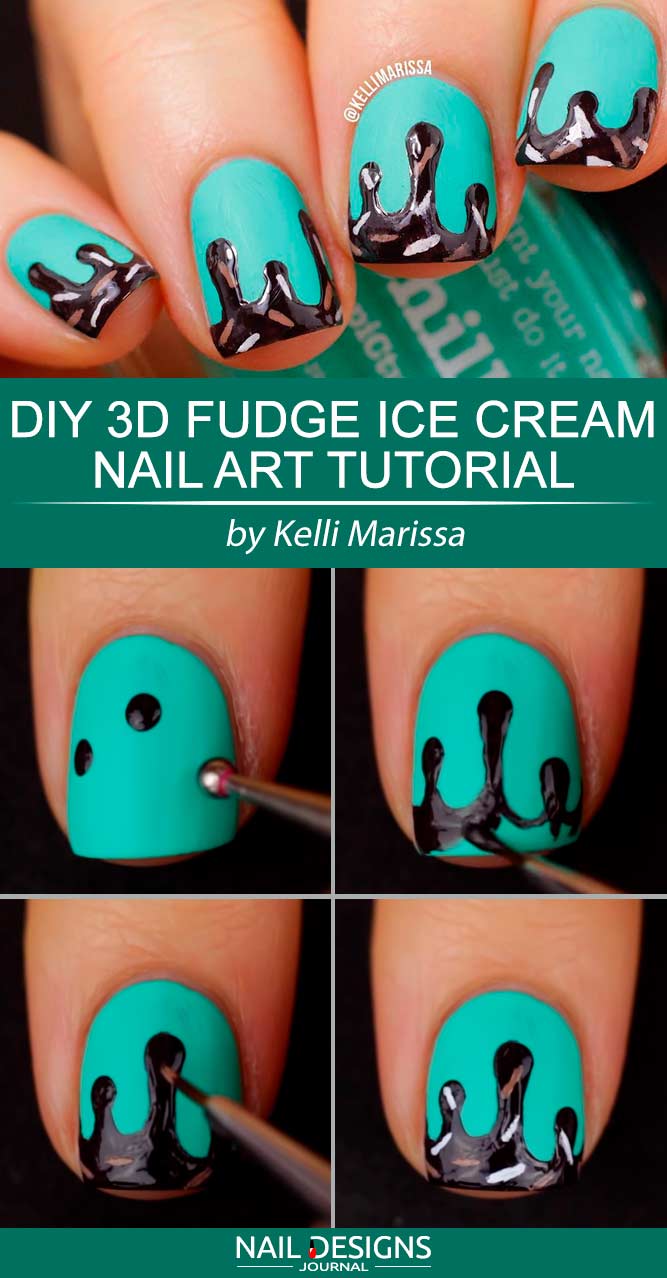
DIY 3D Nails Art Tutorial
A super cute design that you should definitely try. In addition, apart from being super pretty it is also really easy to do yourself. Just follow our instructions.
- Use a base coat and a minty color on your nails. After, apply a matte top coat.
- With a dotting tool put three random dots in a chocolate color closer to the tip of your nail.
- With a thin brush put some lines down from the dots and make them a bit rounder to appear as if they are dripping. Fill in space on the tip with the same chocolate color we used for dots.
- Add some sprinkles with light strokes of a light milk chocolate color and a beige one.
- Repeat the same process on all of the nails and finish this nail design with a top coat.
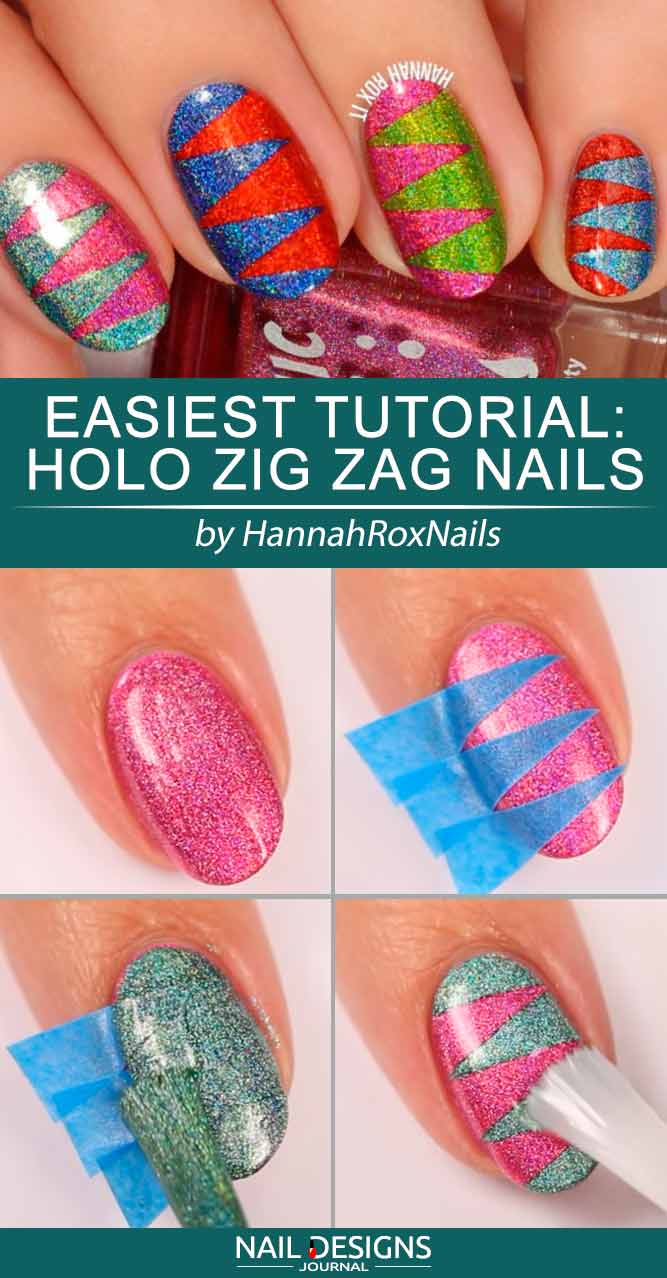
Easiest Tutorial: Holo Nails
Are you looking for a super fun and creative nail design? Then we have it for you. Repeat after us to get it done by yourself.
- Apply a base color to the nail. We will be using a rose glittery one. You can choose other ones for other nails.
- Put three little sharp angles cut from a painter stamp to the nail and apply a blue color all over it. Slowly remove the angles.
- Repeat the same steps on other nails and apply some glossy top coat.
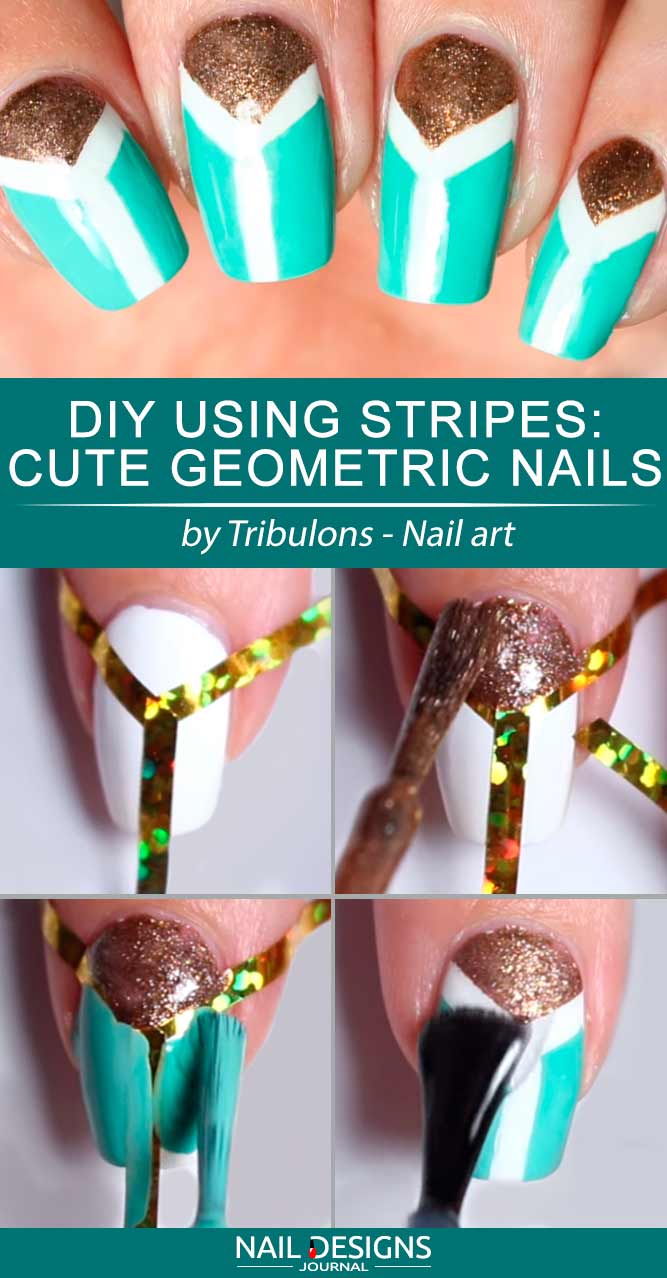
DIY Using Stripes: Cute Geometric Nails
If you like different geometric designs, this one will for sure be your piece of cake. Are you ready to try it on your nails?
- Apply a white color as a base to the nails.
- Use some sticky stripes for nail designs and stick three little pieces to create the desired shape.
- Apply a glittery gold nail polish to the triangle that sticky stripes have created.
- Fill other two spaces with some ocean blue nail polish and carefully take off the lines.
- Make the same design on other nails and apply some top coat.
We hope you enjoy these tutorials and will succeed in their replication with the least of time and effort involved. Do not forget to visit us for some more fresh ideas and pieces of trendy advice!
Was this article helpful?