Christmas nail art is our favorite as what can be cuter and more heart-warming? We know that the holidays are really soon because we can already smell them everywhere we go. So, let’s start getting into the right mood and explore several pretty designs for your festive manicure. Are you ready to learn how to create them?
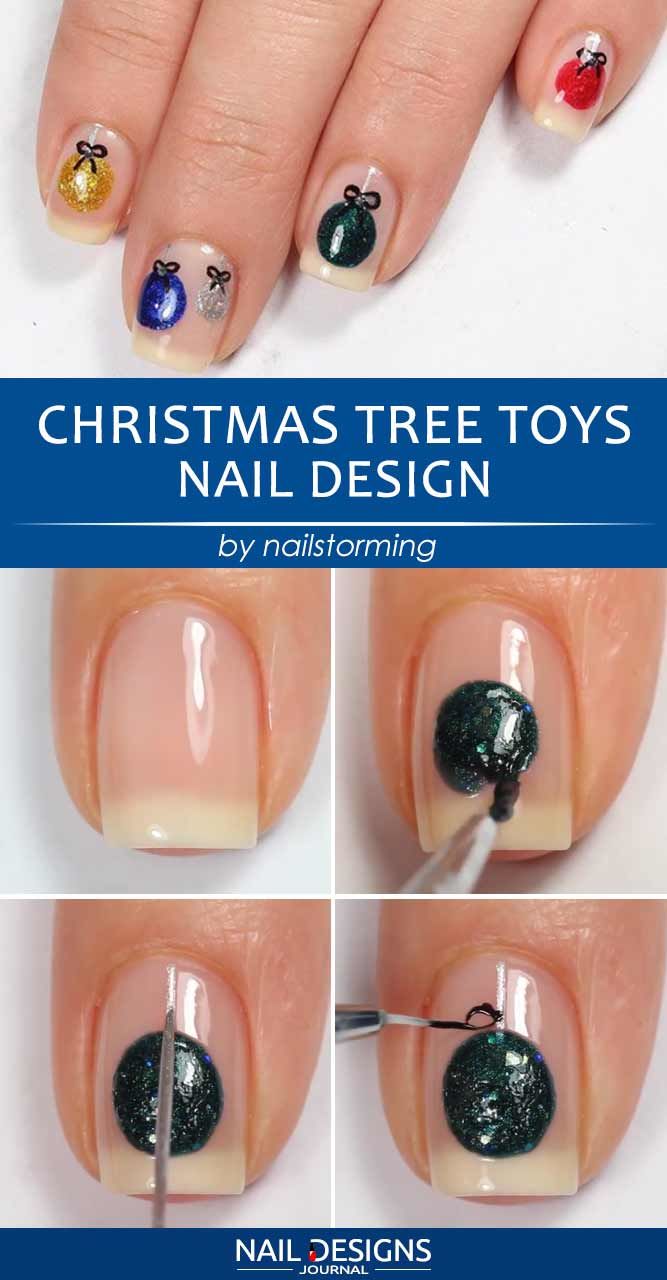
Christmas Tree Toys
-
1. Apply a clear base coat.
2. Use a white sheer nail polish as the base for your classy winter nails.
3. With a tiny detailer brush and a dark green nail color, draw a circle and fill it in.
4. Add a sparkly silver nail polish on top of the circle.
5. Using the detailer brush and a black nail polish, draw bauble hooks.
6. Repeat steps 2-5 for the rest of the nails playing around with the colors and placement of the ornaments.
7. Cover these cute Christmas nails with a top coat.
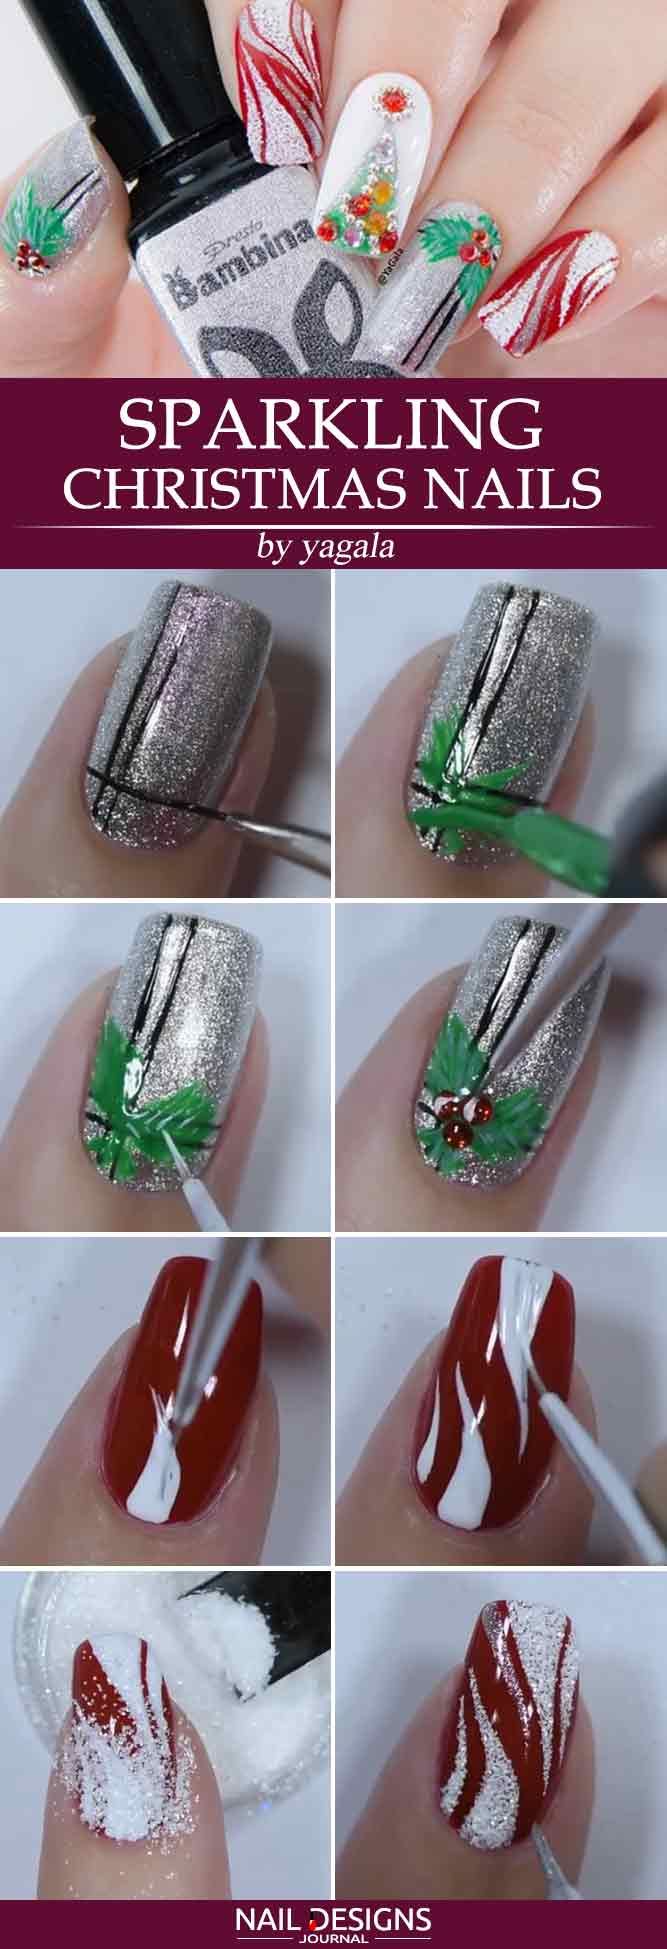
Sparkling Christmas Nails
-
1. Apply a clear base coat.
2. Paint your ring finger and thumb nails with a silver nail polish.
3. Paint the index and pixie finger nails with a red nail polish.
4. Paint the middle finger nail with a white nail polish.
5. With a detailer brush and a black nail polish, draw two horizontal and two vertical crossing lines on the silver acrylic Christmas nails.
6. Using the detailer brush, draw holly leaves with a green nail polish and apply red rhinestones to mimic berries.
7. On the red Christmas nails, draw white “flames” near the top and the base of your nail. Sprinkle them with white shimmery powder.
8. Outline the flames with a silver nail polish.
9. With the green nail polish and detailer brush, draw a triangle on the white Christmas nails, starting from the tip and working your way toward the base of the nail.
10. Attach nail beads and rhinestones to the green triangle and grace it with a star on top, which altogether incarnates the Christmas Tree.
11. Finish off with the clear top coat to set your Christmas nail art in place.
Classic Plaid Nails In Christmas Colors
-
1. Start with a coat of a clear nail base.
2. Accentuate the tips of the index and middle finger nails with a red nail polish, while applying it all over the rest of the nails.
3. Using a green nail polish and a small detailer brush, draw two vertical lines on each side of the nail and one horizontal line near the tip of the nail.
4. Draw a gold horizontal line near the green line closer to the tip of the nail.
5. With a white nail polish and a detailer brush, draw two horizontal lines near the base of your thumb, ring and pixie finger nails.
6. Complete this festive yet simple Christmas nails manicure with a clear top coat.
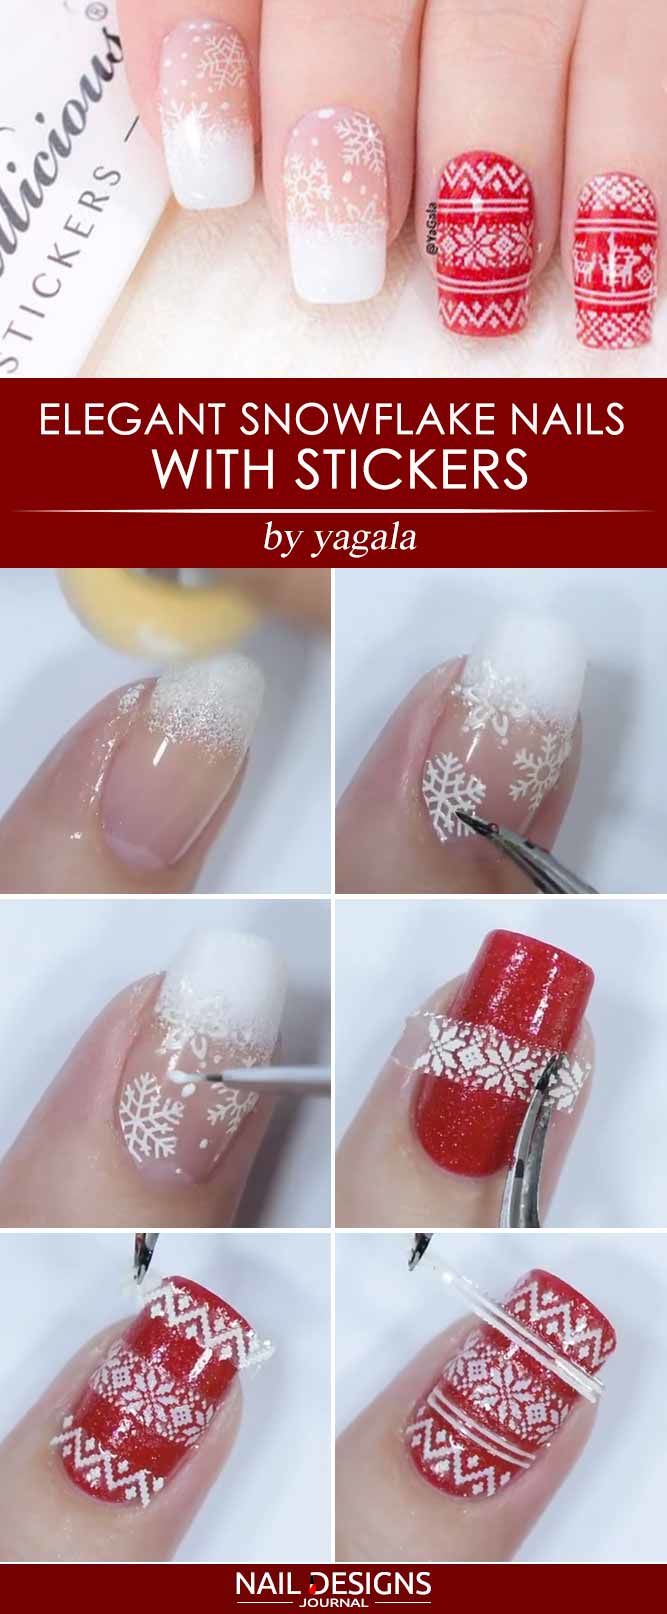
Elegant Snowflake Nails with Stickers
-
1. Apply a clear top coat.
2. Paint your thumb, ring and pixie finger nails with a red nail polish.
3. Apply a white nail polish to the tips of the index and middle finger nails. Use a sponge to make the print blurrier.
4. Cut out stencils with the desired pattern and stick them to the Christmas acrylic nails.
5. Cut off the excess sticker if needed.
6. As a finishing touch, apply a clear coat to your elegant and classy Christmas acrylic nails.
Christmas Marble Nail Tutorial
-
1. Apply a clear top coat.
2. Place a drop of white, mint, light green and dark green nail polishes on the artist palette or any flat surface.
3. Slightly blend the colors to make streaks using a flat brush.
4. Apply the marble polish to the nail using the brush.
5. Add silver strips with the help of a detailer brush.
6. Apply a clear top coat to your marble green Christmas nails.
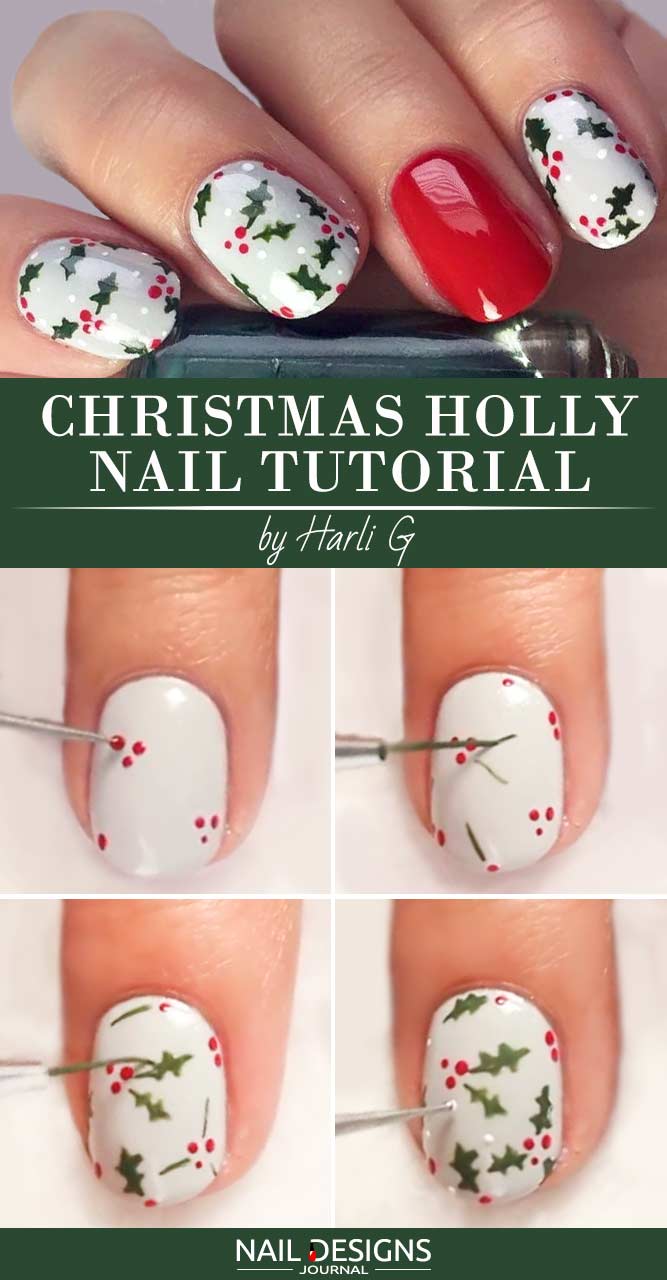
Christmas Holly Nail Tutorial
This Christmas nails design is a bit complicated but we are sure that you can pull it off.
- Apply a base in a light shade and paint one nail red.
- Take a dotting tool that is really small. Dip it into any shade of red nail lacquer you have at hand. With its help, create little clusters that consist of 1 to 3 dots.
- Now dip it into green lacquer and paint lines that will then turn into leafs.
- To create the leafs, add two pointed edges to both sides of every green line.
- Add some white dots to the design – that would be snow.
- Apply top coat.
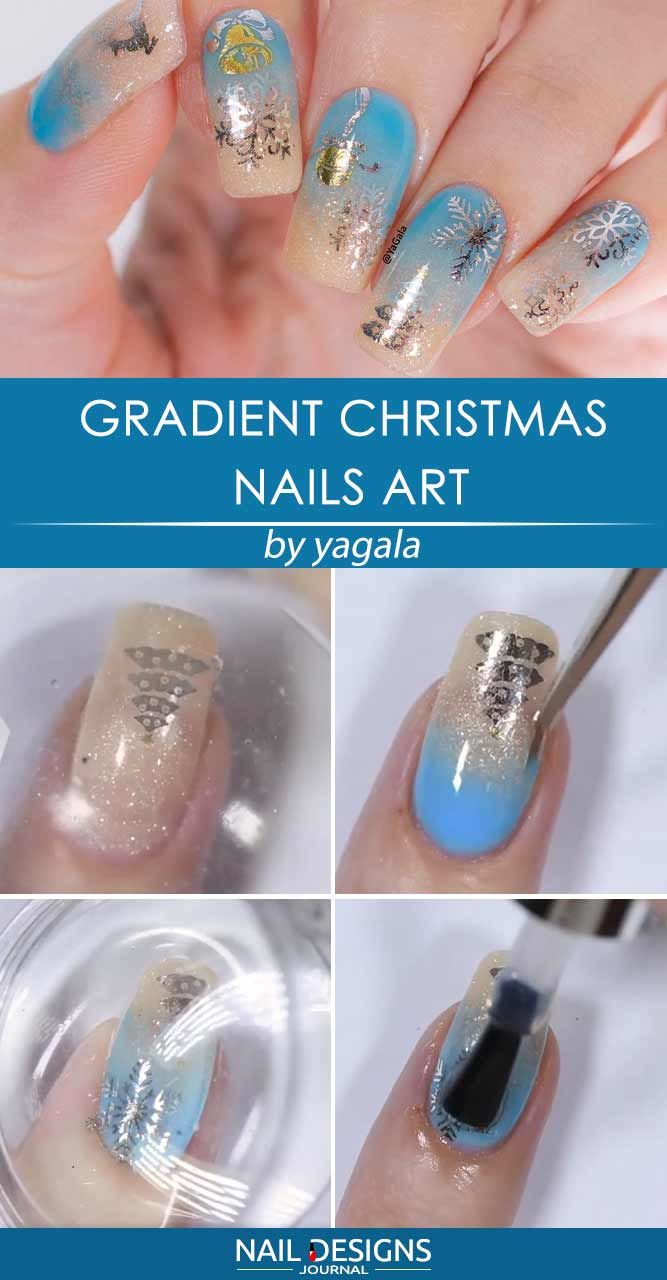
Gradient Christmas Nails
Gradient Christmas nail art will never lose its relevance. It looks intricate and unusual while giving off holiday vibes. Here is how you can achieve it:
- Apply a clear base coat.
- Apply a gold shimmery nail polish to every fingernail to use it as a base.
- Pick up a Christmas décor decal with a stamping tool, remove the protecting film and transfer the image to the nail.
- Apply a blue nail polish to the base of each nail.
- Using a thin detailer brush, blend the blue nail polish toward the middle of the nail.
- Apply a top coat.
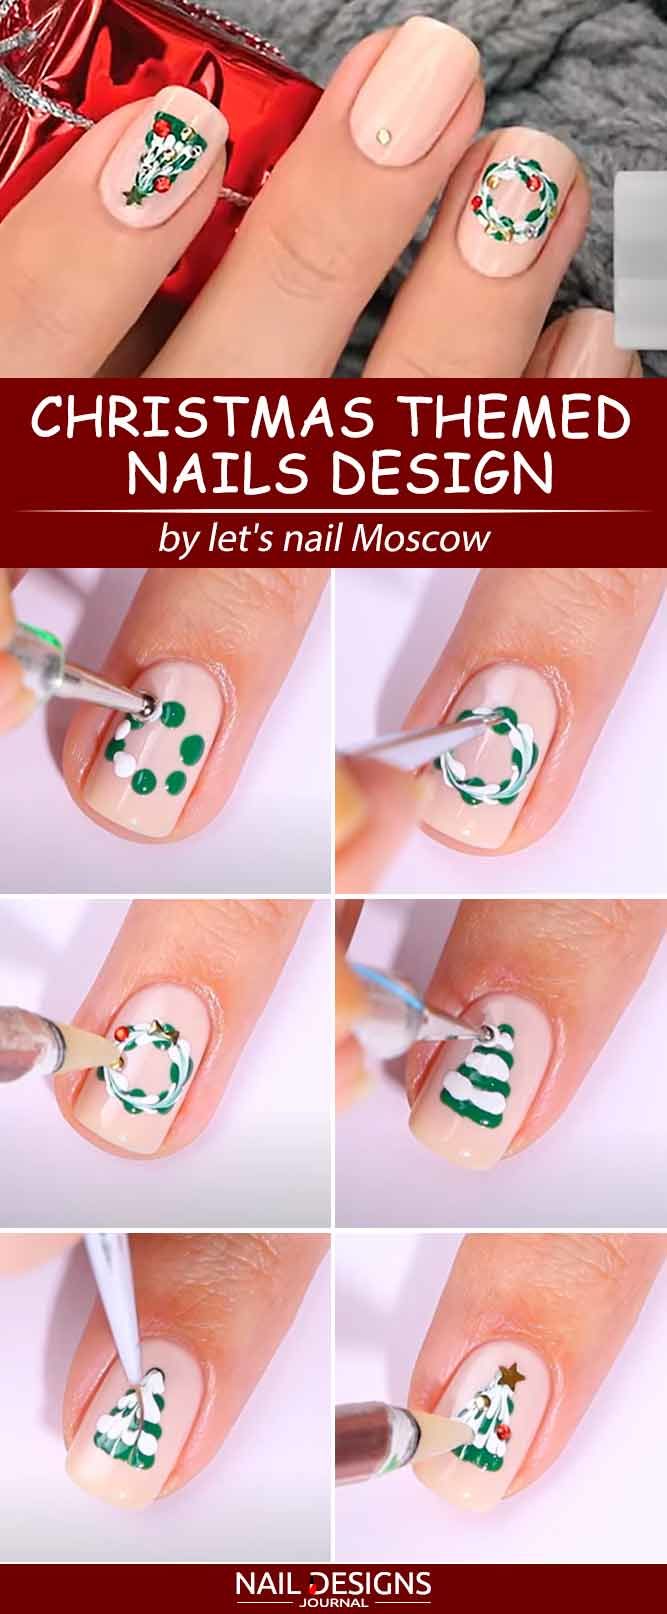
Christmas Themed Nails Design
Adorning your manicure with the main symbols of Christmas, such as a Christmas tree and wreath, is always a good idea. Follow these steps to get the festive nail design:
- Use a clear base coat on every nail.
- Follow up with a beige nail polish.
- With the help of a dotting tool and a green nail polish apply dots to your ring finger nail in a circular pattern and to the index finger nail in the shape of a pyramid.
- Using the dotting tool, apply a white nail polish between the green nail polish and smudge the colors with a small detailer brush.
- Apply red and gold rhinestones to the designs to represent Christmas ornaments.
- Finish off with a clear top coat.
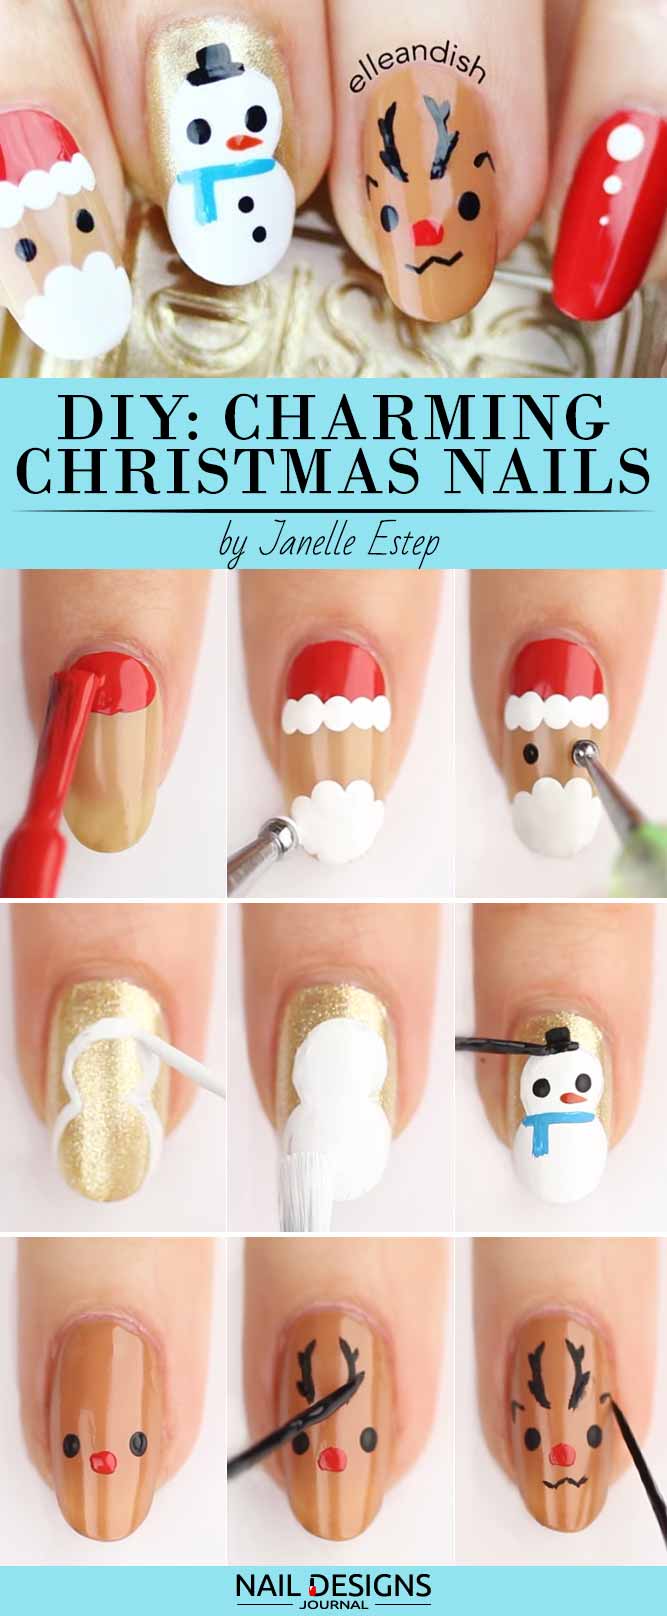
How to Do Charming Christmas Nails
This nail art idea will take some time and patience, but it will worth it.
- Start with applying base coat.
- Apply a base in beige to the pointer finger.
- Apply red nail polish to the nail bed of the pointer finger so that it resembles a Santa’s hat.
- With a dotting tool, add some white dots to the hat.
- Now paint white dots around the tip so that they resemble a Santa’s beard.
- Place two dots in black in the middle of the nail. That would be eyes.
- Now apply one or two layers of nail lacquer in gold glitter to your middle finger./li>
- Take a very thin brush and paint a white snowman outline.
- Fill in the outline with white nail lacquer.
- Create eyes with two dots in black.
- Take a thin brush and orange nail lacquer to get a carrot nose.
- Add a horizontal and vertical line in blue for a scarf.
- Paint a small hat in black.
- Place two black dots that will be the buttons.
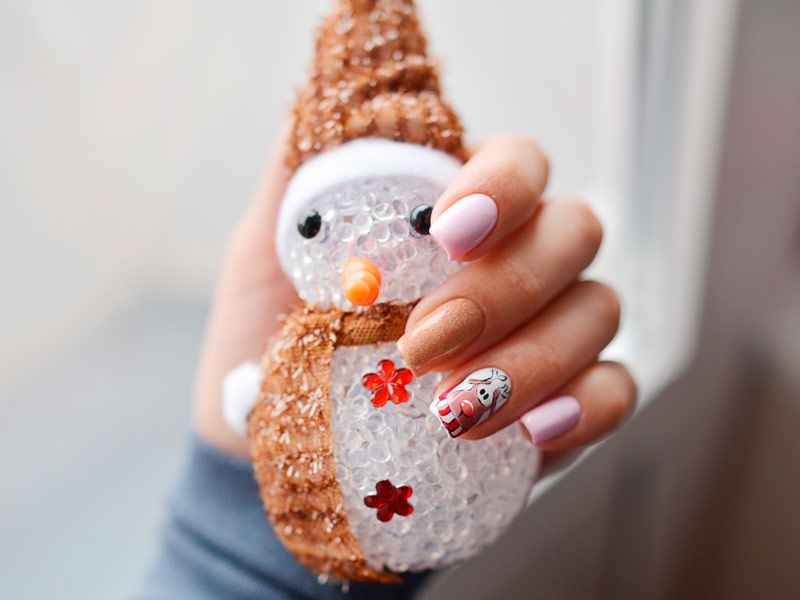
- Apply brown nail lacquer to your ring finger.
- Using a dotting tool, place two black dots for the eyes and one red dot for the nose.
- Using a thin brush, place two black parentheses closer to the nail bed. Add small black lines for parentheses to resemble antlers.
- Paint a flat W letter for the mouth.
- Add V letters for the ears.
- Paint your pinkie and thumb red.
- Using a big dotting tool, place several white dots over the red base.
- Finish with top coat.
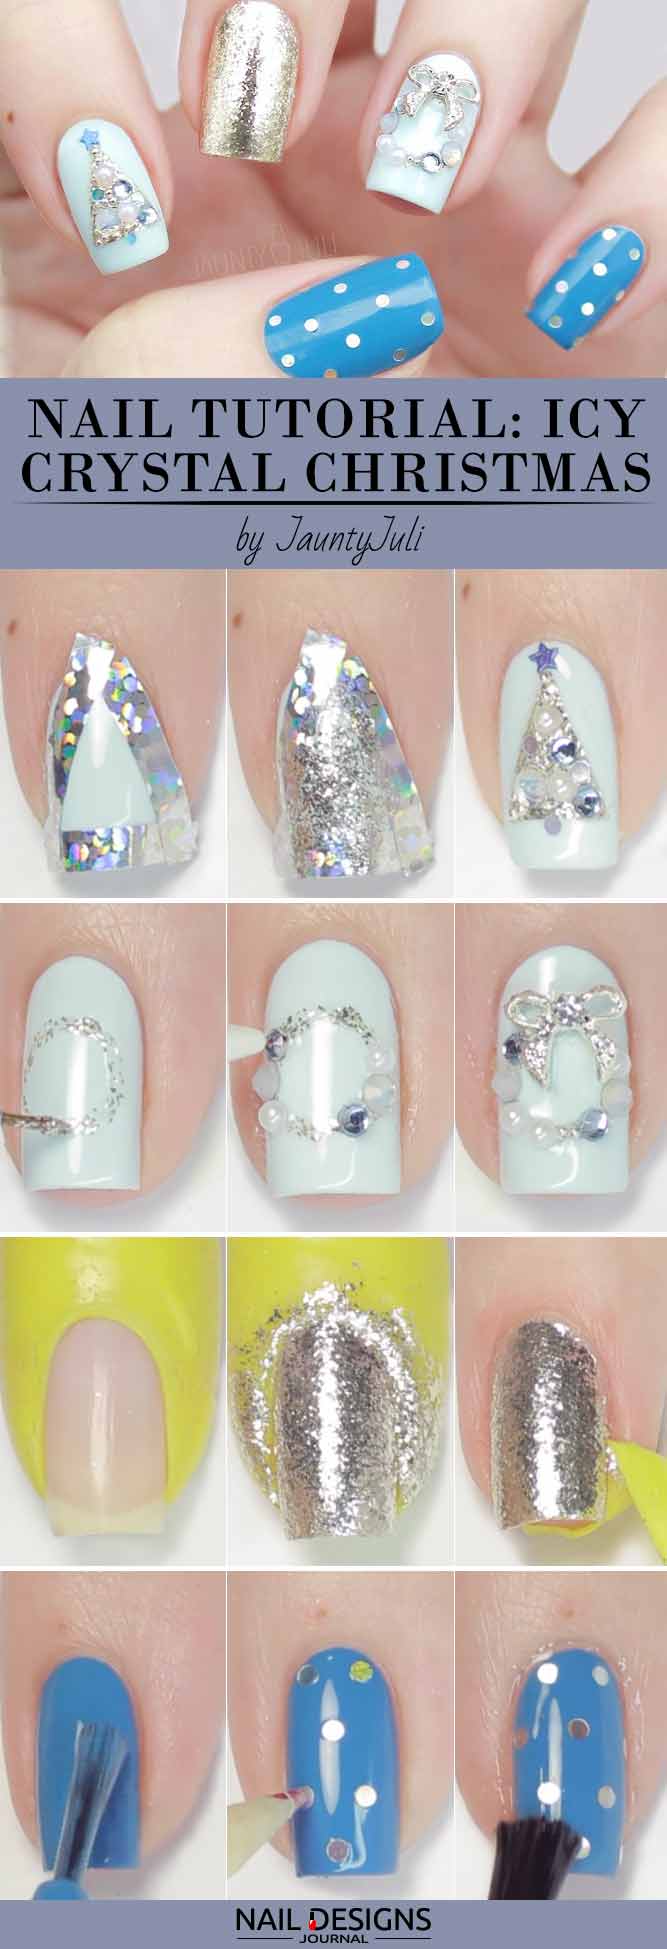
Icy Crystal Christmas Design
Let’s see how to do icy crystals on your nails.
- Paint your pointer and ring nails in pastel blue.
- Paint your thumb and pinkie fingernail in sky blue.
- And the glitter accent will be on the middle finger.
- Apply special protective barrier around your middle finger as many layers of polish will be applied to it.
- Take the glitter nail lacquer and apply it to a small makeup sponge. The sponge is capable of absorbing the nail lacquer. Thus, only the glitter will be left.
- Now dab the middle fingernail with the sponge full of glitter. Remove the protective barrier.
- Let’s move on to the Christmas tree nail design. Take striping tape of a wide shape and outline a triangle over your nude blue nail.
- Again, take that sponge with glitter and dab it onto the nail right inside that triangle.
- After removing the tape, you will get an even triangle. Apply the top coat on this nail at once.
- Now place rhinestones of various shapes and sizes onto the glittery triangle. Fix with top coat.
- Use star glitter in blue to create the top garland for your tree. Again, fix with top coat.
- Repeat steps 7-11 on your ring finger. But this time create a circle rather than a triangle. Thus, you will get a festive wreath. Add a cute bow decor.
- Now using holographic glitter in silver, create a polka dot pattern on your sky blue fingernails.
- Apply top coat.
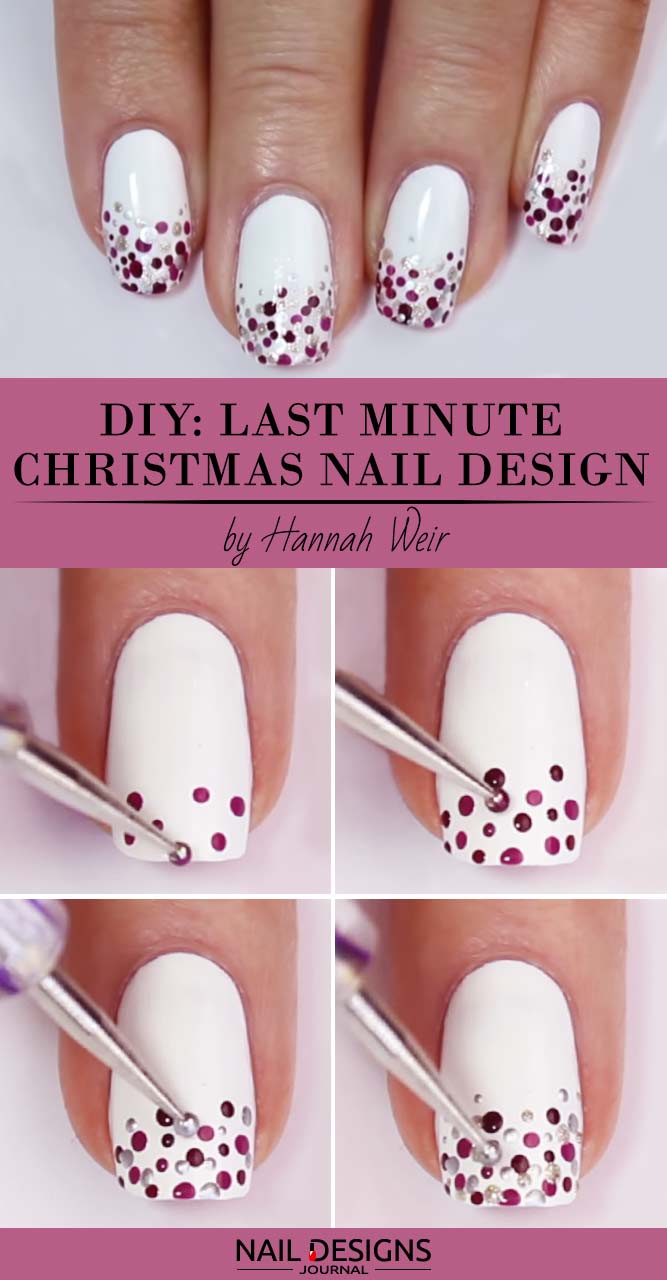
Last Minute Christmas Nail Art
This pretty dotticure nail art is super easy to pull off.
- First, paint all your fingernails white.
- With a dotting tool of a medium size and purple nail lacquer, place purple dots randomly on the tips and around them.
- Do the same with nail lacquer in dark purple so that there is less spare space left.
- Repeat the procedure, using silver nail lacquer.
- Now use gold glitter nail lacquer for the same purpose.
- Apply top coat.
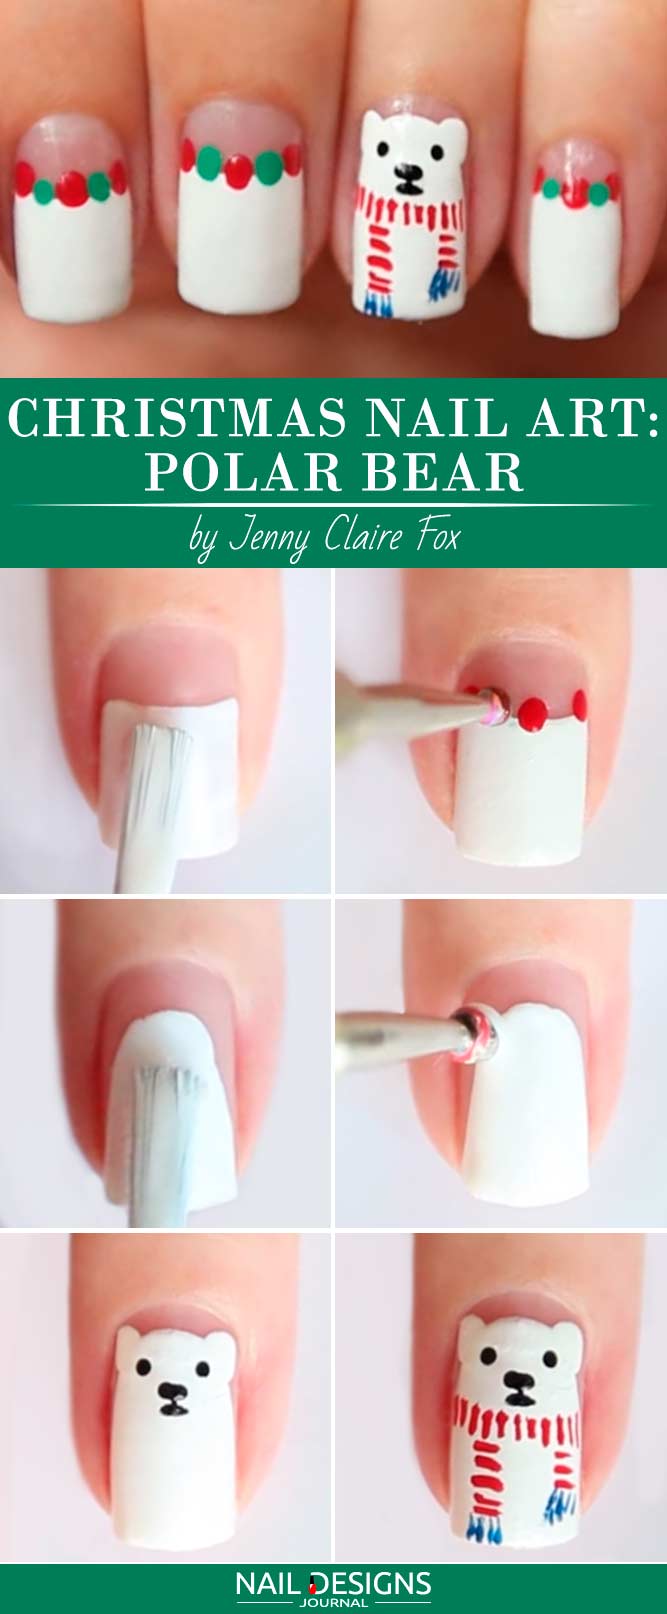
Christmas Nail Art: Polar Bear
This Christmas nail art design is not very intricate but quite time-consuming.
- Apply base coat.
- Create half-moons with white nail lacquer. Two coats of white will do.
- Starting from the middle of your ring finger, paint a white bear.
- Using a dotting tool, add white ears to the silhouette of the bear.
- With a dotting tool that is small, create a black nose, mouth, and eyes.
- Take a nail striper and add horizontal and then vertical thin red lines for a scarf.
- Add some contrasting blue lines for the tips of the scarf.
- Now take a dotting tool of a medium size and embellish the nail beds of all other nails with alternating three red and two green dots.
- Apply top coat.
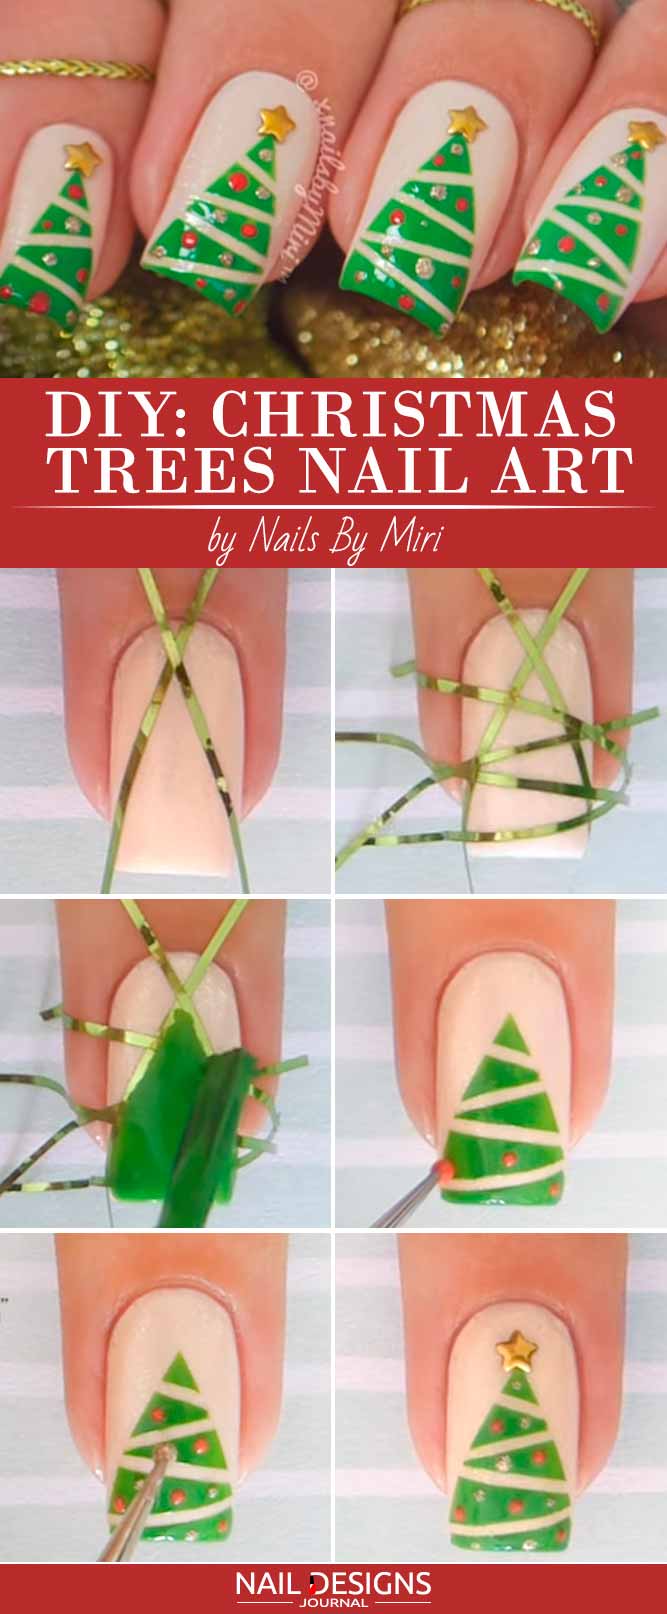
Cute Christmas Trees on Your Nails
- Apply a base coat.
- Use light beige nail polish as a base coat.
- With the help of a striping tape form a Christmas tree shape.
- Fill it in with green nail polish.
- Remove the tape.
- Add tiny red and silver dots to resemble Christmas ornaments.
- Place a star on the top.
- Coat your nails with a glossy top.
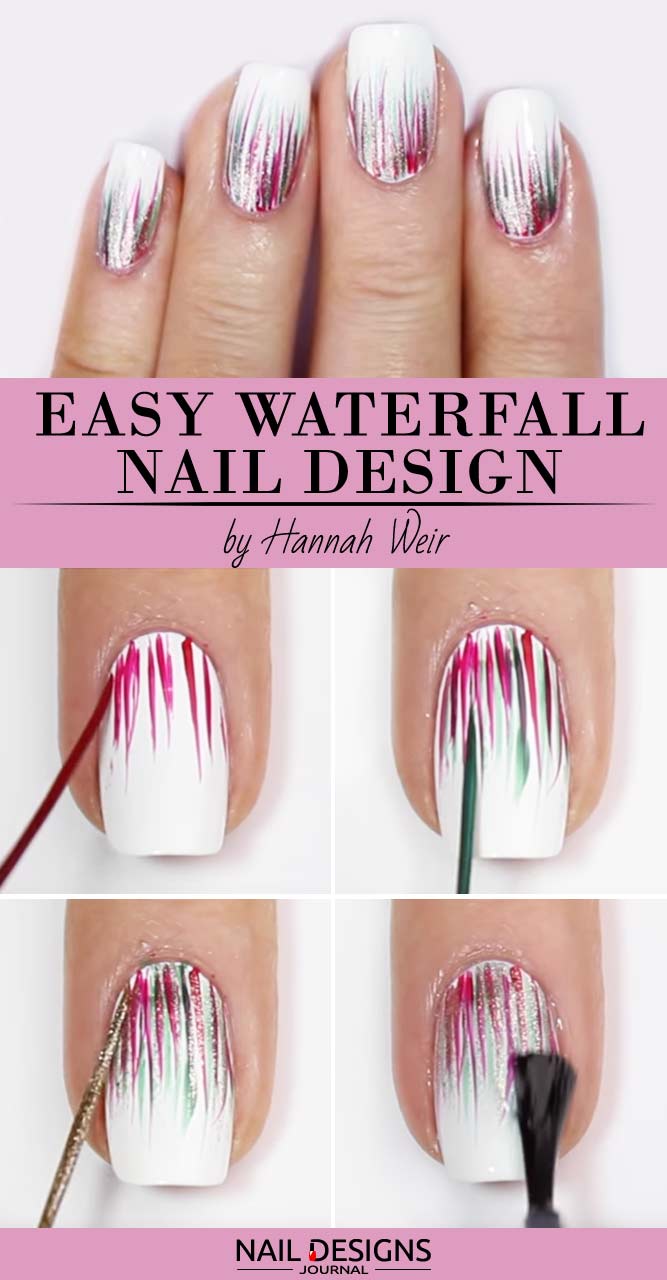
Easy DIY: Waterfall Nail Design
- Apply a base coat.
- Use white nail polish as a base color.
- Paint vertical, wispy red, light green and gold stripes on the nail to create a perfect waterfall nails.
- Coat your nails with a glossy top.
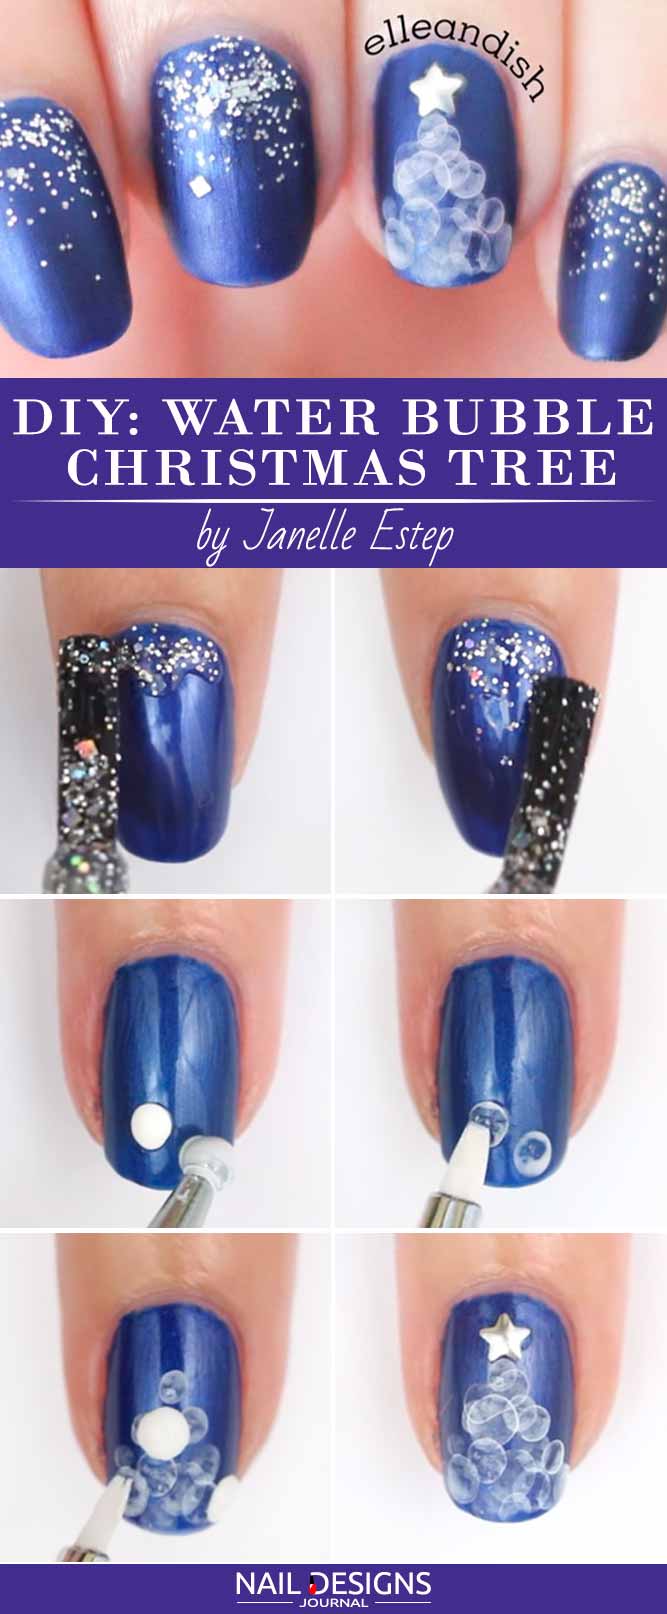
Wonderful Water Bubble Christmas Tree
- Apply a base coat.
- Paint your nails blue.
- Add glittery ombre to all the fingers but ring one.
- Now, dissolve a little bit of acrylic paint with water.
- Use a dotting tool and acrylic paint to form a Christmas tree with the help of bubbles.
- Soak up all the excess paint out of the dots so that they resemble bubbles.
- Introduce more bubbles for the layered effect.
- Place a star stud at the top.
- Coat your nails with a matte top.
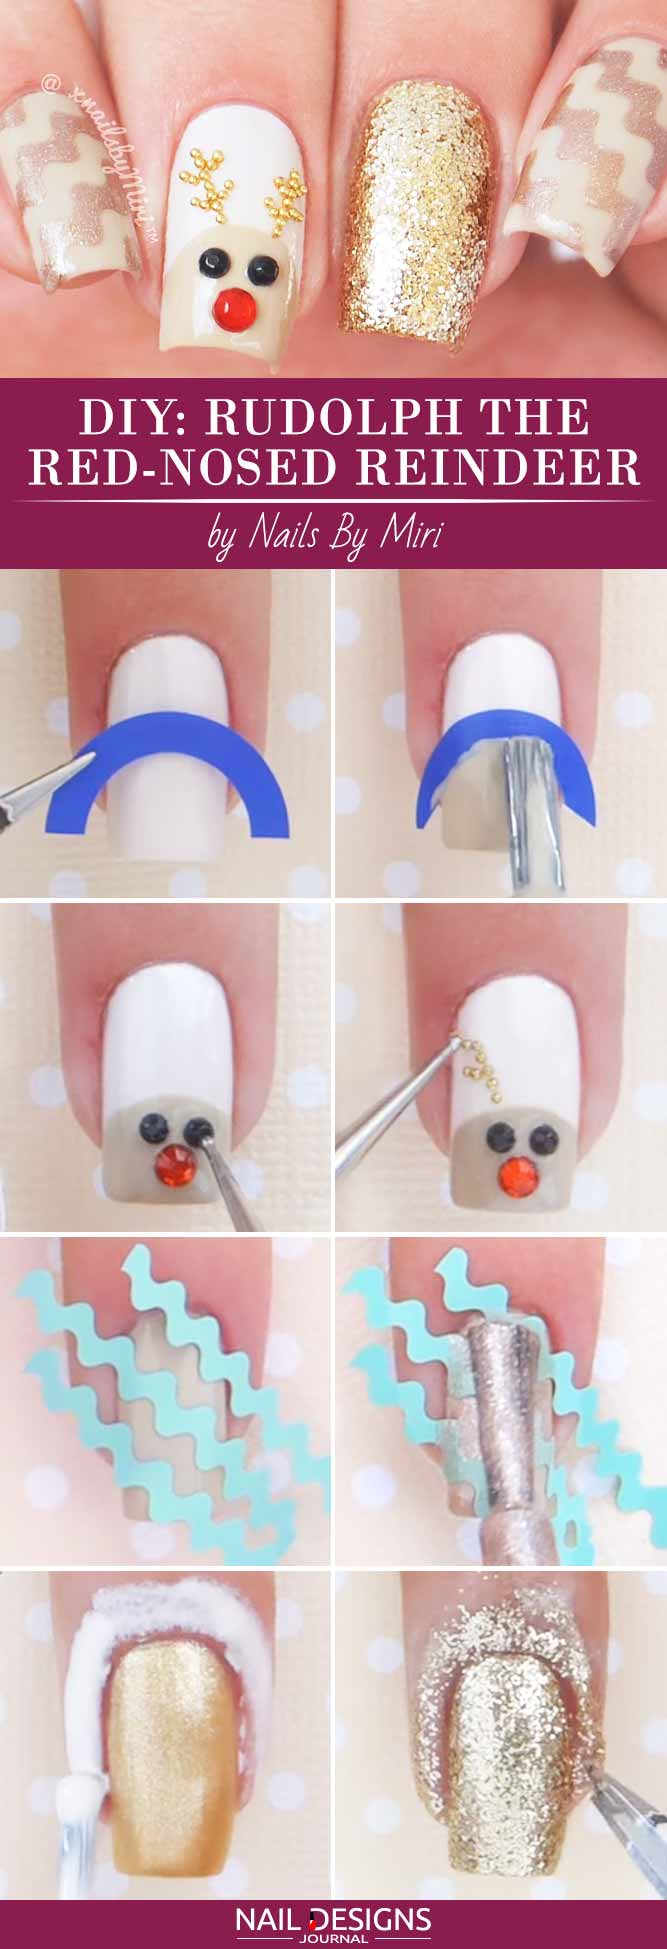
DIY: Rufolph the Red-Nosed Reindeer
- Apply a base coat.
- Use a white base coat on your ring finger.
- Place a rounded decal in the middle.
- Cover the top part of your nail with beige nail polish. Remove the decal.
- With the help of colored rhinestones add a deer’s eyes, nose, and horns to the design.
- Paint your index and pinkie beige.
- Use wavy decals on.
- Cover the nails up with glittery polish.
- Remove the decals.
- Paint your middle finger with gold glitter nail polish.
- Coat your nails with a glossy top.
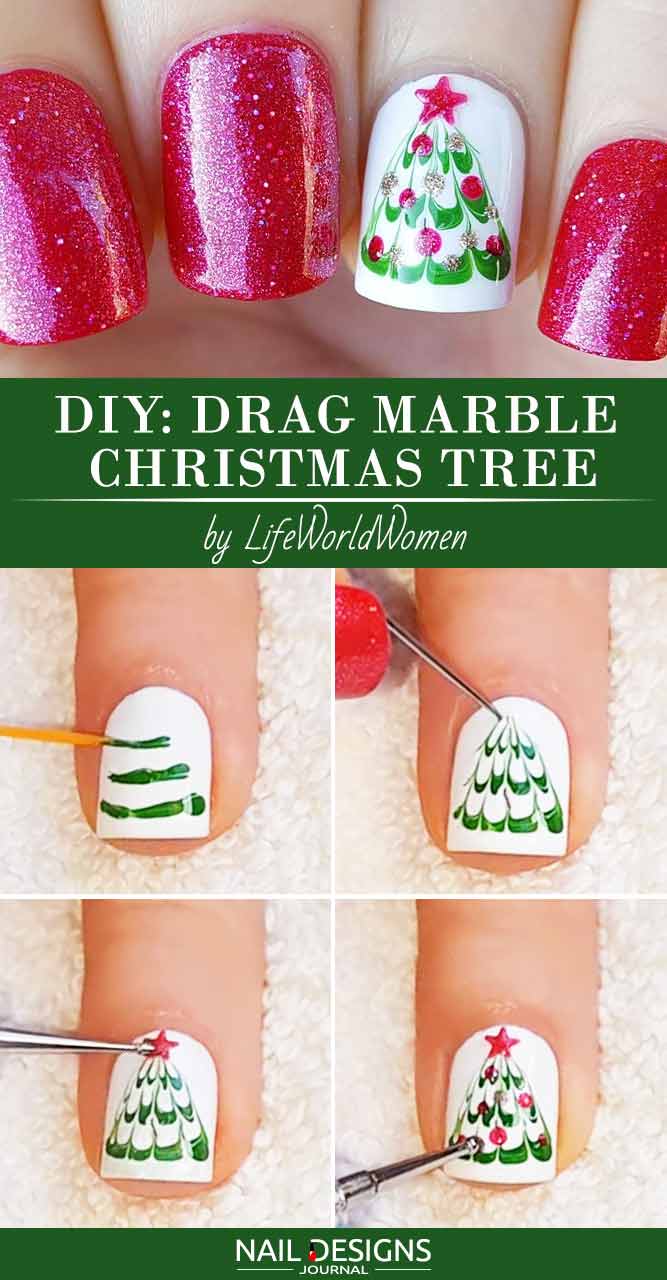
Mesmerizing Drag Marble Christmas Tree
- Apply a base coat.
- Paint your ring finger white, make sure the polish is still wet when you proceed.
- Add three green lines across the nail.
- With the help of a needle or a toothpick, make a Christmas tree shape.
- Place a star stud on the top of the tree; you can also paint it red if you like.
- Introduce some red and gold Christmas ornaments to the design.
- Coat your nails with a glossy top.
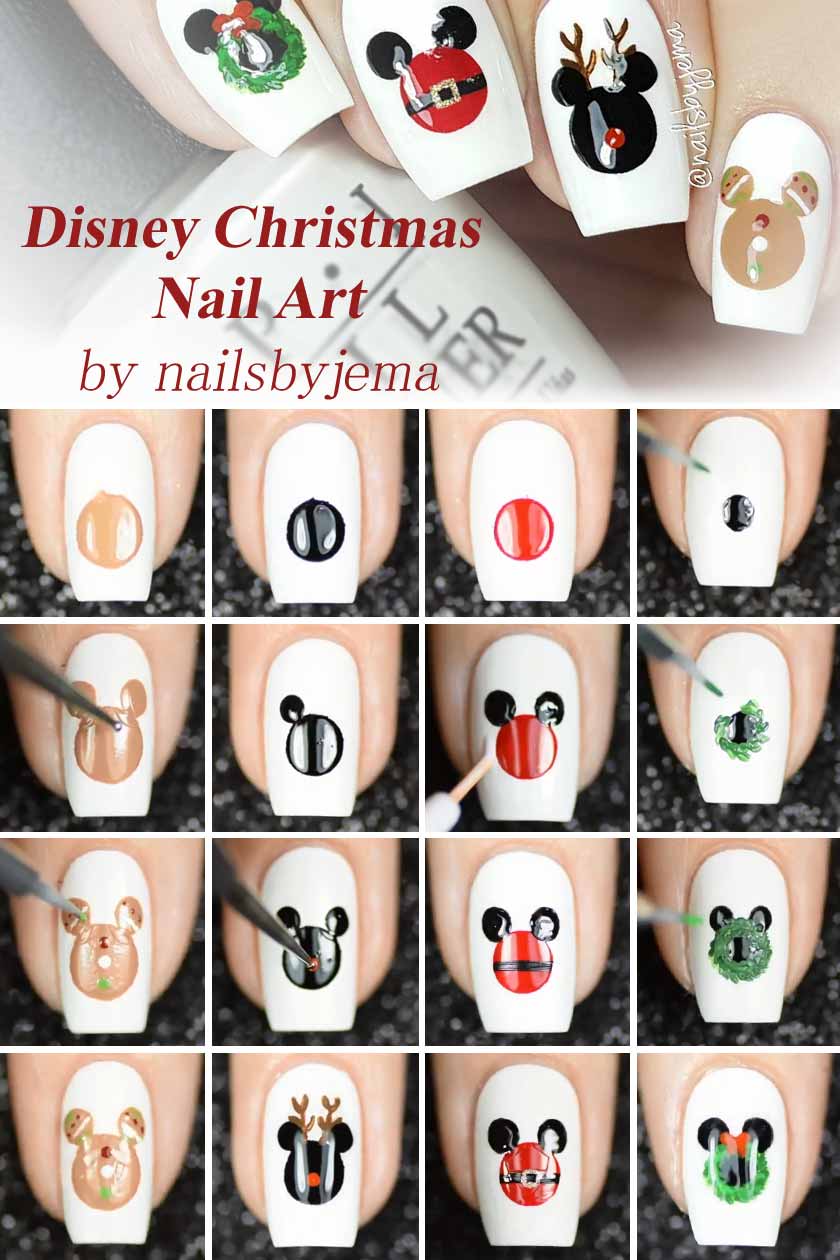
Disney Christmas Nail Art
- Apply a base coat.
- Coat your fingers with a white base.
- Use a round decal to create an even beige circle.
- With the help of a dotting tool and beige nail polish add two ears to the circle.
- Introduce gingerbread ornament to the image.
- Create a black circle using round decal.
- Place two black ears on the top of the circle.
- Add a small red dot as a nose and two reindeer horns to the image.
- A round decal will help you create an even red circle.
- Using a dotting tool and black nail polish add two ears.
- Draw a Santa belt to the image.
- Paint a black circle in the middle of your nails.
- Outline it with green.
- Depict two round black ears and a red bow on the picture.
- Apply a top coat.
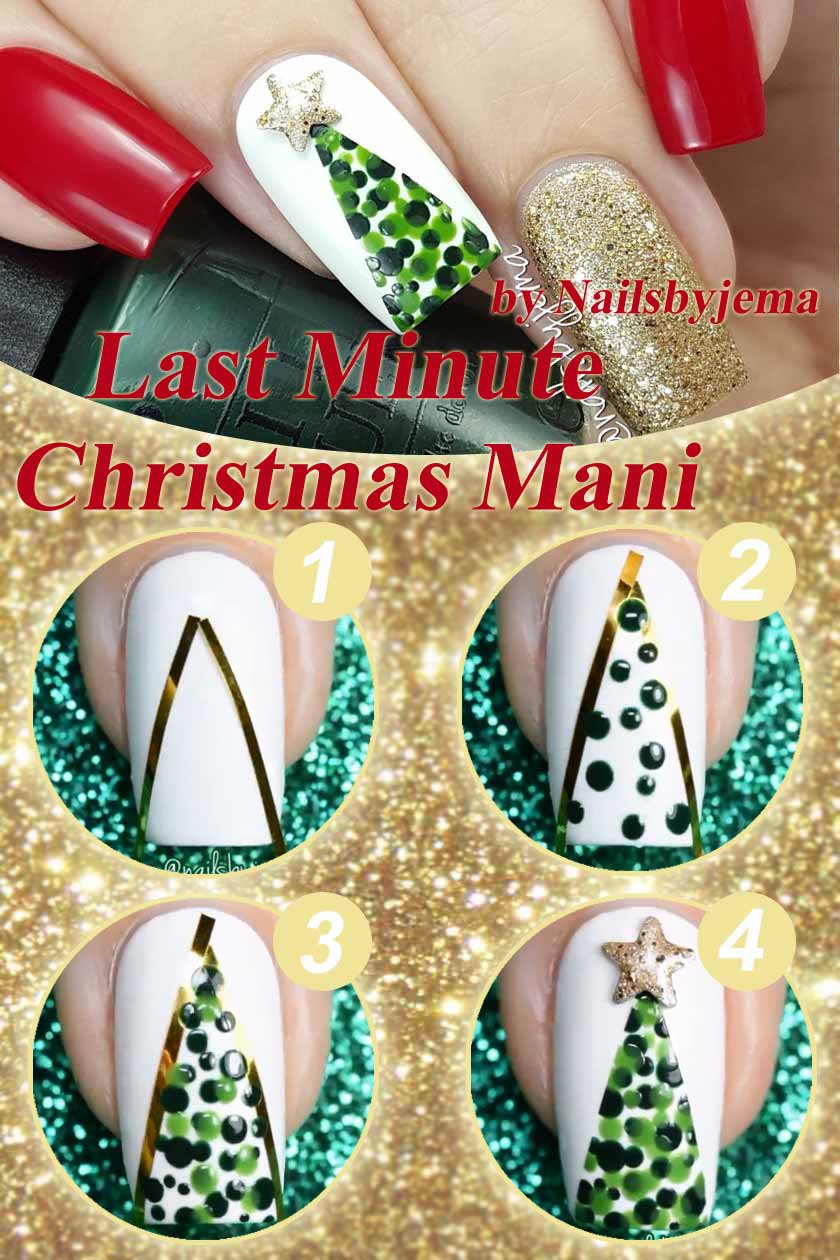
Dotted Christmas Tree Nail Art
- Apply a base coat.
- Paint your nail white.
- Place two thin striping tape pieces to form a triangle in the middle of your nails.
- Using a dotting tool and green nail polish add different-sized dots to the middle.
- Repeat the procedure with light green nail polish.
- Remove the striping tape.
- Add a star to the top.
- Apply a top coat.
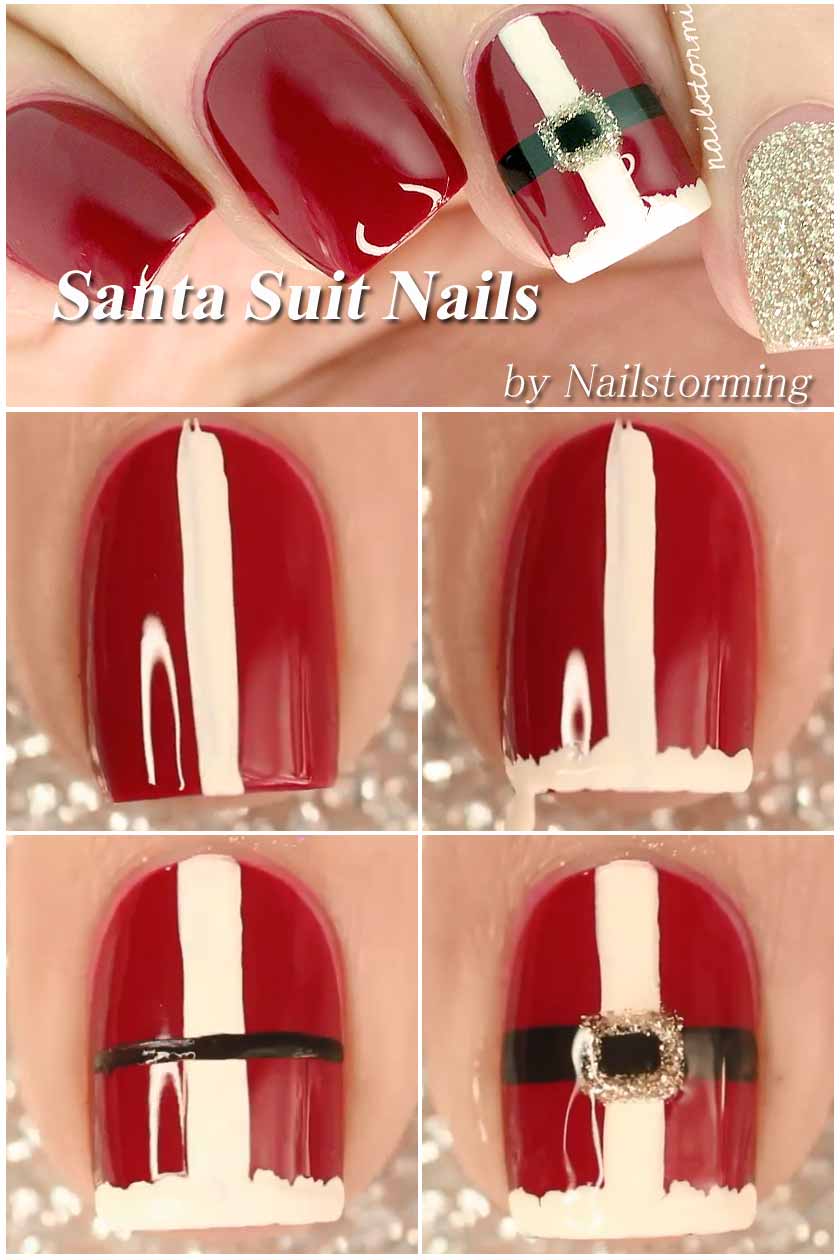
Santa Suit Nails
- Apply a base coat.
- Paint your nails red.
- Add a white vertical stripe to the middle of your nail.
- Repeat with a rigged white line on the tip of your nail.
- Draw a black horizontal line in the middle of your fingernail.
- Place a sparkling square to the middle of the black stripe.
- Coat your fingers with a glossy top.
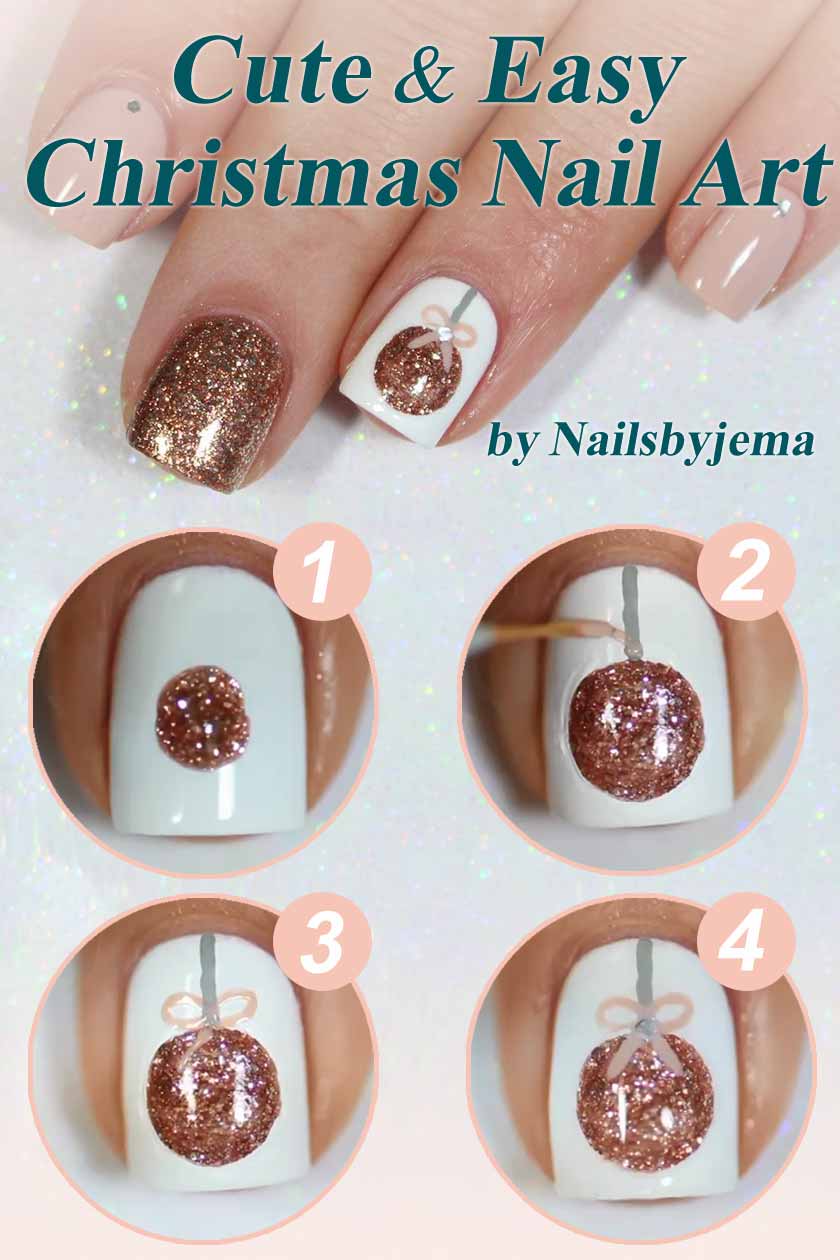
Sparkly Christmas Tree Balls Manicure Idea
- Apply a base coat.
- Paint your nail white.
- Add a rose gold glittery circle to the middle of your finger.
- Draw a thin grey line from the bottom of your nail to the circle.
- Using pale nail polish and a striping brush draw a cute bow at the base of the circle.
- Add a tiny rhinestone to the middle of the bow.
- Apply a top coat.
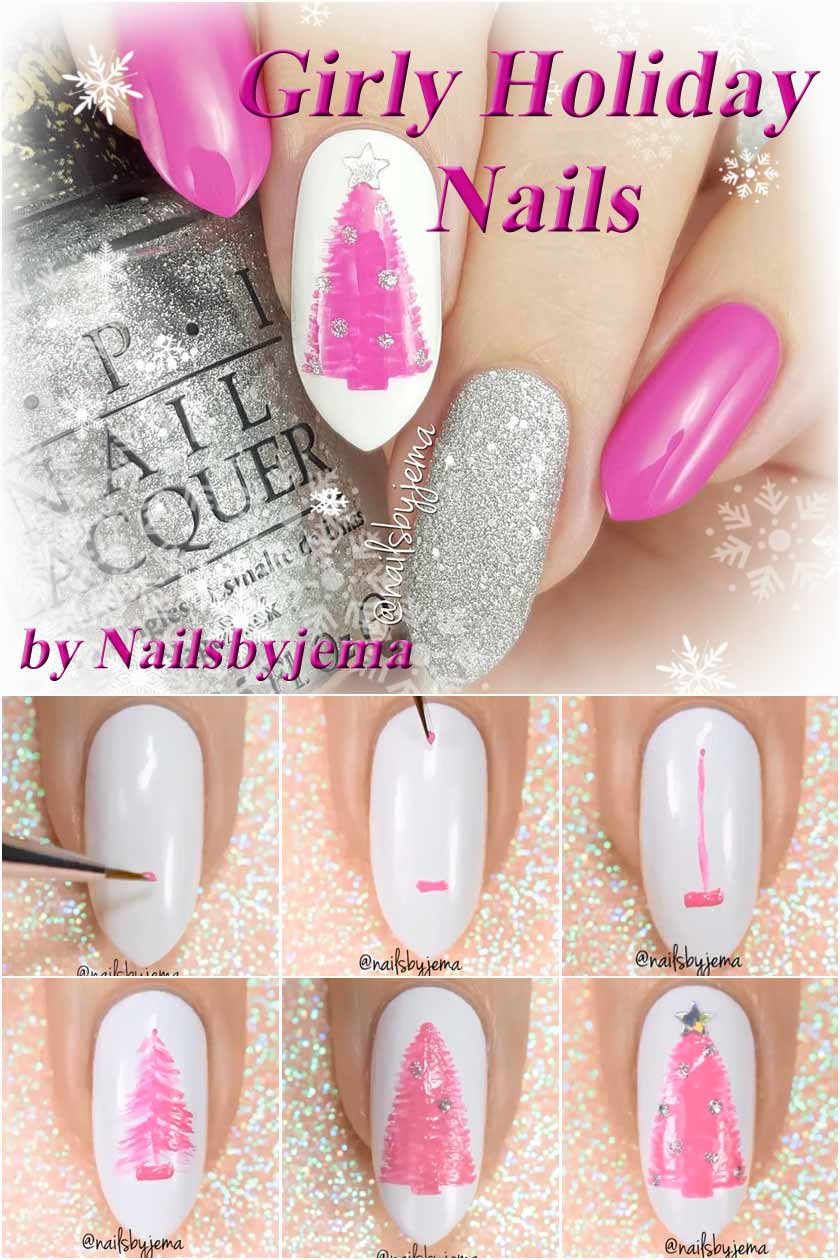
Girly Christmas Nails in Pink
- Apply a base coat.
- Paint a nail with white base coat.
- Using a bright pink nail polish and a striping brush draw the outline of your tree.
- Keep building up the fullness of the Christmas tree until you are satisfied with it.
- Add tiny silver dots to the tree as Christmas ornaments.
- Place a star on the top of the tree.
- Apply a top coat.
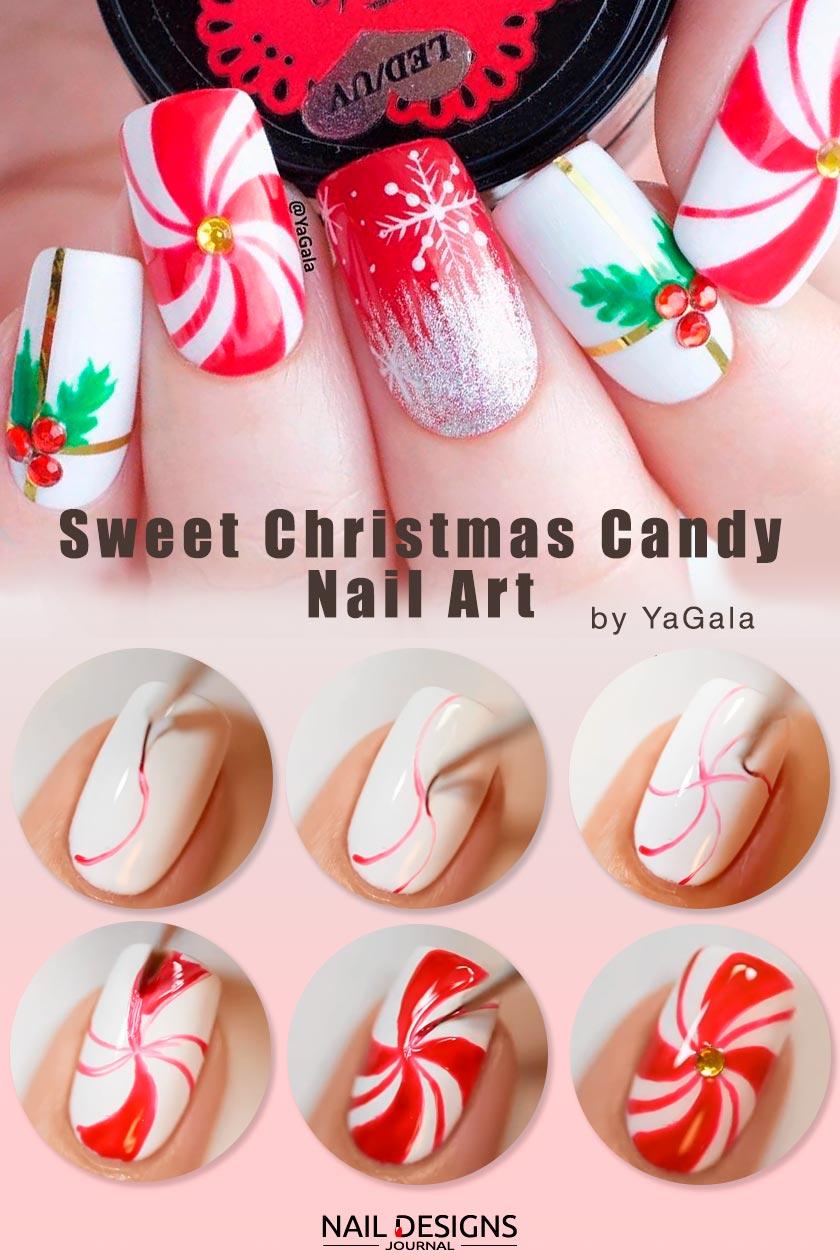
Sweet Christmas Candy Nail Art
- Apply a top base coat.
- Use white nail polish as your base.
- With the help of a thin striping brush and red nail polish draw two horizontal swirls.
- Repeat the same procedure vertically.
- Fill the swirls in with red nail polish.
- Add some more curved red lines to make your nail resemble a Christmas candy.
- Place a gold stud in the middle.
- Top coat your nails.
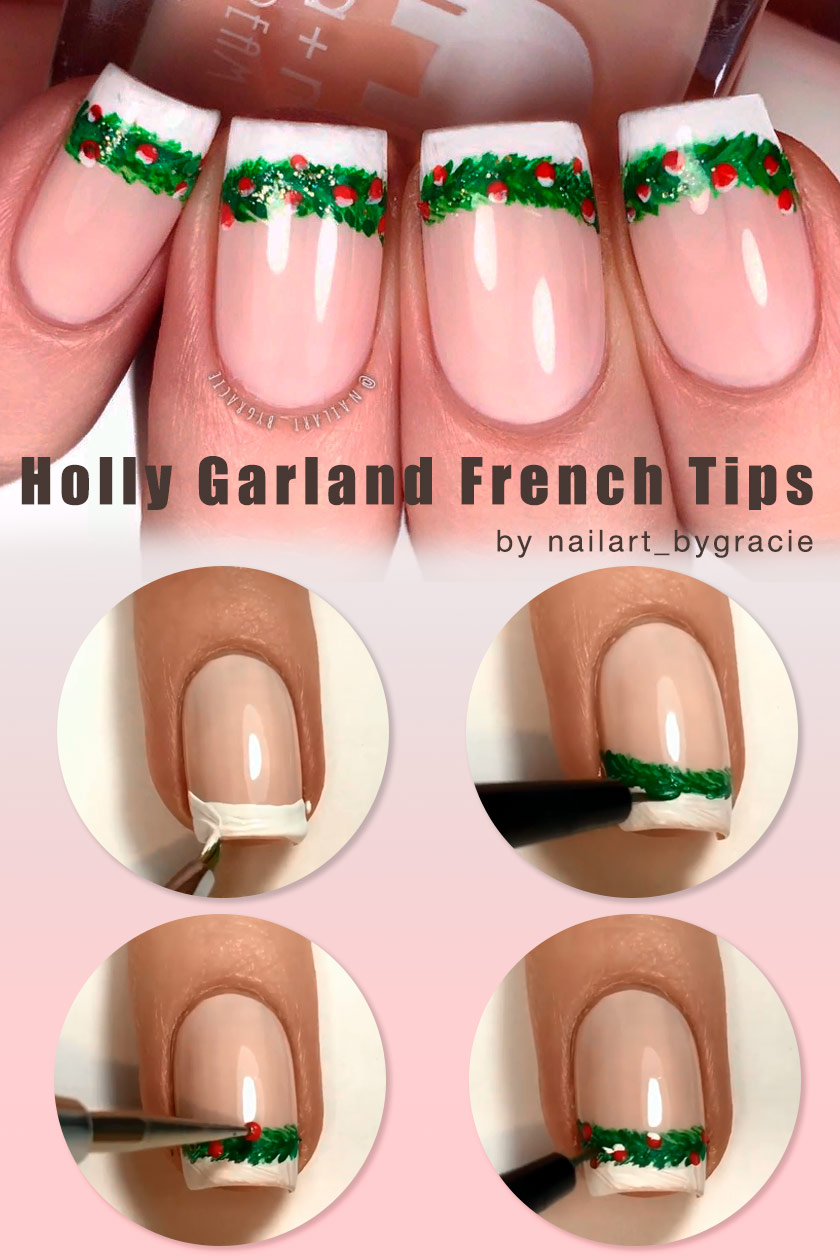
Holly Garland French Tips
- Apply a top base coat.
- Use nude nail polish as your base.
- Create a French tip.
- Underline the white French tip with the thin green line.
- Make the green line look like a Christmas tree twig.
- Add tiny red dots to the design.
- Use some white nail polish and a striping brush to underline the red dots.
- Top coat your nails.
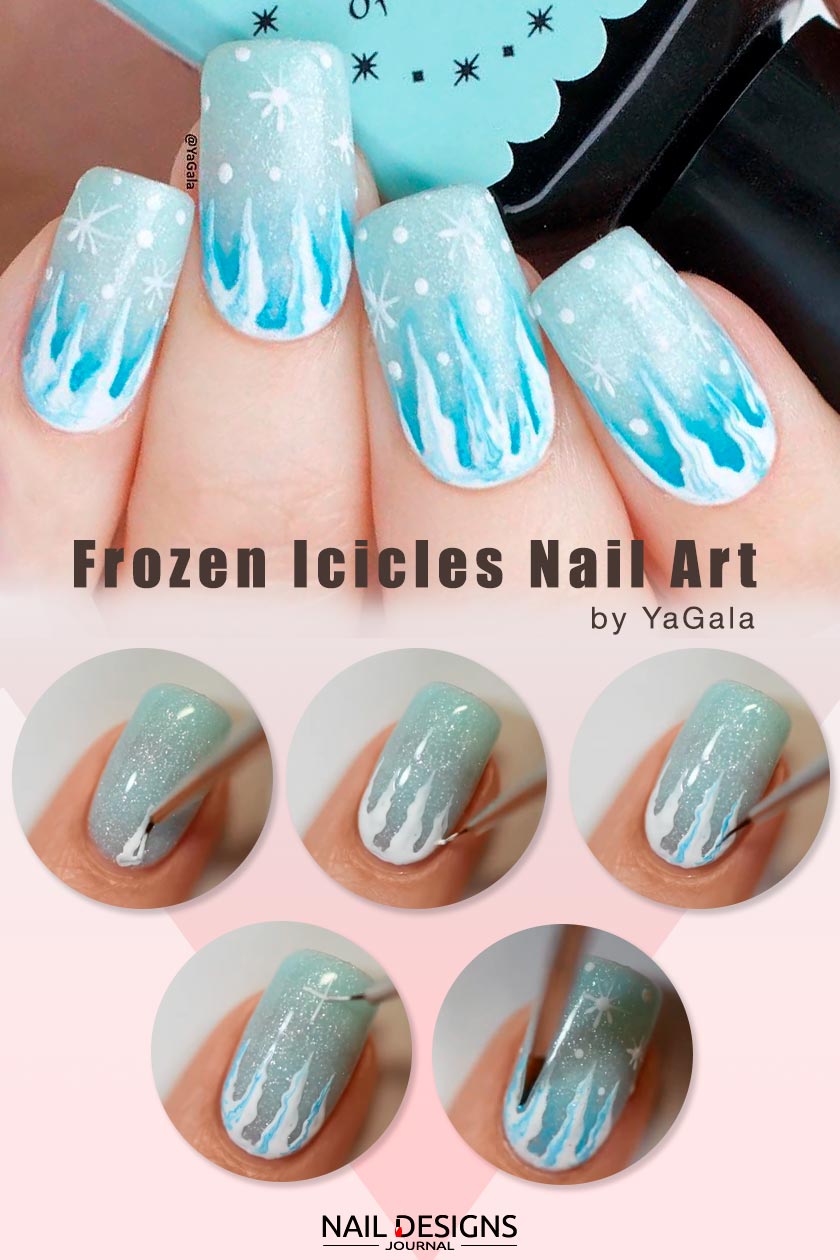
Frozen Icicles Nail Art
- Apply a top base coat.
- Use sparkly blue nail polish as your base.
- With the help of a striping brush and white nail polish, draw icicles hanging from the top of your nail.
- Add some blue nail polish to intensify the icicles.
- Draw occasional snowflakes and dots over the nail.
- Cover the nail with white acrylic powder.
- Fill in the gaps between icicles with blue nail polish.
- Top coat your nails.
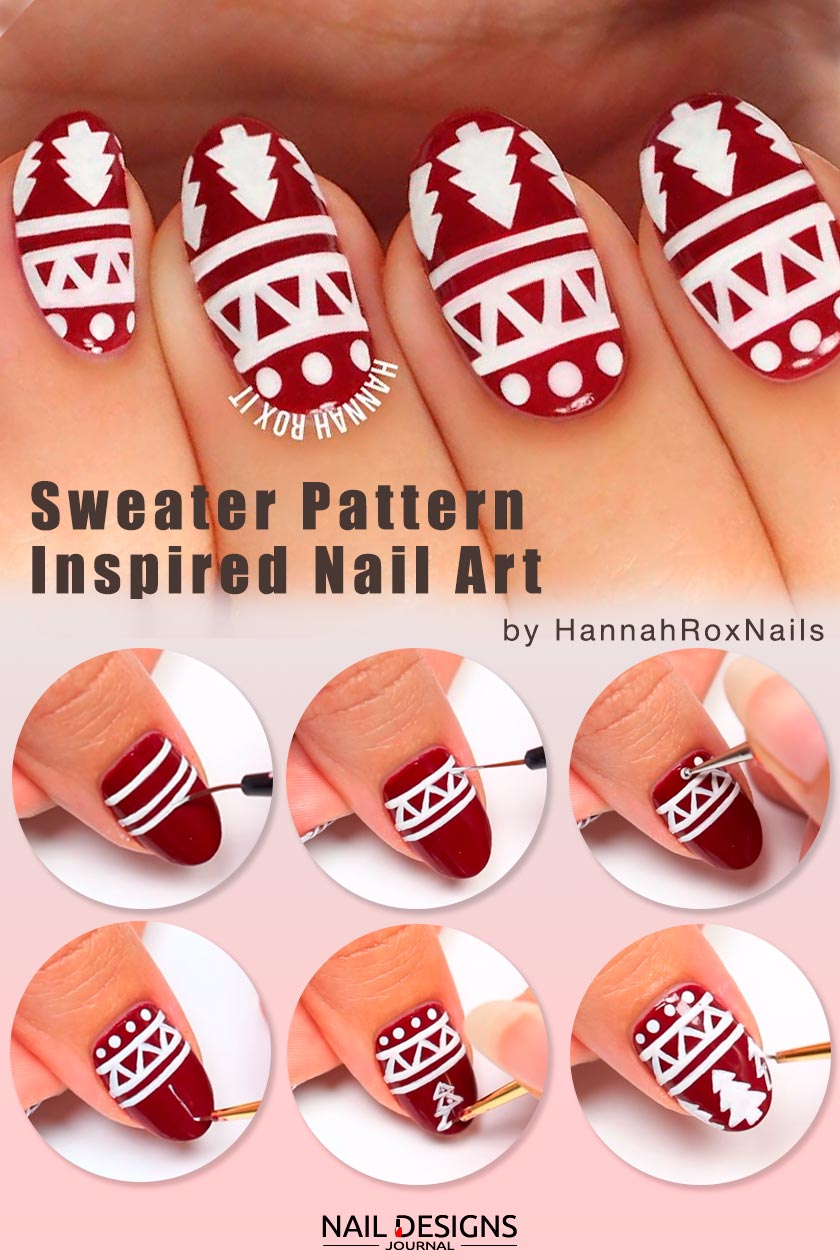
Sweater Pattern Inspired Nail Art
- Apply a top base coat.
- Use red nail polish as your base.
- Draw a white horizontal line close to your cuticle.
- Repeat the line a little higher above the first line.
- Add a third line, but this time it should be a lot closer to the first one.
- Fill in the first two line with a zigzag one.
- With the help of a dotting tool, add some dots at the top of the nails.
- Draw little Christmas trees to fill out the rest of the nail.
- Top coat your nails.
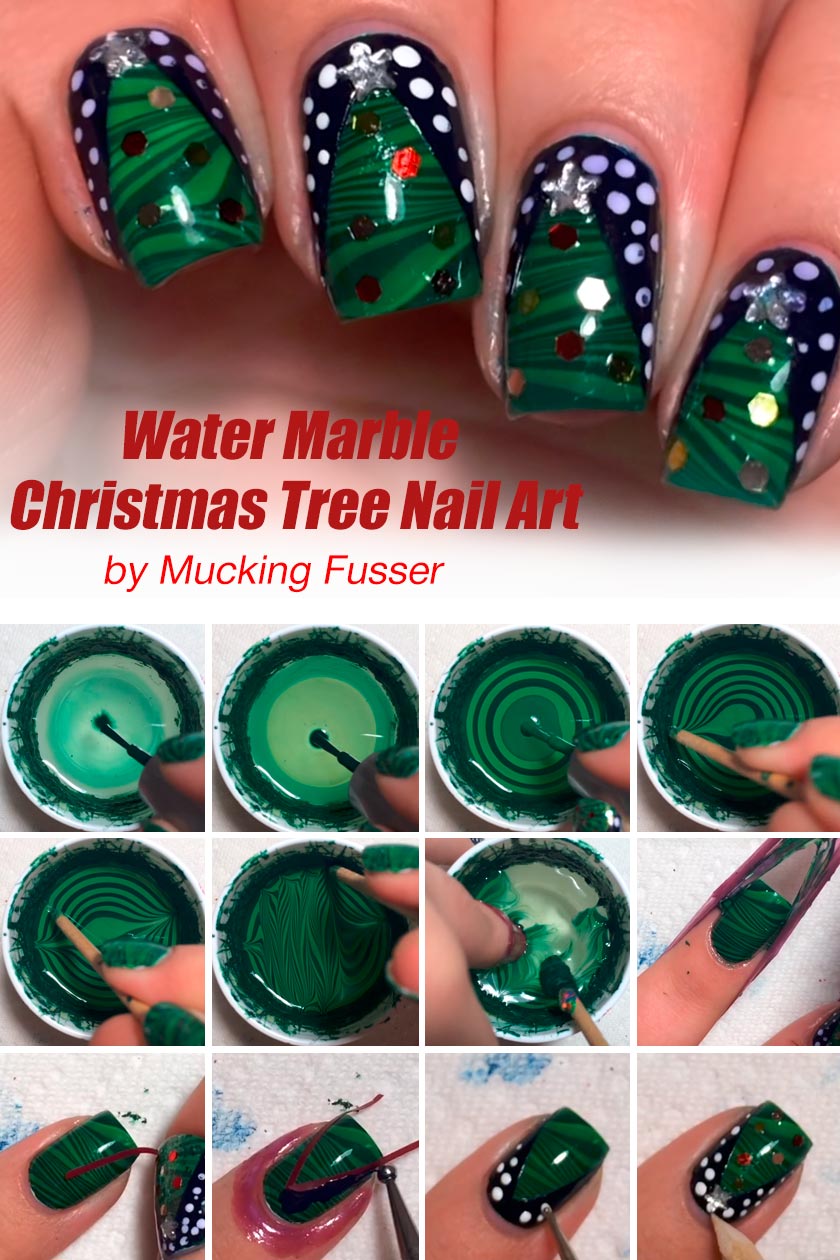
Water Marble Christmas Tree
- Apply a top base coat.
- Use white nail polish as your base.
- Apply liquid latex to secure your cuticles.
- With the help of a cup of room-temperature water and two various shades of green start creating a water marble pattern.
- Use an orange stick or a toothpick to create the desired pattern.
- Place your nail right into the water design.
- Clean up the messes on the surface.
- Pull your finger out, slowly.
- Remove the liquid latex.
- Use vinyl stickers to create a Christmas tree shape.
- Apply dark blue polish around the vinyl secured area.
- Add tiny white dots to the dark base.
- Place a start stud to the top of the tree.
- Use some different-shaded glitter to decorate the tree.
- Top coat your nails.
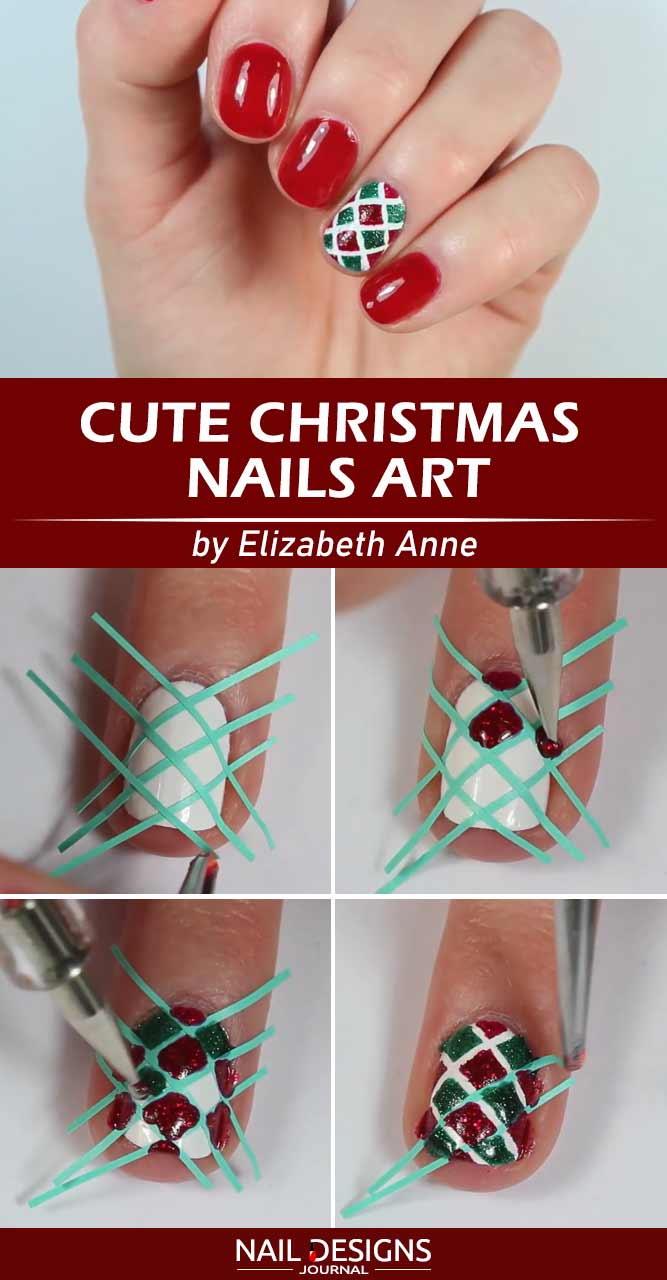
Cute Christmas Nails Art
-
1. Apply a clear base coat.
2. Apply a red nail polish to every nail except for the ring finger nail.
3. Apply a white nail polish to the ring finger nail.
4. Stick nail art striping tape over the white nail polish so that it forms a diamond pattern.
5. Using green and red nail polishes, color the diamonds with a dotting tool, altering the shades.
6. Apply a clear nail coat overtop.
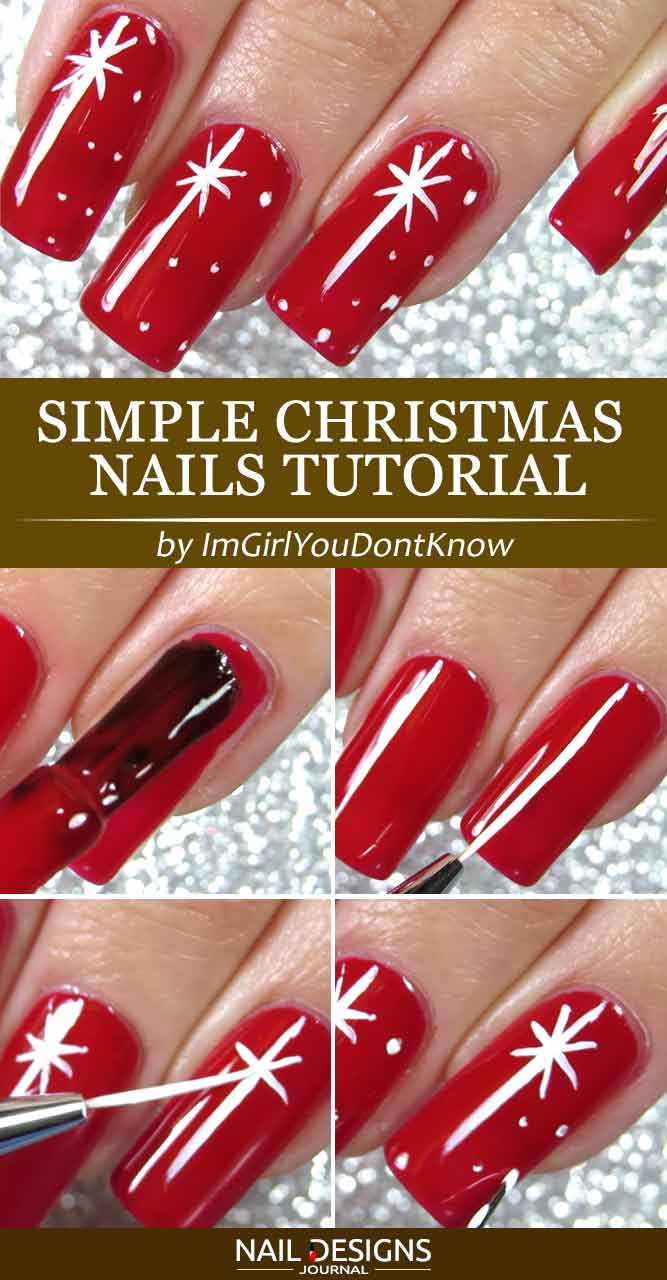
Simple Christmas Nails Tutorial
-
1. Apply a clear base coat.
2. Paint your nails with a red nail polish.
3. With the help of a thin detailer brush, draw Christmas Star and a scattering of small stars on your every nail.
4. Apply a clear top coat.
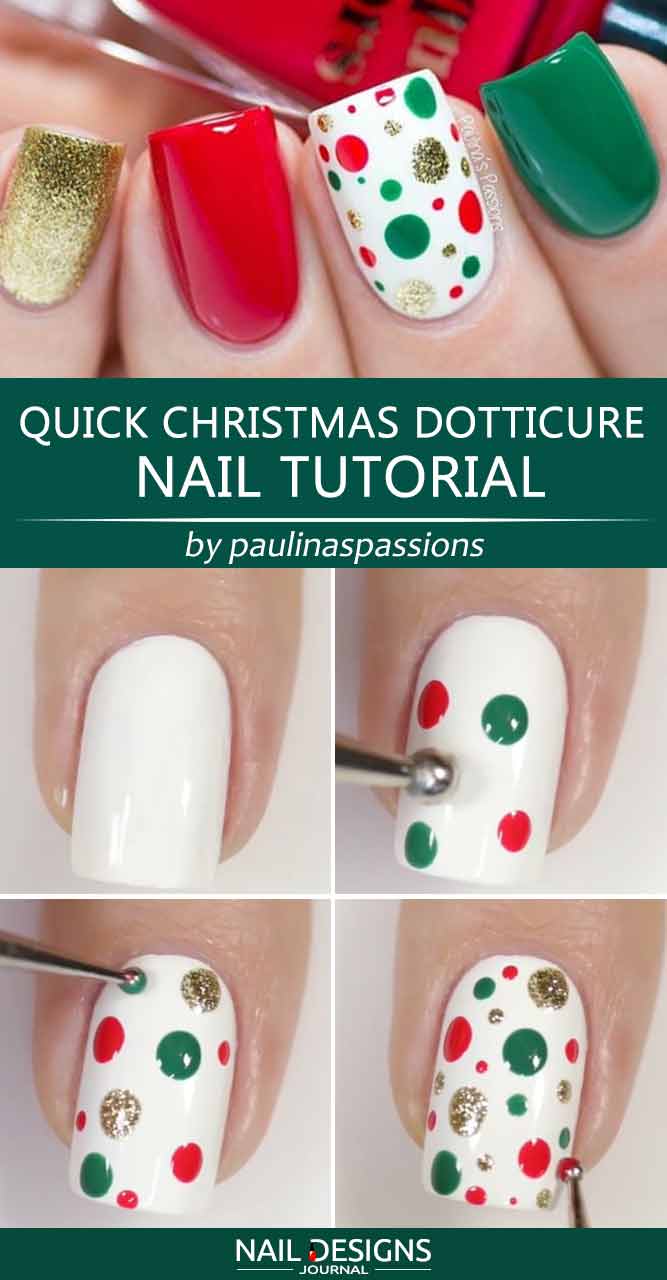
Quick Christmas Dotticure Nail Tutorial
-
1. Apply a clear base coat.
2. Paint the pixie finger nail with a gold glitter nail polish, the ring finger nail with a red nail polish, the middle finger nail with a white nail polish and the index finger nail with a green nail polish.
3. With a dotting tool, apply gold, red and green dots to your middle finger nail.
4. Apply a clear top coat.
We hope you enjoy these Christmas nail art tutorials and will succeed in their replication with the least of time and effort involved. Do not forget to visit us for some more fresh ideas and pieces of trendy advice!
Was this article helpful?

