
Snowflake nails are the best representatives of your winter look and spirit. Plus, holidays are coming and you should look accordingly festive. That is why we thought of nothing better than to treat you with a fresh portion of winter nail art tutorials. The thing is that there are many different techniques to pull off snowflake art, and it may be difficult to find the proper one. But we managed to gather most of them in our article, and we rush to share them with you. It does not matter what you prefer more, stencil mani or stamping, rhinestones or mere dots, decal or hand-drawn manicure – we have it covered! We hope you enjoy and find something wintery and special to try out next time you opt for a fancy mani of yours.
Geometric Snowflake Nails
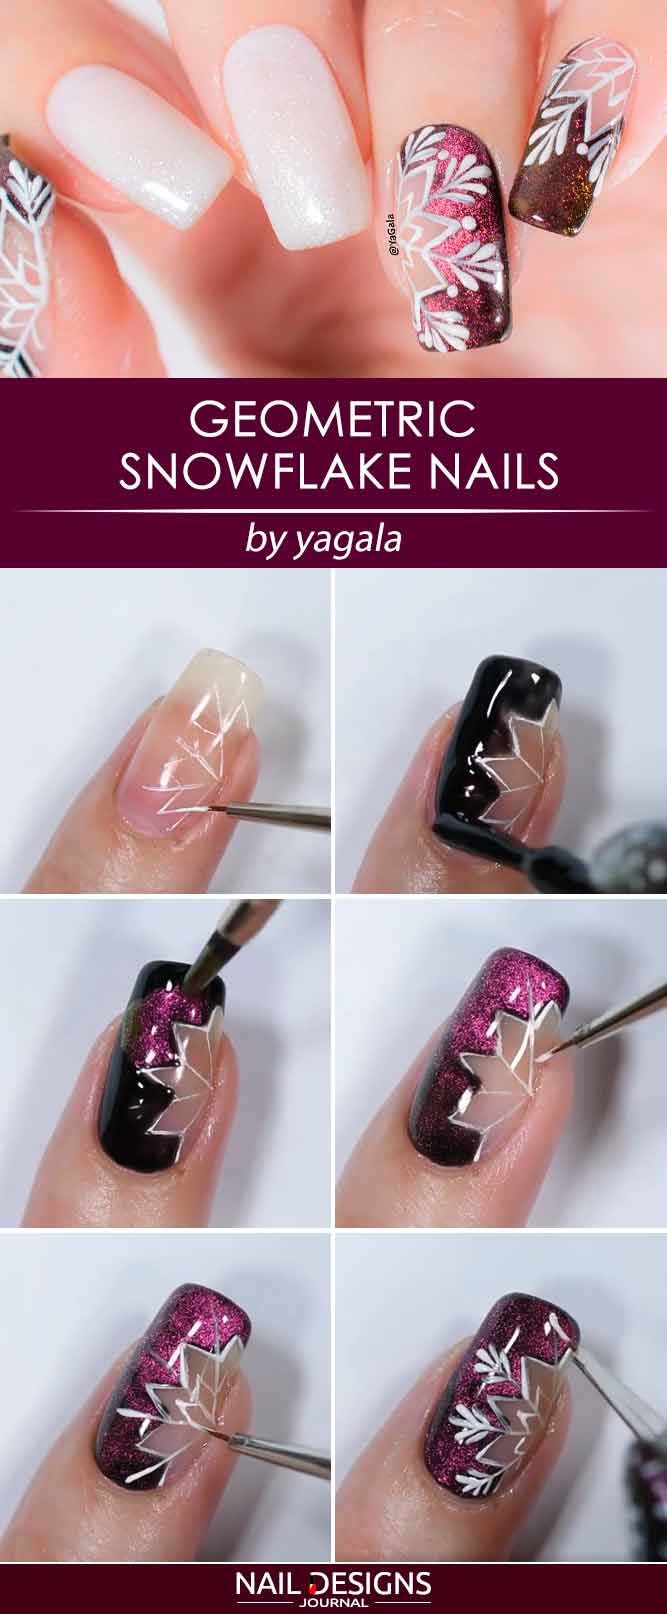
The geometric design looks stylish and intricate on its own. But when it is combined with snowflakes, you instantly get powerful winter vibes. Follow these steps to achieve geometric snowflake nails:
- Apply a coat of clear nail base.
- With the help of a tiny detailer brush and a white nail polish, draw the outline of the snowflake.
- Fill in the space outside the snowflake with a black nail polish.
- Apply duo-chrome shimmery nail polish atop the black nail polish.
- Intensify the outline of the snowflake with the white nail polish and add streaks to it.
- Top off with a clear nail polish.
Modern Hand Painted Snowflake Nail Art
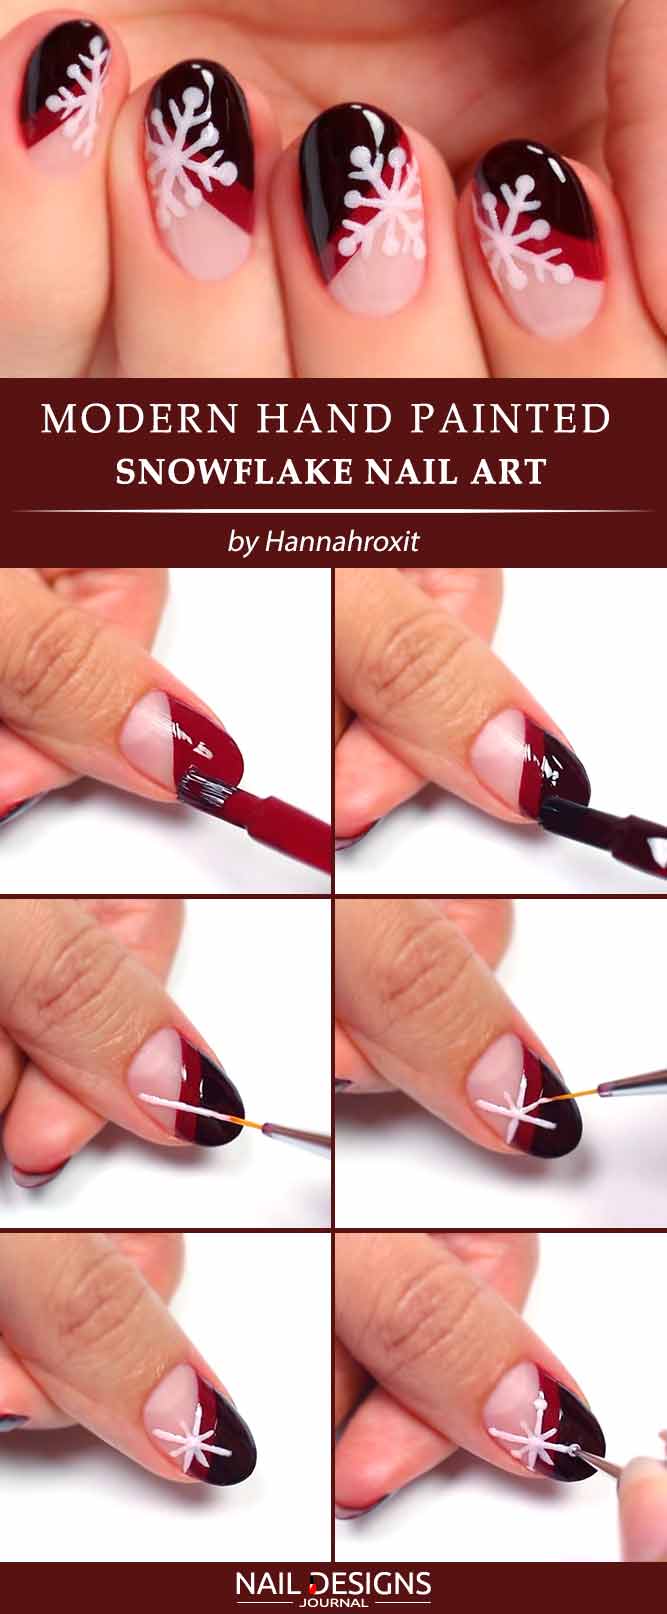
- Apply a base coat.
- Place a wine red base coat diagonally to the half of your nail.
- Repeat the procedure with darker red nail polish but make sure the previous color is showing.
- With the help of a thin striping brush and pale pink nail polish and an X shape to the nail.
- Add smaller ones between the larger ones then add a dot at the end of each line and draw angled lines on the longest ends.
- Coat your fingers with a glossy top.
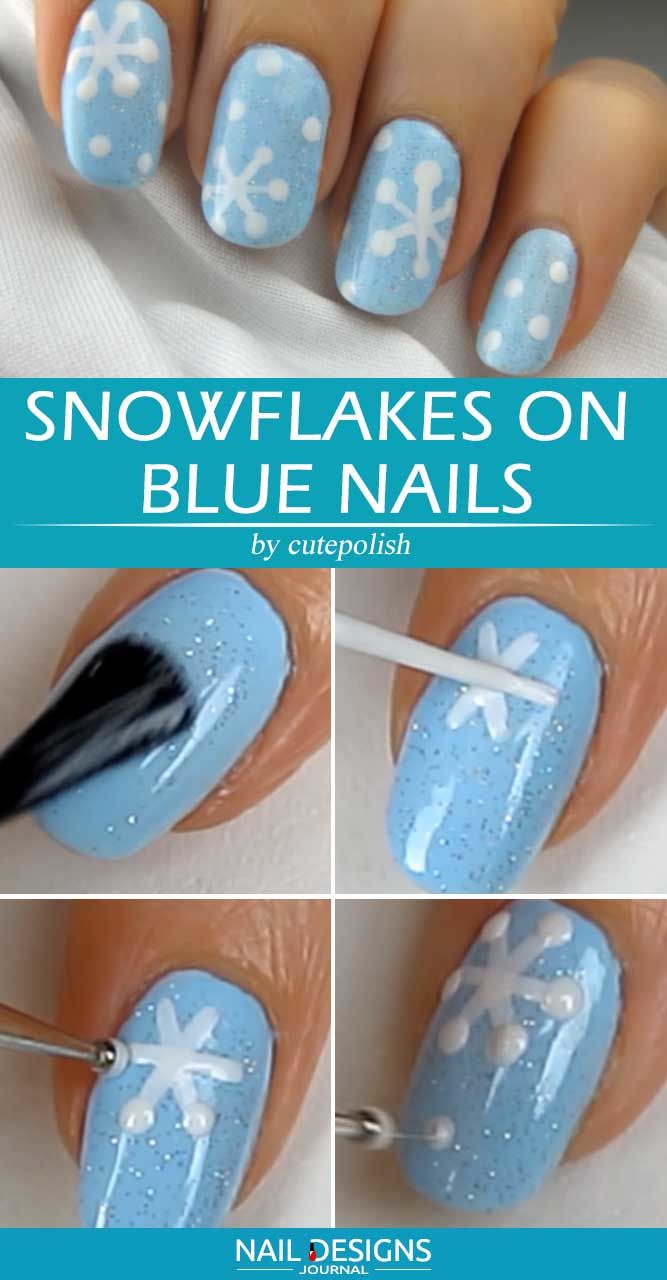
Easy Blue Snowflakes Nails Design
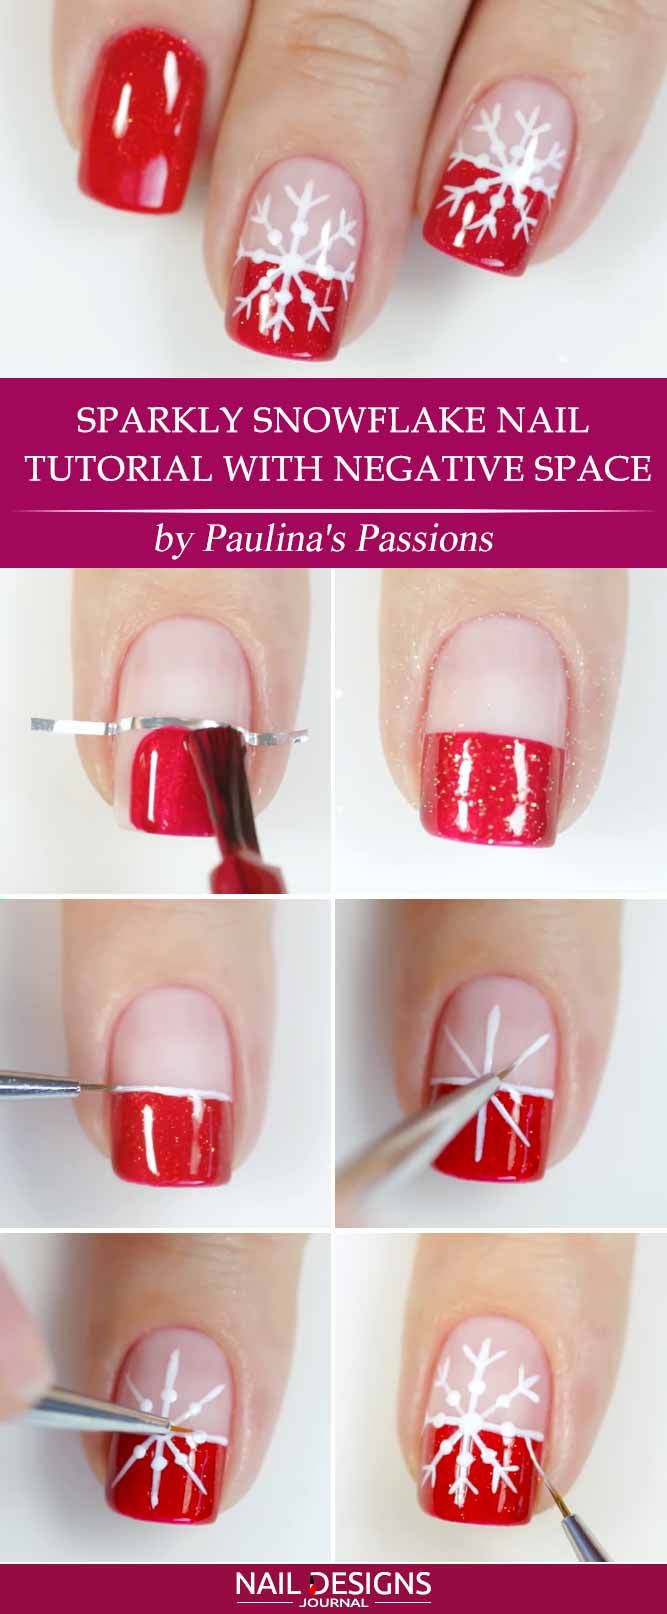
Sparkly Snowflake Nails Tutorial With Negative Space

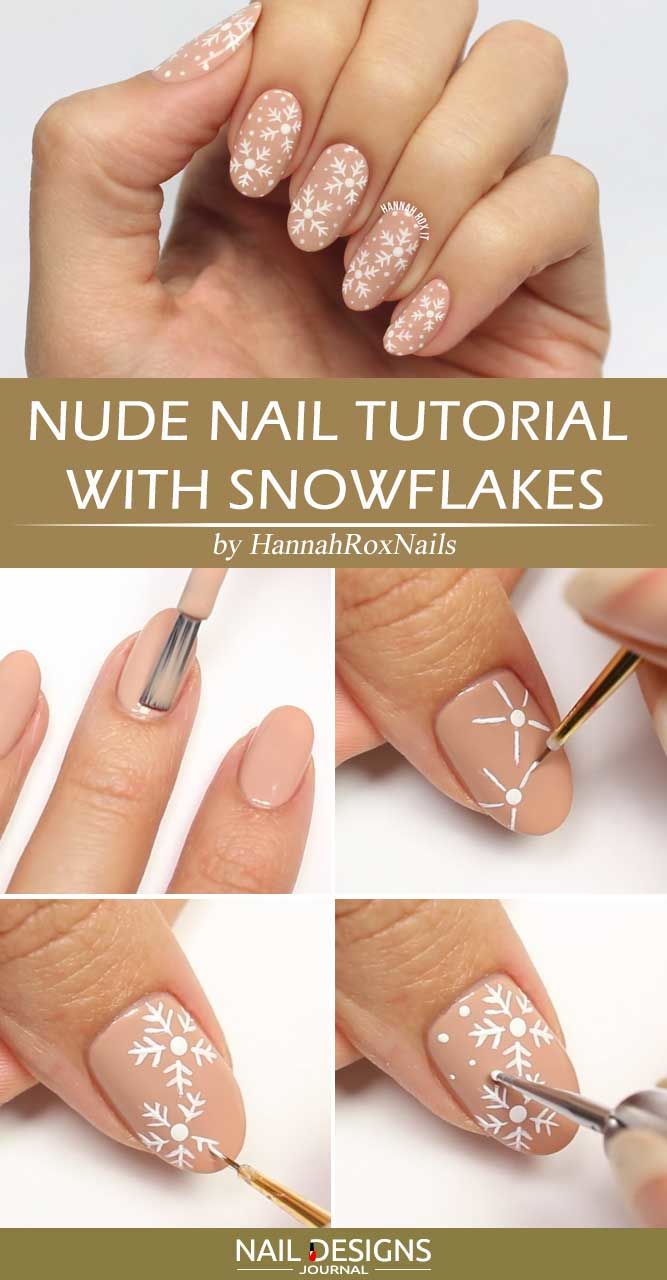
Nude Snowflake Nails Tutorial
Red Glittery Nails with Snowflake Art
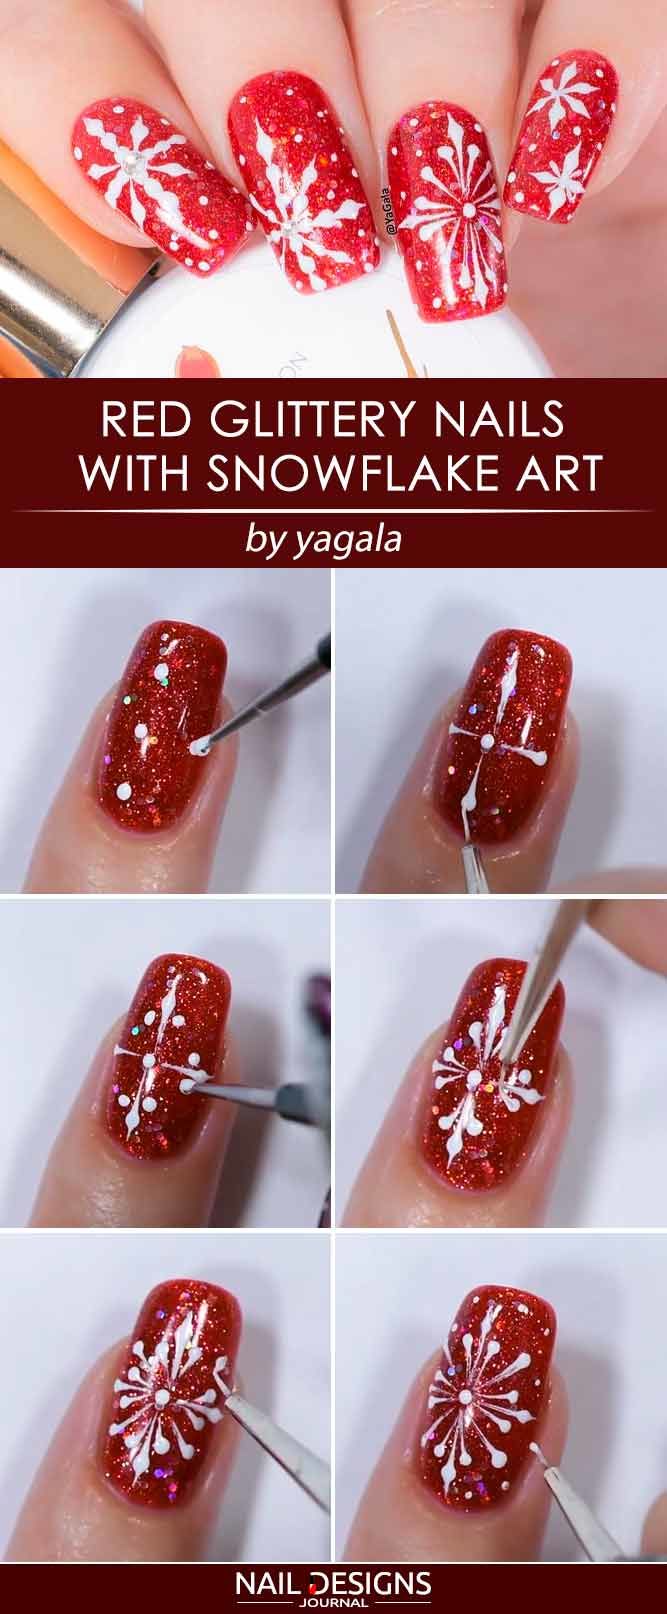
Red nails are a staple for Christmas. Yet, you can make your mani even more festive by adorning it with snowflakes. Here is how to do this:
- Apply a clear base coat.
- Paint your nails with a red glittery nail polish.
- Using a white nail polish and a thin detailer brush, place a dot in the middle of the nail.
- With the same brush, place four dots crosswise at an equal distance from the previous dot.
- Drag the dots toward the center.
- Place more dots between the streaks closer to the center dot than previously and drag them toward the center.
- Repeat the previous step.
- Apply a clear nail coat overtop.
Snowflake Nail Art For Christmas
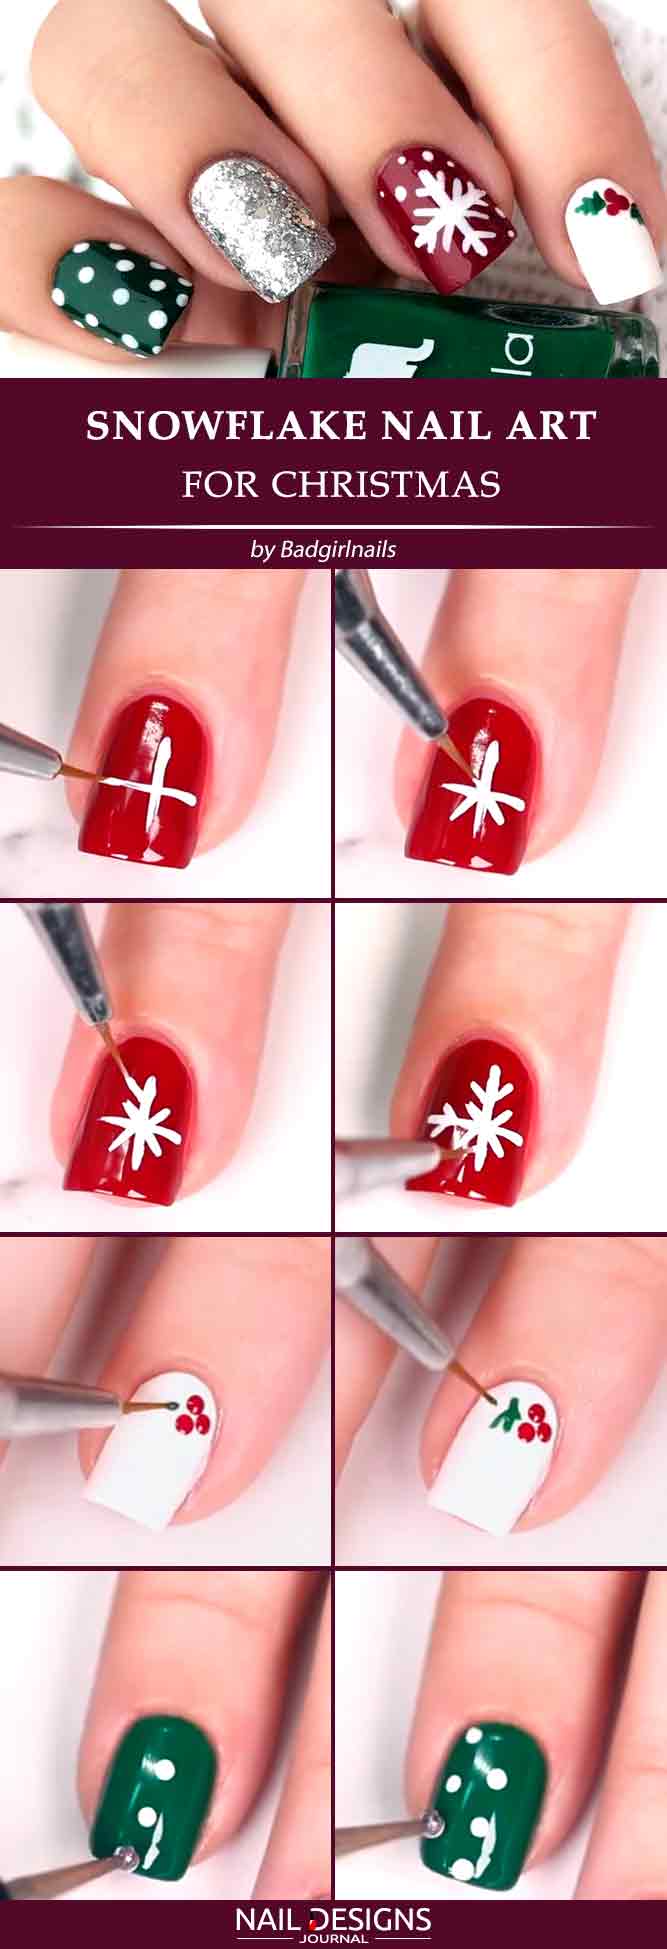
- Apply a base coat.
- Paint your ring finger red.
- Draw a white cross shape on your fingernail.
- Add some more diagonal lines to the image to make it look like a snowflake.
- Paint your pinkie white.
- Introduce a tiny holly branch to the white base.
- Coat your index finger green and add white dots to it.
- Apply a top coat.
Sweet And Simple Snowflake Nails Design
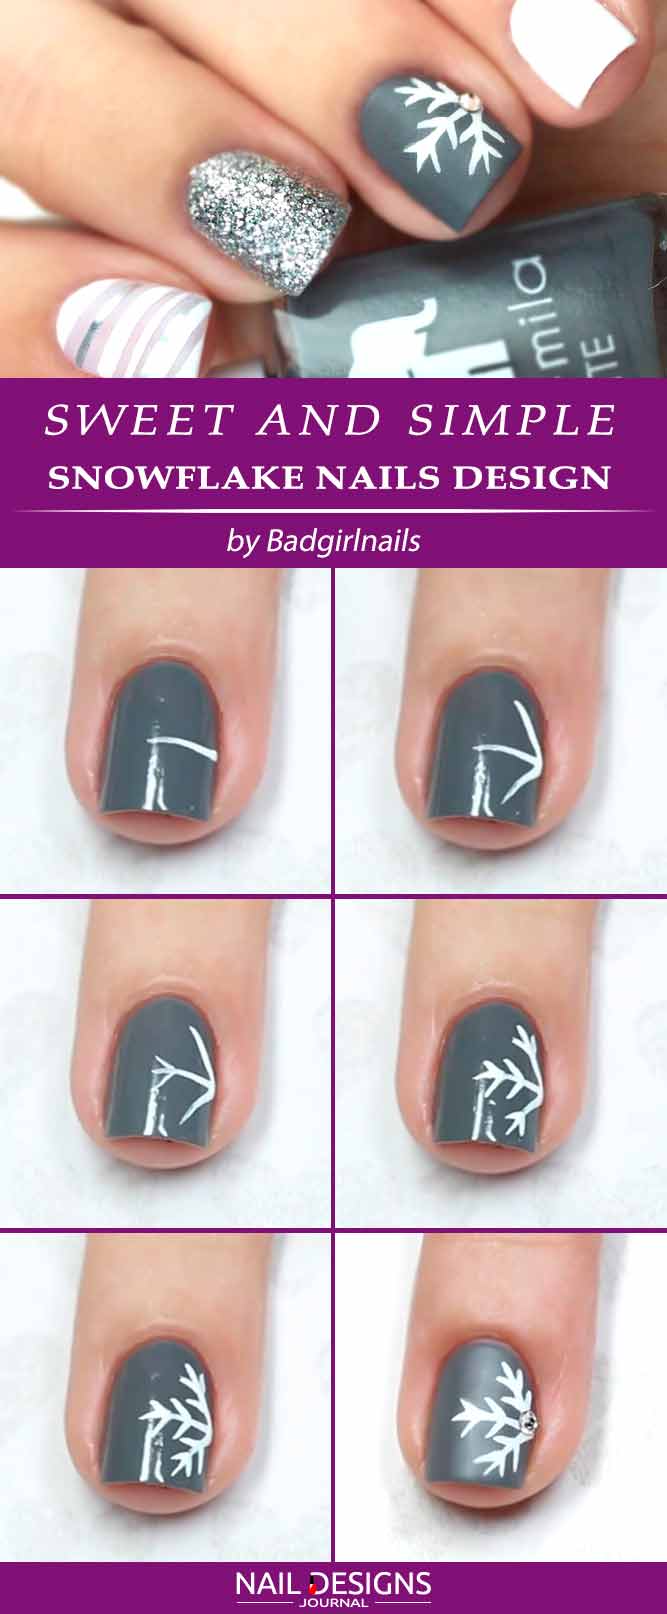
- Apply a base coat.
- Paint your nails grey.
- With the help of thin striping brush and white nail polish draw a snowflake shape on your nail.
- Add a rhinestone to the center of the snowflake.
- Coat your nails with matte top.
Quick and Easy Snowflakes Nail Art
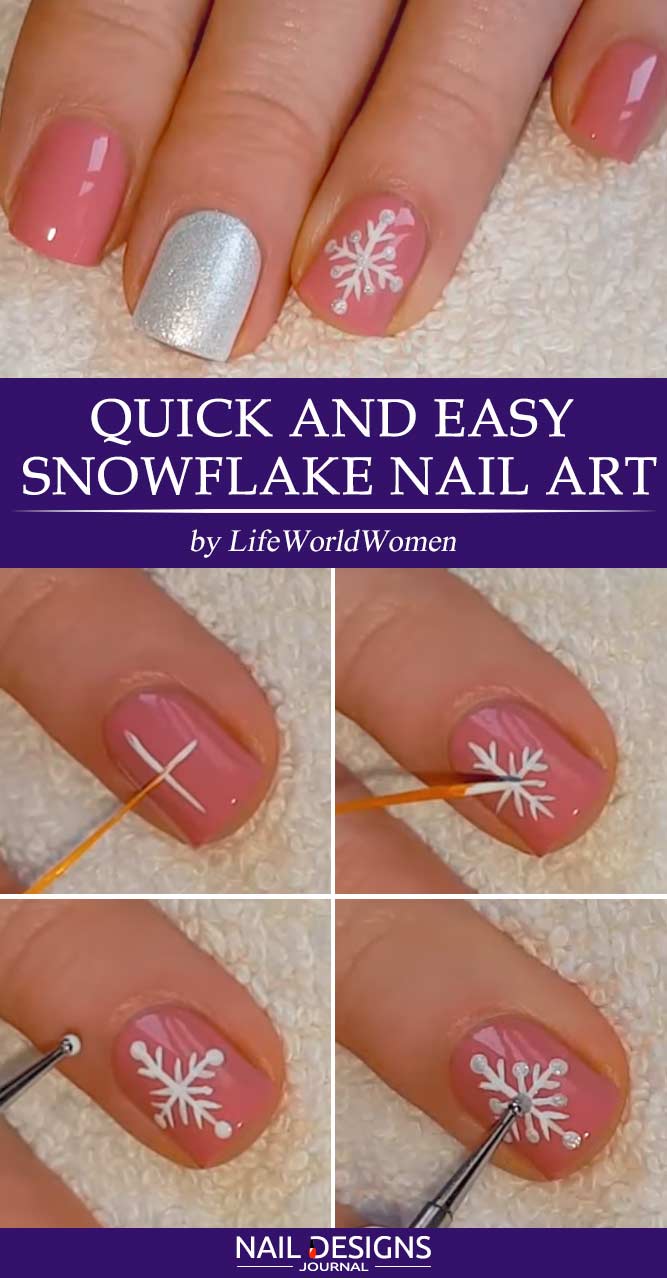
- Apply a base coat.
- Apply a white base coat to your middle fingernail.
- Apply pink base to all the other fingernails.
- Apply glittery base over the white one.
- Use a tiny brush and white nail polish to create a cross shape on your ring fingernail.
- Add two smaller lines to form the X.
- Add two angled e to your cross-shaped lines.
- Add small dots to each side of the ‘cross’ and the X.
- Apply white glittery dots over plain white ones.
- Apply top coat.
Drag Marble Snowflake Nails in Simple Steps
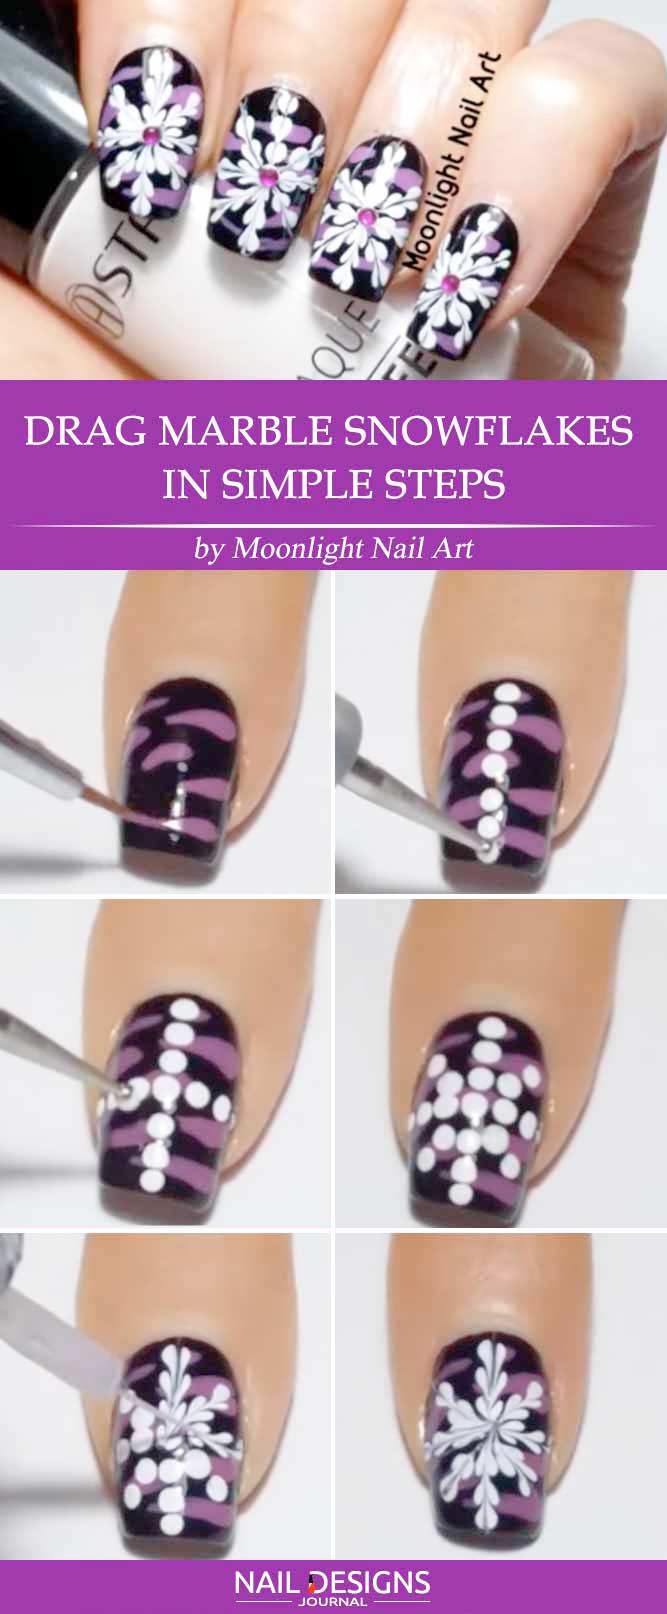
- Apply base coat.
- Apply black nail polish.
- Add tiny purple lines to the black base.
- Create a white dotted vertical line.
- Add a horizontal dotted line.
- Add dotted side lines so that you form a dotted snowflake.
- With a tiny brush or a toothpick, connect all the lines, heading towards the center.
- Add a purple stud to the center.
- Apply top coat.
Totally Doable Hand Painted Snowflakes On Your Nails
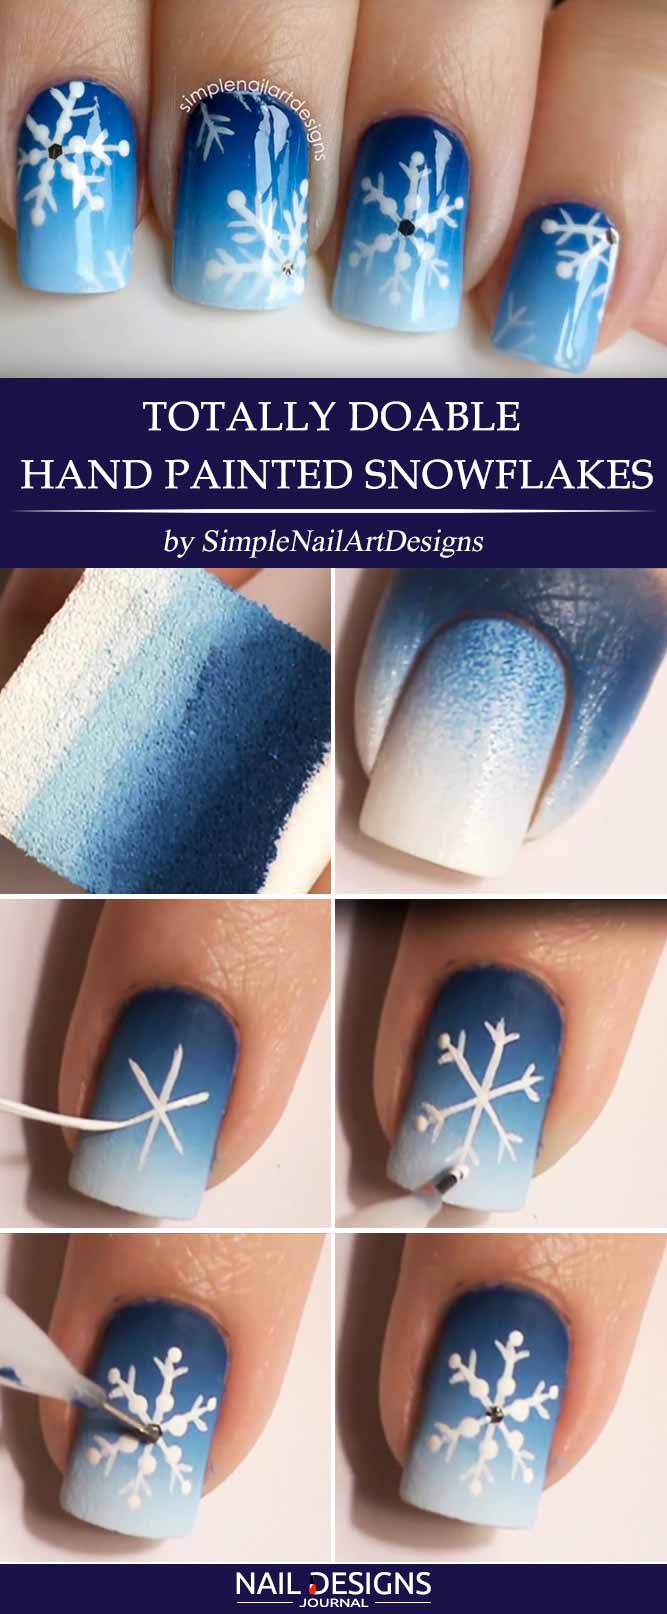
- Apply base coat.
- Apply while base coat.
- Create the gradient with three shade of blue and a sponge.
- With the help of tiny brush and white nail polish, create a snowflake.
- With the help of a dotting tool and white nail polish, add a tiny dot to the end of every line.
- Add larger dots to the middle of your snowflake.
- Add a piece of silver glitter to the center.
- Apply top coat.
Dotticure Technique Explained for Snowflakes Nail Art
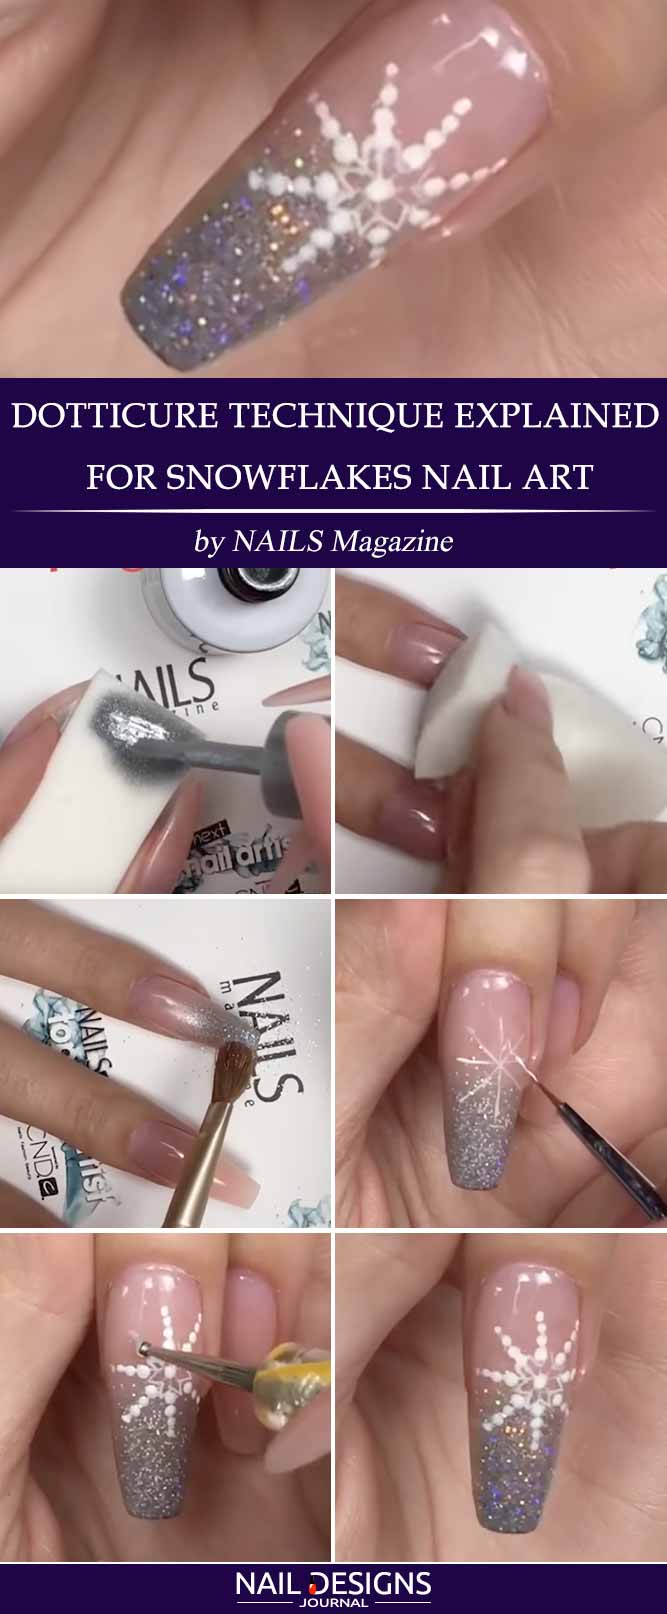
- Apply base coat.
- Apply silver nail polish to the top of your nail with the help of a sponge.
- Add some silver glitter on top to make it shinier.
- Apply top coat.
- Form a snowflake shape with the help of white nail polish.
- Draw start points connecting the lines.
- Add a dot to the center.
- Add dots to each line of your snowflake.
- Apply top coat.

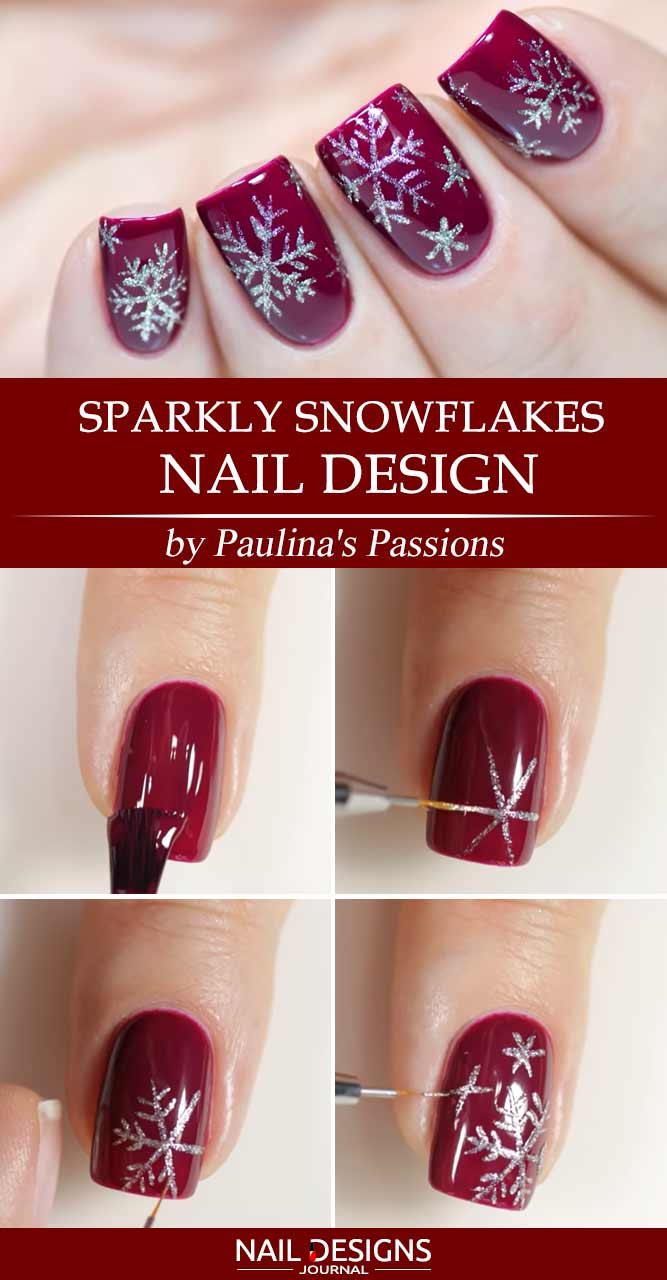
Stamping Technique to Get Snowflake Nails
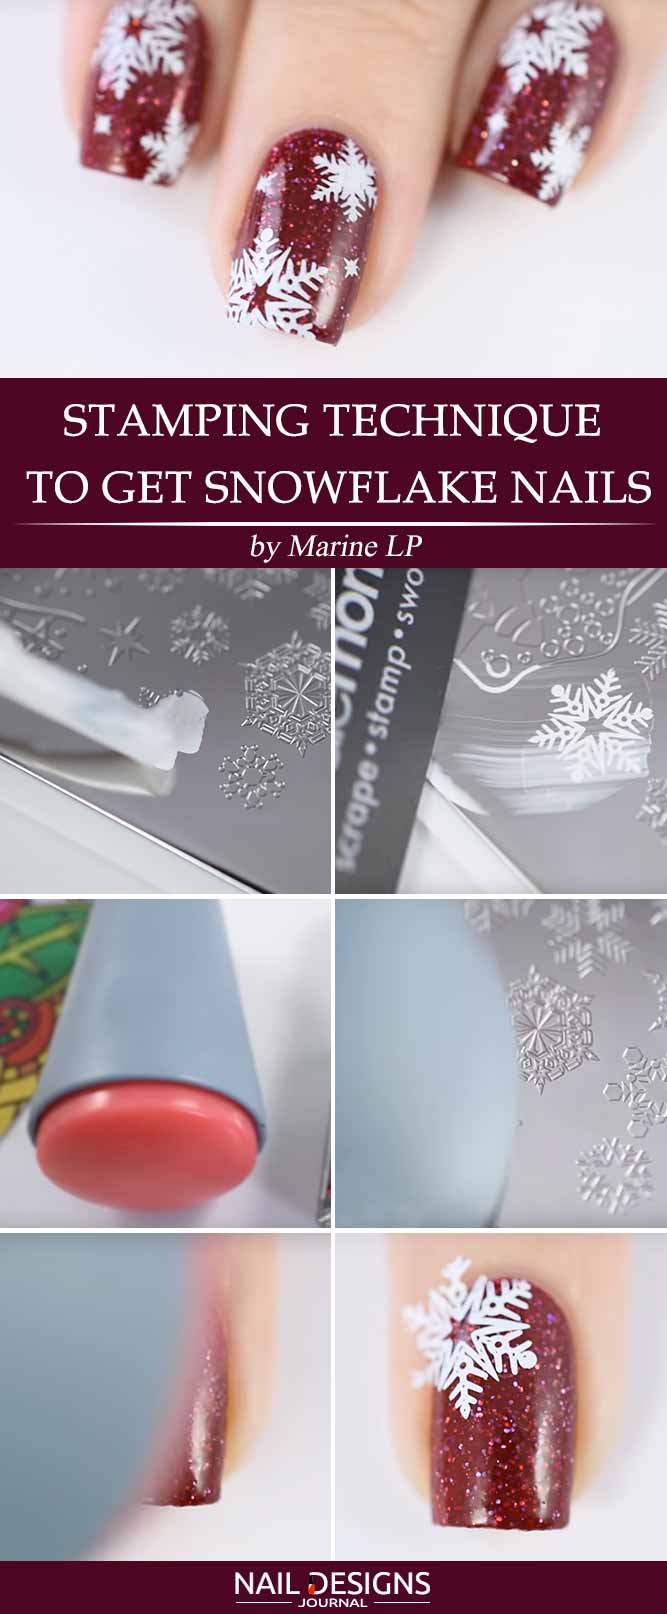
- Apply base coat
- Cover your nails with sparkly burgundy base
- Choose a snowflake stamping pattern.
- Cover it with white nail polish.
- Take away all the unnecessary nail polish.
- Stamp the pattern over the base.
- Clean up.
- Apply top coat.
Super Easy Hand Painted Snowflake Nails
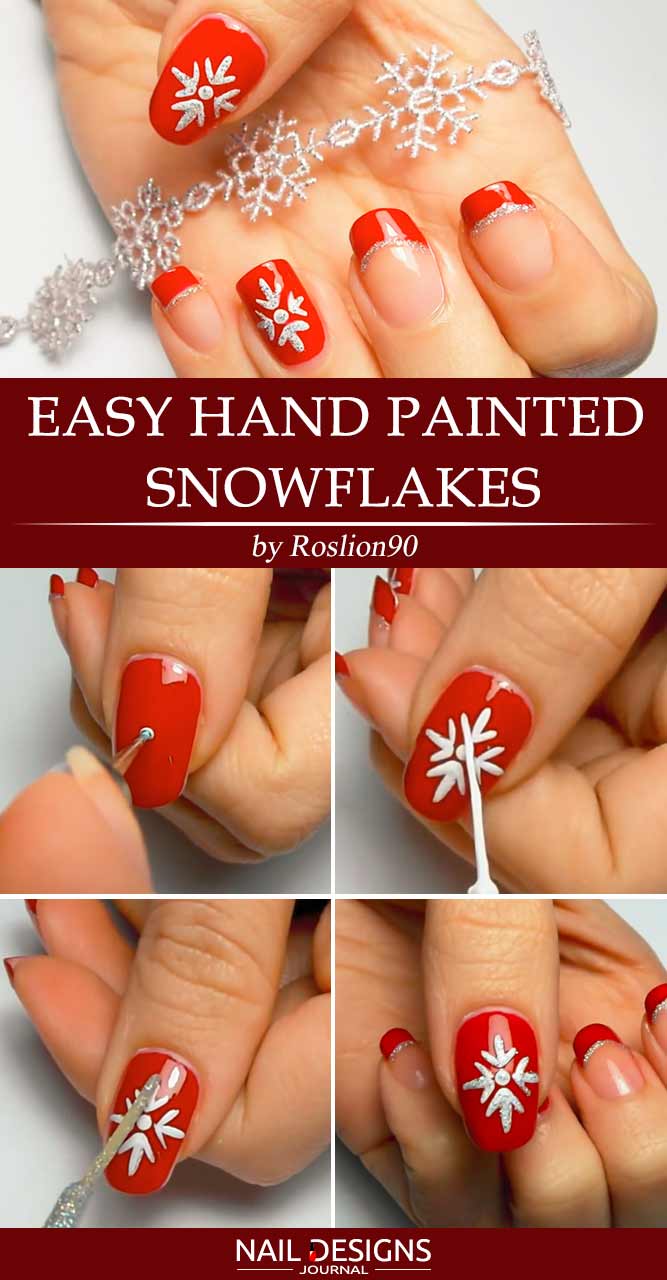
- Apply a base coat.
- Cover your thumb with red nail polish.
- Add a white dot to the center of your thumb and create a snowflake lines, starting from the center, but without touching it.
- Add a silver sparkly outline to your snowflake.
- Repeat the same design over your ring finger.
- Add red French tip to the rest of your nails.
- Underline the red tip with silver sparkly nail polish.
- Apply top coat.
Sparkly Glitter Snowflake Nails Design

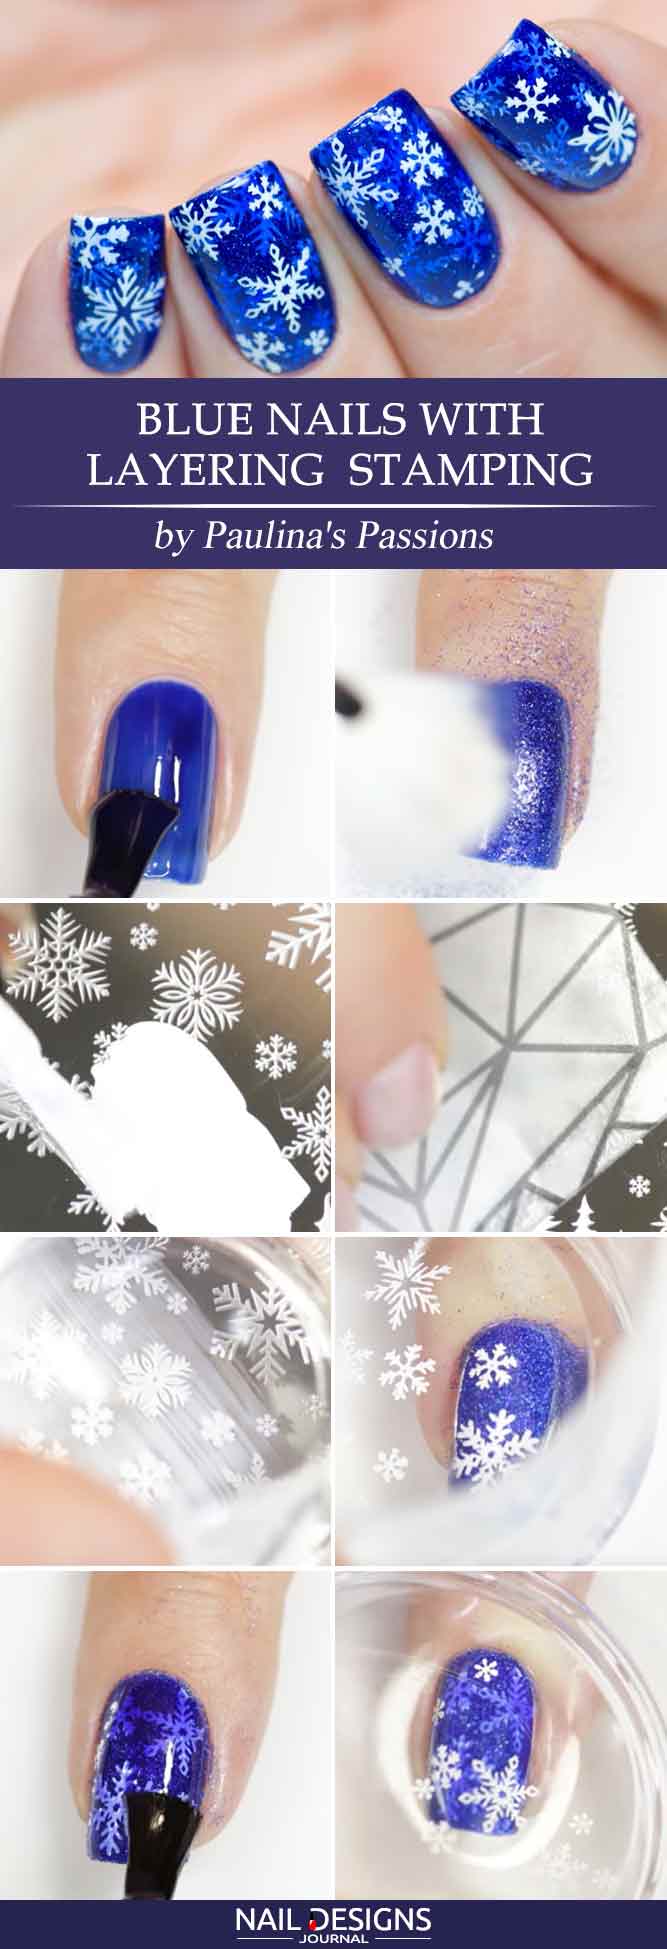
Blue Snowflake Nails With Layering Stamping
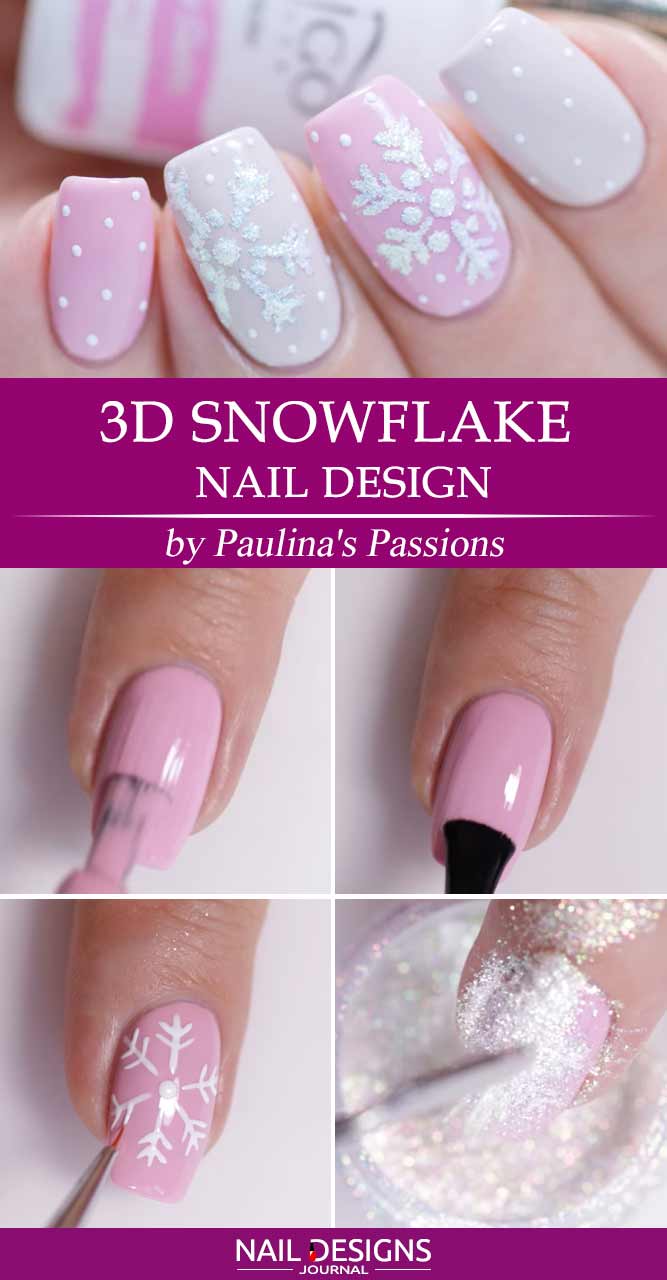
3D Snowflake Nails Design
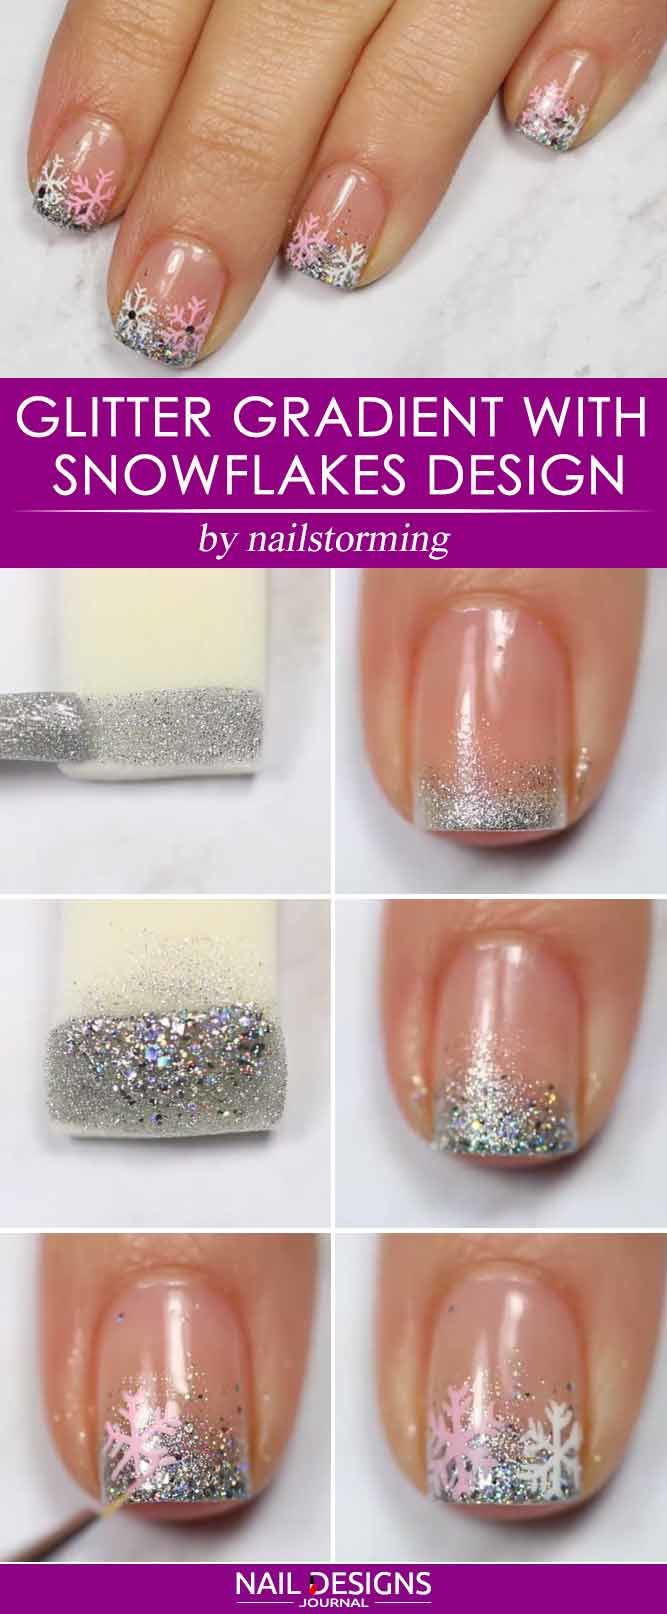
Glitter Gradient With Snowflake Nails Design
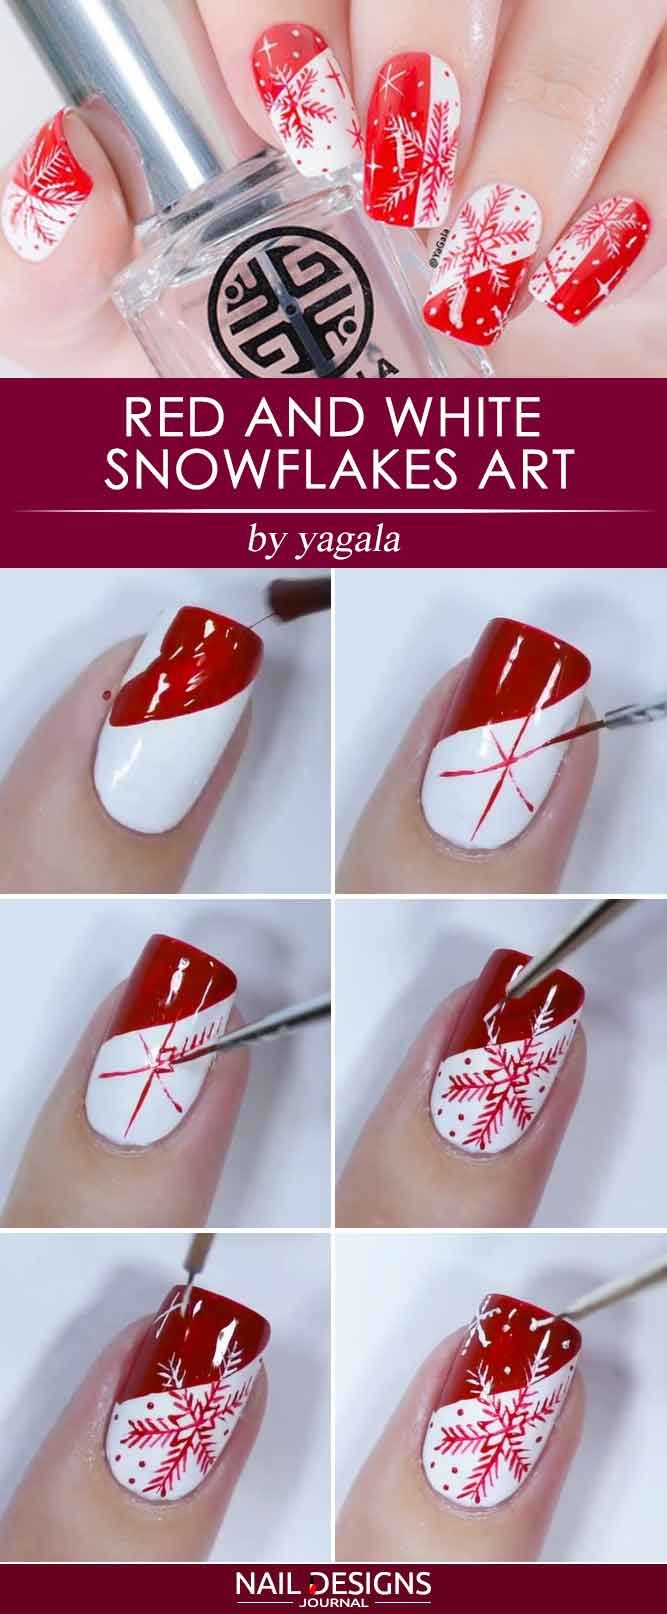
Red And White Snowflake Nails Art
We hope you enjoy these tutorials on snowflake nails and will succeed in their replication with the least of time and effort involved. Do not forget to visit us for some more fresh ideas and pieces of trendy advice!
Was this article helpful?