
Even if you are not planning to celebrate All Saints’ Day, I suggest you read this article. Manicure for Halloween comes in every taste and color, which means you will surely find easy Halloween nails looks that you will be able bring to life at any other time of the year! As usual, I’ve gathered here the trendiest nail tutorials to make your life easier!
Quick Navigation
- Bloody Chrome Nails Tutorial
- Oogie Boogie Nails Tutorial
- Lady Gaga Meat Dress Nails Tutorial
- Sandworm Ombre Nails Tutorial
- 3D Eyeball Nails Tutorial
- Jack Skellington Halloween Nails Designs
- Spirited Away Easy Halloween Nails
- Lovely Gradient Easy Halloween Nails
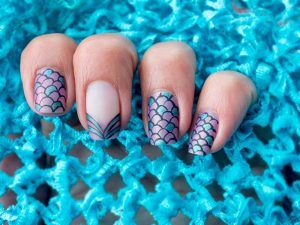
- Simple Skeleton Mermaids Nails Design
- Cute Ghosts Nails Tutorials
- Simple Bloody Mani For Halloween
Bloody & Chrome Nails Tutorial
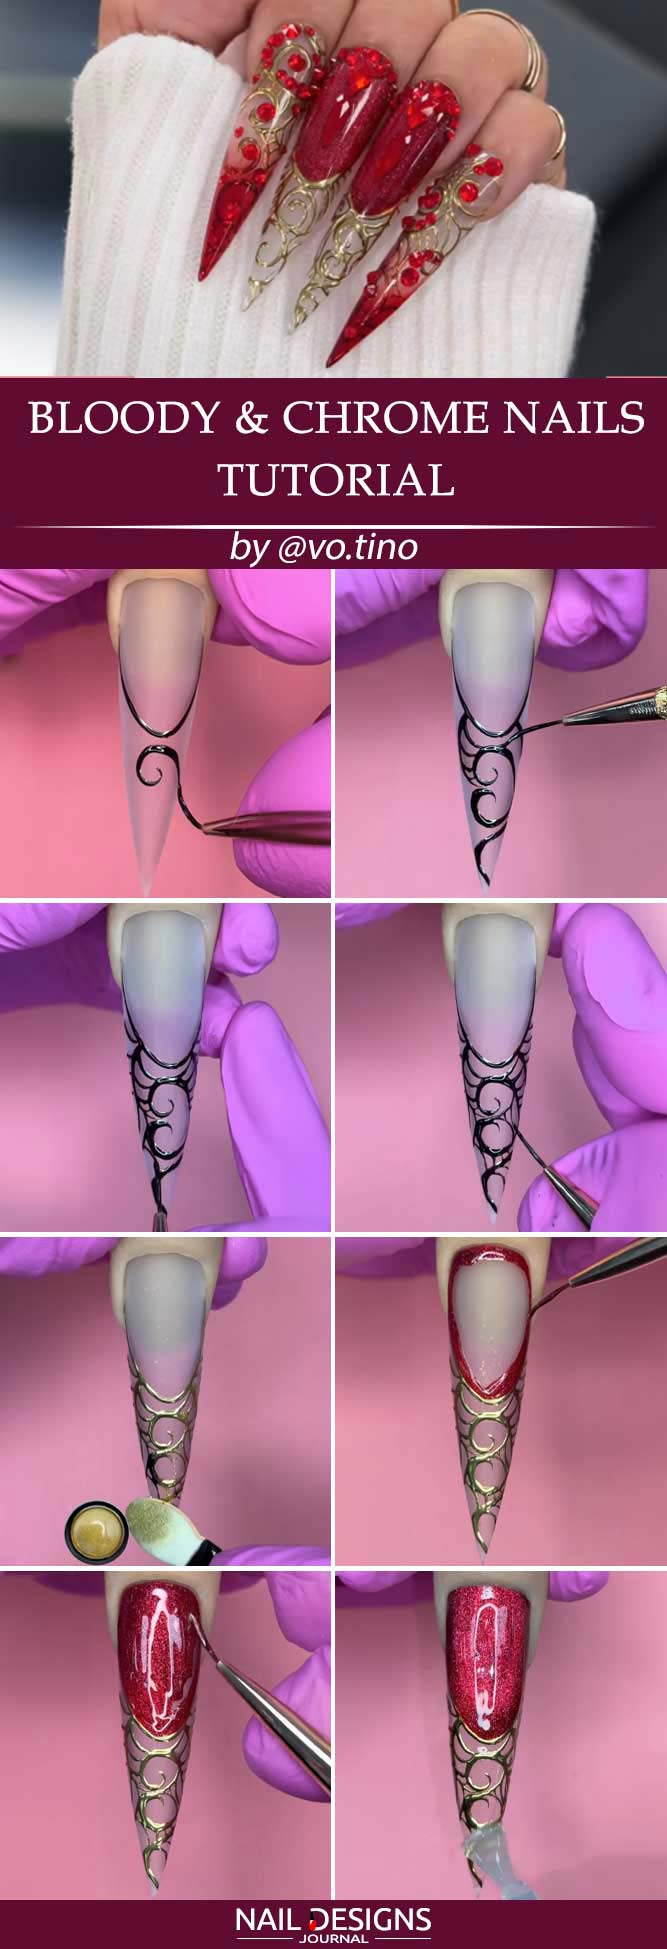
by @vo.tino
-
- Cover your nails with Non Sticky Teflon Matte Topcoat by Tino Vo (it will help you keep the background clean).
- Draw thin lines with Drawing & Painting Black Art Gel using a 7mm painting brush.
- Style the lines in a spiderweb model.
- Fill in the nail back with Ruby Red Magnetic Cateye Gel.
- Apply a generous layer of clear top coat, like Clear Texture Gel.
- The Dreamtime Crystal DC 2078 Hotfix Rhinestones Crystal Dark Red by Dreamtime Creations will perfectly complement this look.
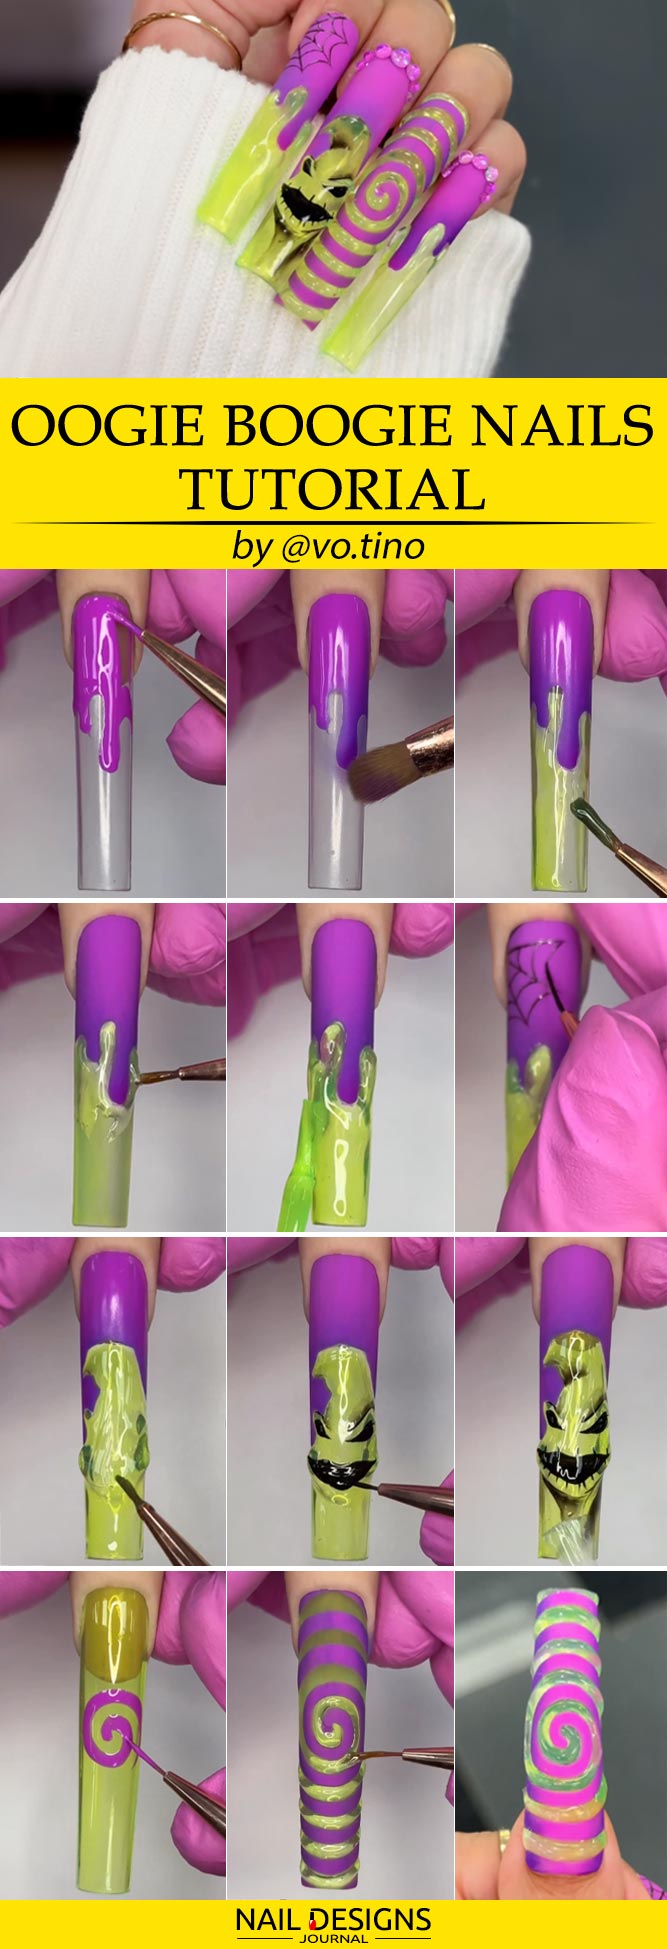
Oogie Boogie Nails Tutorial
by @vo.tino
- Paint the nail bed with Magenta Gel Kolor.
- Apply Neon Super Pigment on it.
- Paint the rest with Stained Glass Gel #02.
- Grow the nail tip with 3D Gelly Emboss Gel.
- Draw a thin spiderweb at the nail base with Drawing & Painting Black Art Gel using a 7mm painting brush.
- Grow another nail tip with 3D Gelly Emboss Gel.
- Give it the Oogie Boogie face shape.
- Draw facial features (spooky eyes, brows and toothy mouth) with the same Drawing & Painting Black Art Gel using a 7mm painting brush.
- Cover the figure with the Clear Texture Gel.
- Feel free to add more details to the face.
- Make a spiral pattern on your other nail using Magenta Gel Kolor.
- Plug the background with Shine It Gel Top Coat, so that the pigment sticks to the green base.
- Cover the nail with Clear Texture Gel.
- Feel free to add a few clear rhinestones at the nail base.
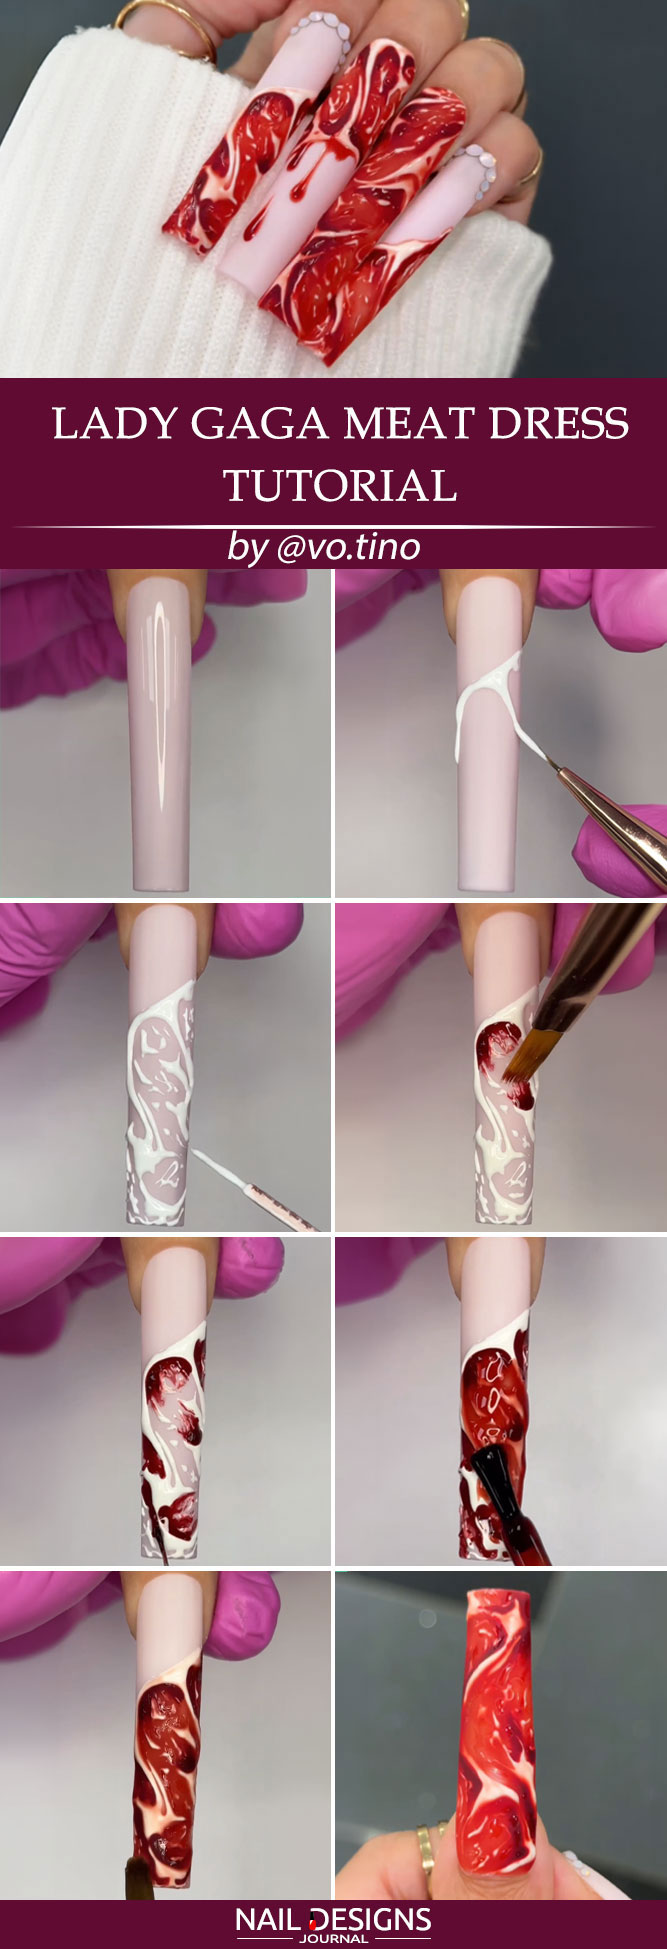
Lady Gaga Meat Dress Nails Tutorial
by @vo.tino
- Start with applying Baby Cream Nude Gel.
- Make your nail matte with Matte It Soak-Off UV/LED Gel.
- Use White Texture Gel to create a “meaty” surface.
- Make it red with Stained Glass Gel #14. It will give your nails a flashy look.
- Cover the “meaty” surface with Blood Sheer Gel.
- Fix and matte it one more time with Shite It Soak-Off UV/LED Gel.
- Feel free to add some white rhinestones at the nail base.
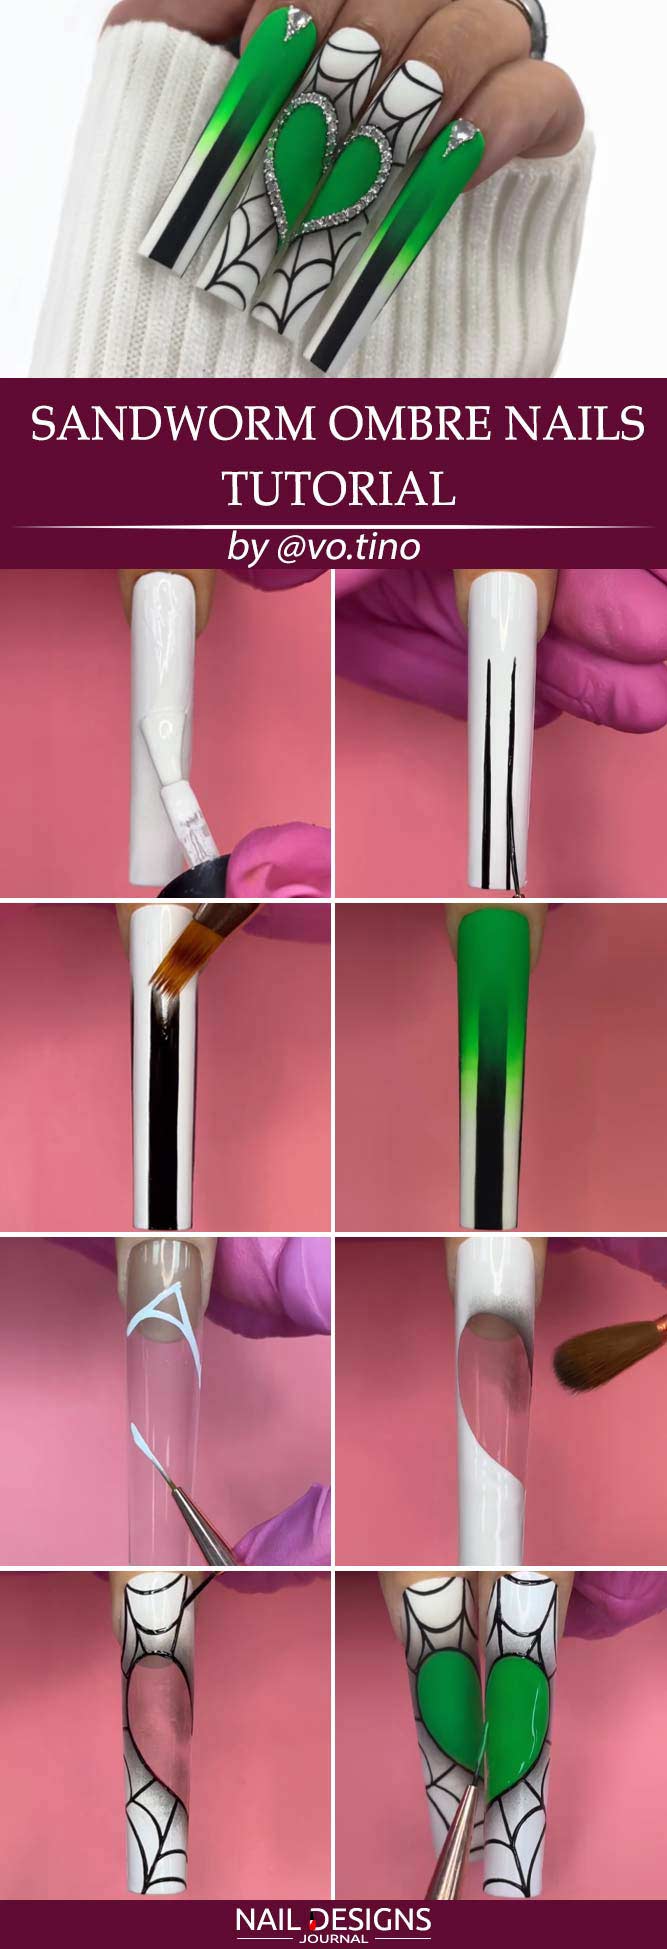
Sandworm Ombre Nails Tutorial
by @vo.tino
- Start with applying White Pigment Base.
- Make a thick strip in the middle of the nail without reaching the base, with One Stroke Liner Black Gel.
- Use Sheer Black Gel to fade the strip base out.
- Make an ombre effect with Green Gel Kolor.
- Apply the same White Pigment Base, creating a half-heart-shaped negative space.
- Apply Black Pressed Pigment along the edges. Blend it well.
- Use the same One Stroke Liner Black Gel to draw a spiderweb around.
- Fill in the negative space with Green Gel Kolor.
- Cover it Matte It or Shine It Topcoat, depending on whether you prefer a matte or glossy finish.
- Replicate this pattern but with the other half-heart-shaped space on your next nail.
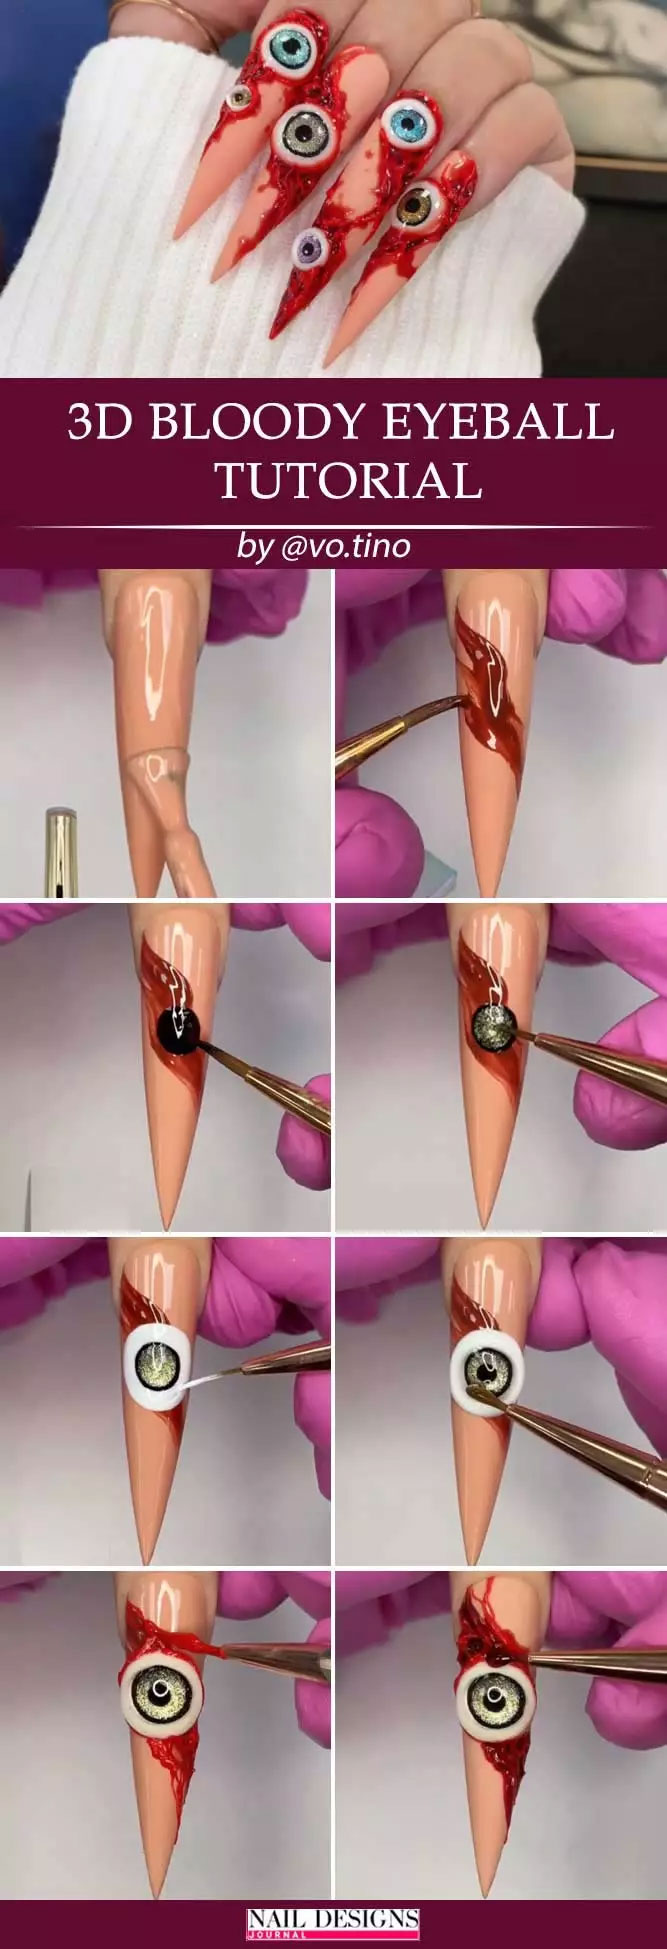
3D Eyeball Nails Tutorial
by @vo.tino
-
- Start with applying the Tan Nude Top Gel.
- Draw a bloody stain in the middle of the nail with the Red Texture Gel.
- Draw a circle in the middle of the stain, using One Stroke Liner Black Gel.
- Fill in the circle with Magnetic Cateye Gel, leaving its border black.
- Grow the eyeball with the White 3D Gelly Gel.
- Draw the eye pupil with the One Stroke Liner Black Gel.
- Cover the eyeball with the Clear Texture Gel.
- Make it veiny and flashy with Red Texture Gel.
- Apply Stained Glass Gel #14 and Blood Sheer Gel on top.
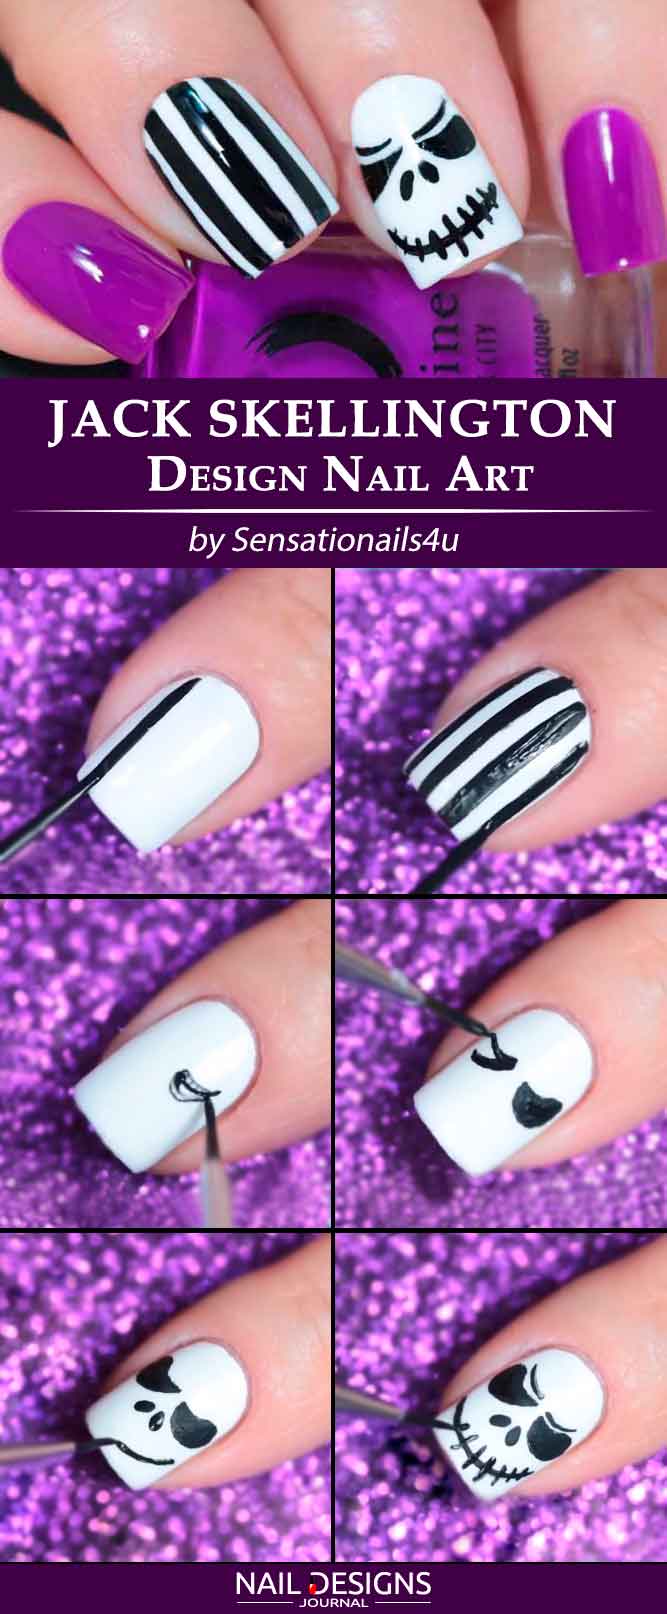
Jack Skellington Halloween Nails Designs
- Apply a base coat.
- Apply a white base coat to the ring and middle finger.
- Apply a purple base coat to the rest of your fingers.
- Add thin vertical lines to the middle finger.
- With the help of a thin detailer brush draw the eyes of the skull.
- Add a nose and stitched mouth.
- Apply a top coat.
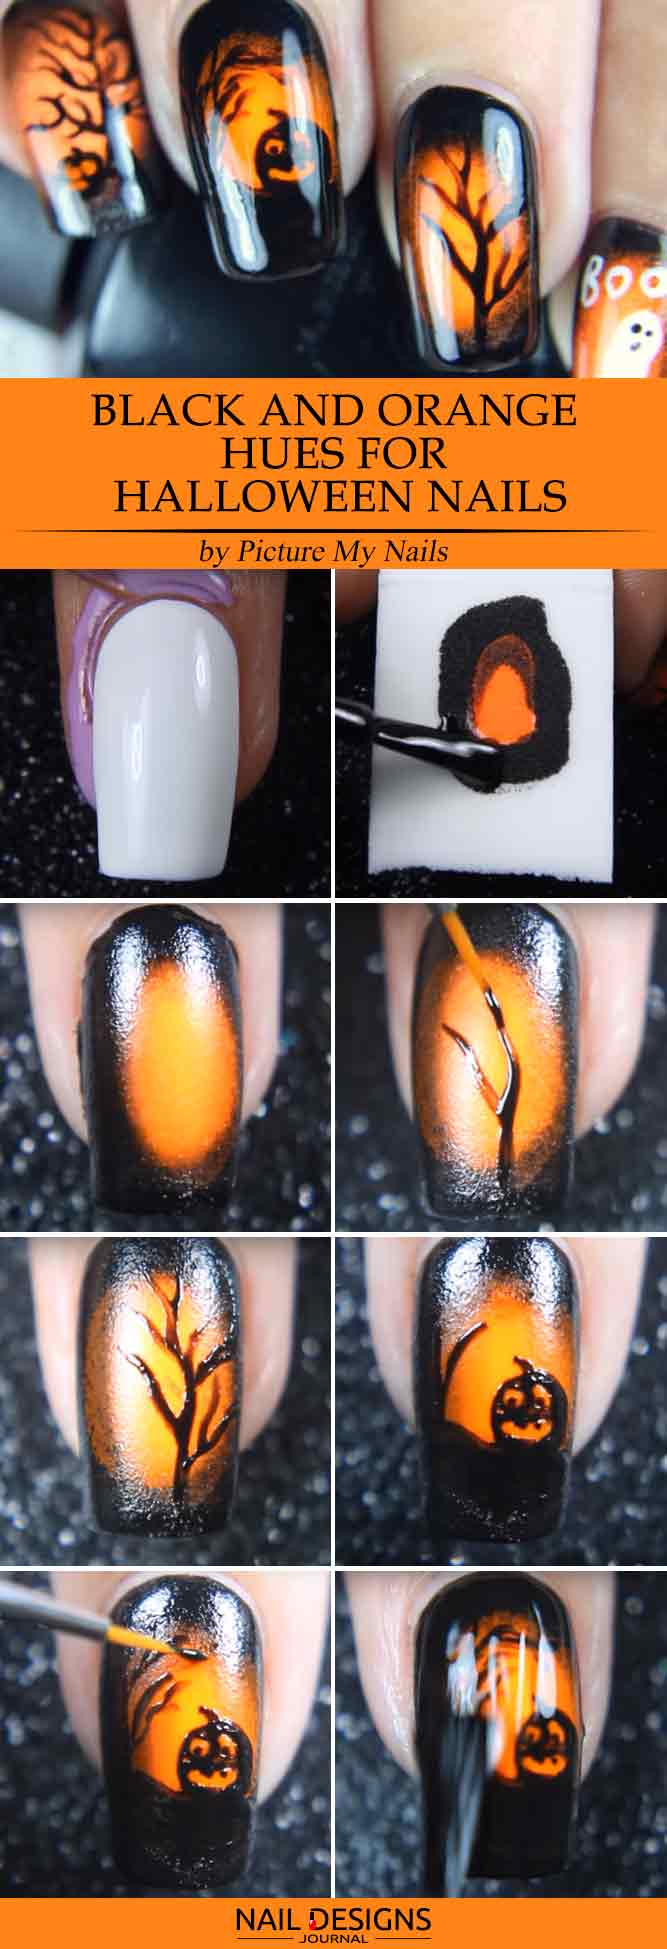
Black and Orange Hues for Halloween Nail Ideas
by Picture My Nails via Youtube
- Apply a base coat.
- Apply a white base coat.
- Apply liquid latex to secure the cuticles.
- Add orange and black nail polish to the sponge, creating a circle.
- Press the sponge onto the nail.
- Using a detailer brush and black nail polish draw a tree in the middle of the orange circle.
- Repeat the procedure with other nails and add pumpkins to the scene.
- Apply a top coat, and easy Halloween nails are ready!
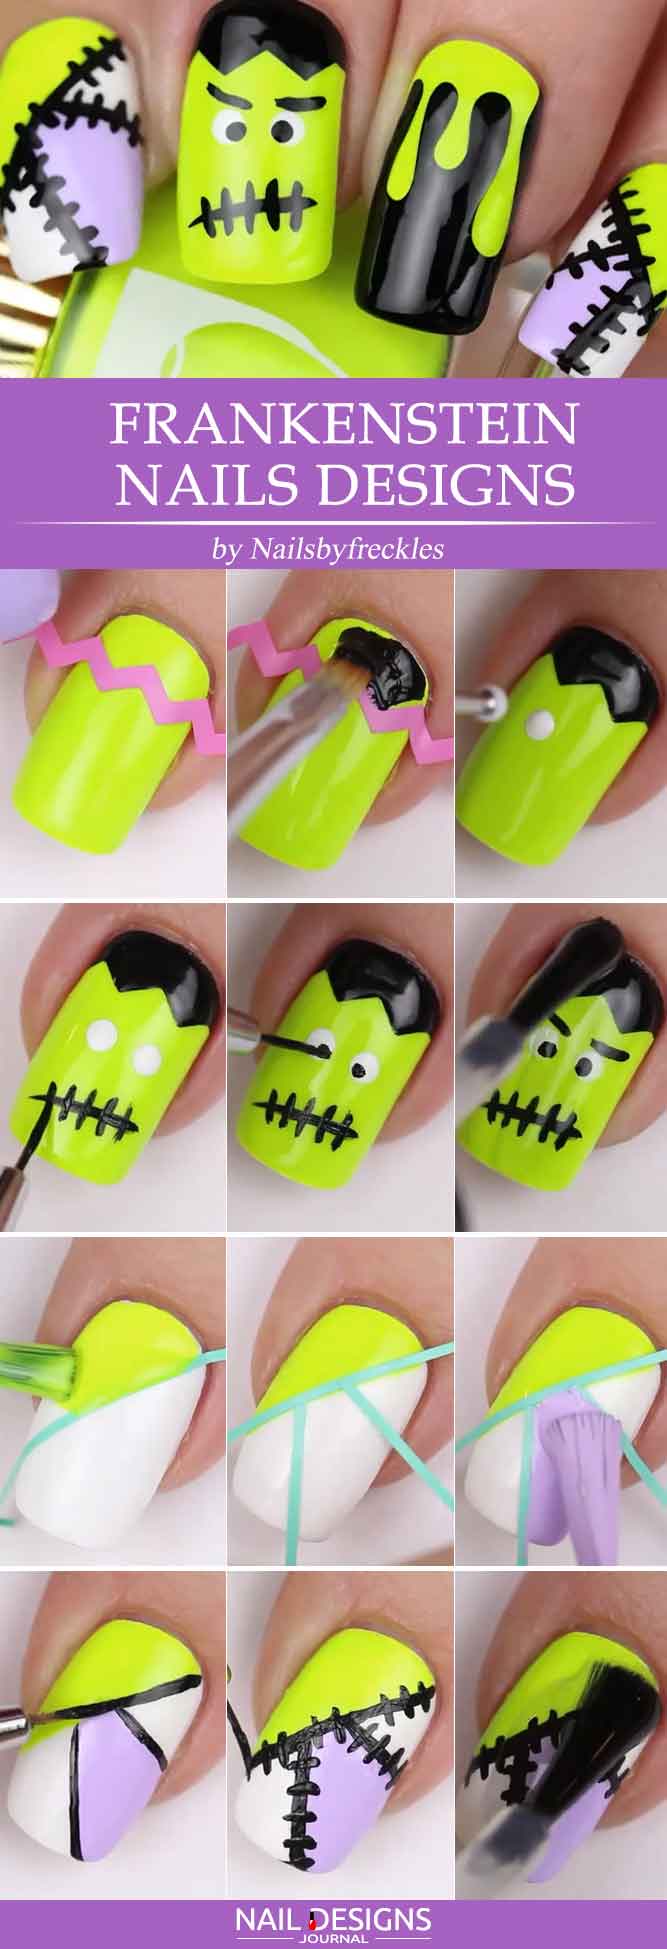
Frankenstein Halloween Manicure
- Apply a base coat.
- Apply a bright yellow base coat.
- Place a chevron sticker closer to the bottom of your nail and paint the bottom part black.
- Remove the sticker.
- Add two white dots to create the eyes.
- Add two tiny black dots to create the pupils.
- Paint your nail white.
- Add striping tape, placing it in different directions.
- Paint the sections yellow and lilac.
- Add black outlined stitches to the design.
- Apply a top coat.
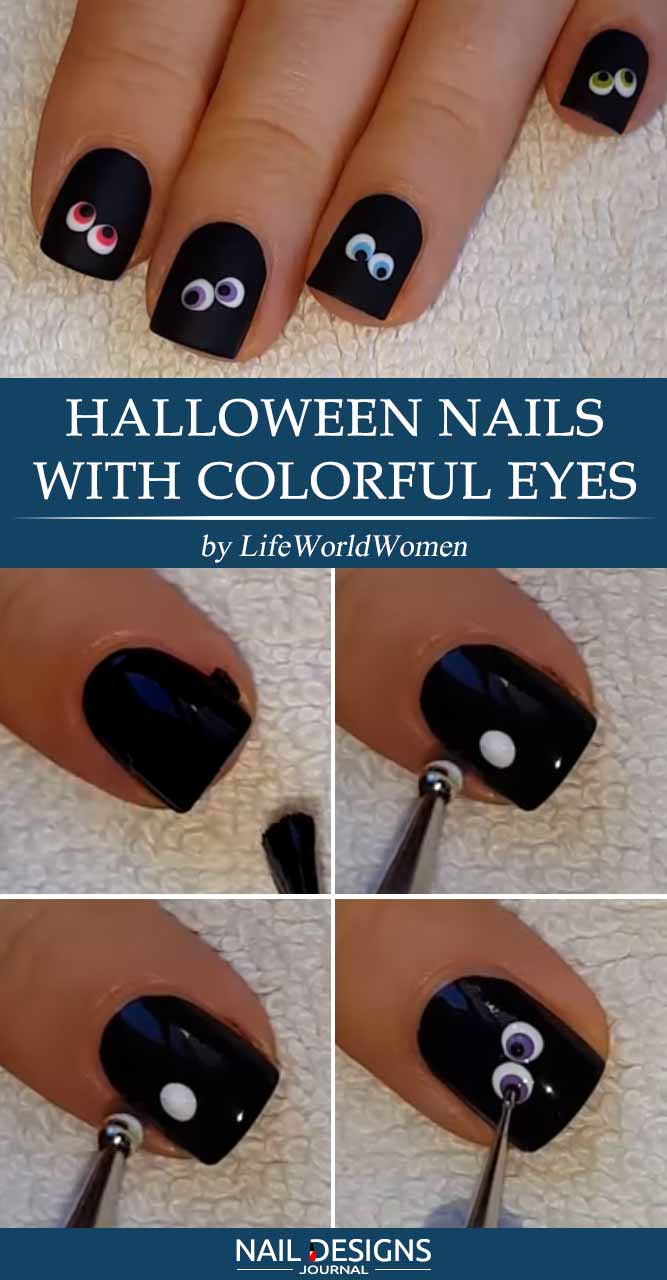
Easy Halloween Nails with Colorful Eyes
- Apply base coat.
- Paint your nails black.
- Add two white dots with a dotting tool for the eyes.
- Add different-colored dots to the white ones.
- Add small black dots to finish the eyes.
- Apply matte top coat.
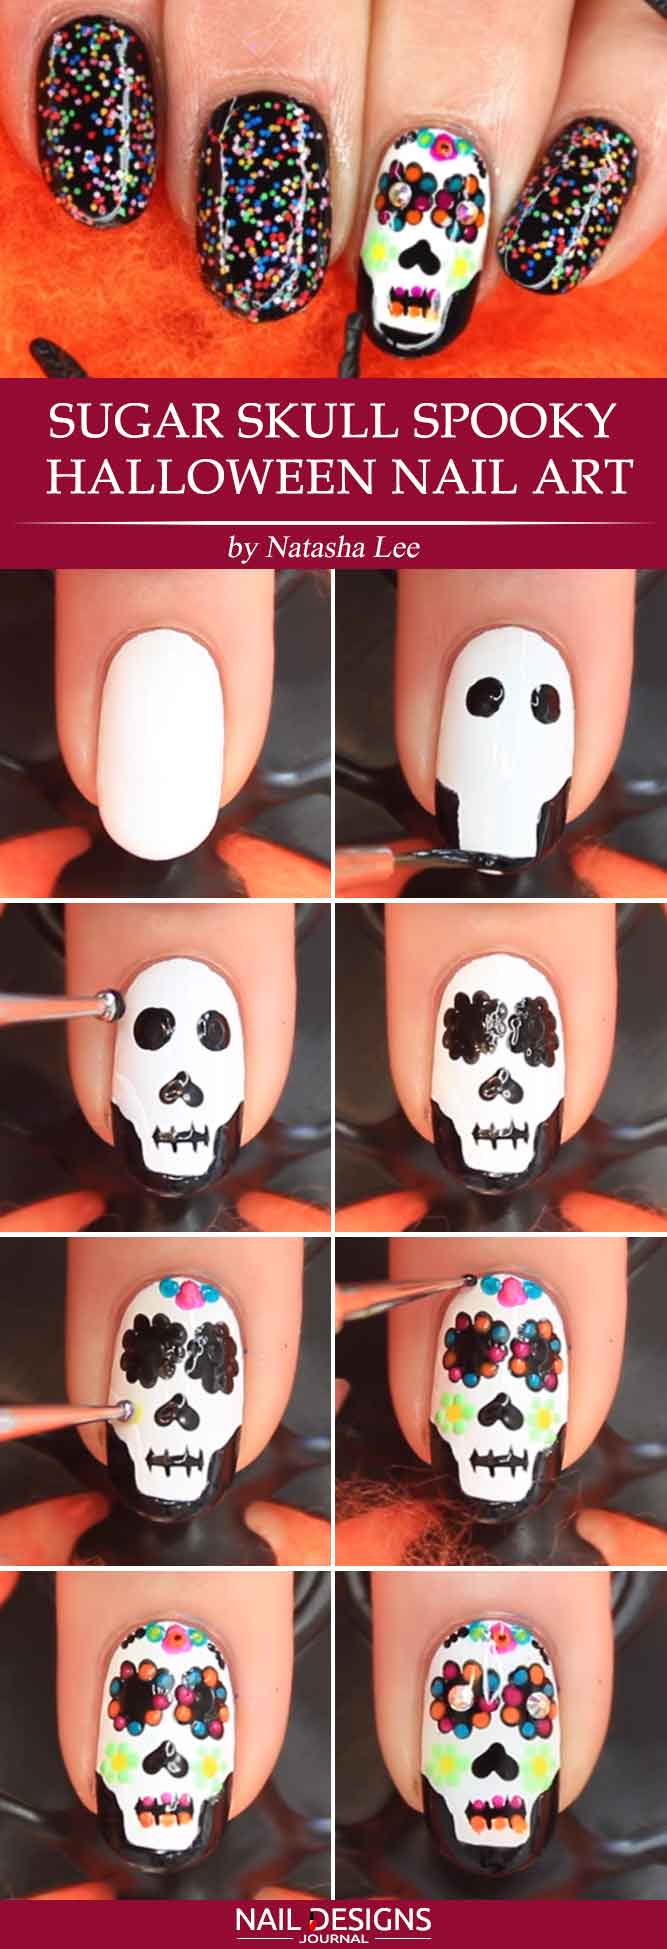
Sugar Skull Halloween Nail Art
- Apply base coat.
- Apply black nail polish to all of your fingers but one.
- Apply white nail polish as a base for the sugar skull.
- With the help of black nail polish and a tiny paint brush, draw all the necessary details the skull has: cheekbones, eyes, nose, teeth.
- With a medium dotting tool and black nail polish, apply dots all around the ‘eyes.’
- Using bright nail polishes, draw flowers on each ‘cheek.’
- Add some bright-colored dots to the black ones around eye sockets.
- Using your bright nail polishes, add extra details to the skull, if needed.
- Apply confetti nail polish over the black base on every nail.
- Apply top coat.
- Add crystals to the skull’s eyes.
Sweet Cat Design For Halloween Nails
- Apply a base coat.
- Using a detailer brush dipped into the black nail polish, draw the head and ears of the cat on the tips of every nail.
- Use a dotting tool and the white nail polish to draw the whites of the eyes.
- Take the detailer brush again and draw the pupils.
- Apply a top coat.
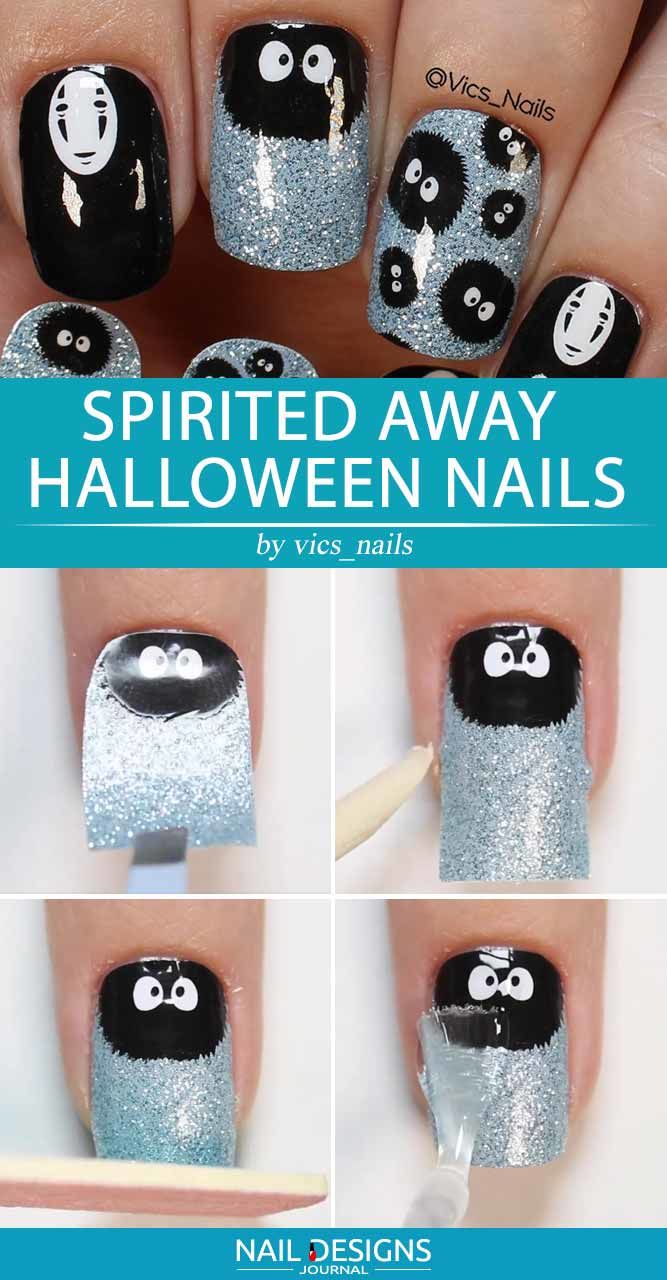
Spirited Away Easy Halloween Nails
by @vics_nails
- Apply base coat.
- Apply silver glitter nails polish.
- Stick some Halloween-spirited sticker to the nail plate base. The Halloween Nail Art Stamping Plates by Qdsuh have really great patterns for every taste and style.
- Apply top coat to finish these easy Halloween nails.
Lovely Gradient Easy Halloween Nails
- Apply base coat.
- Apply glitter polish in lavender and blue colors to a special soft sponge for gradient manicure. You will find some truly amazing shades in the Uberchicbeauty collection.
- Rub the sponge into the nail plate with blending movements.
- Apply some Halloween-spirited sticker to the nail plate.
- Apply gel top coat.
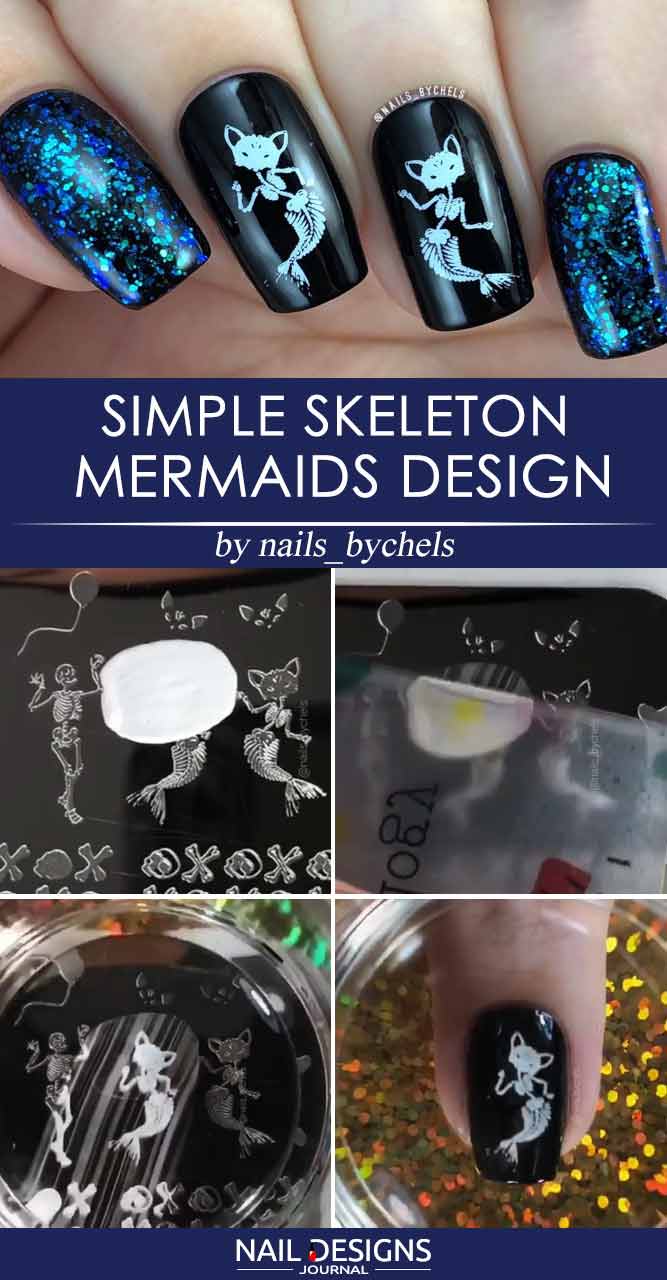
Simple Skeleton Mermaids Nails Design
- Apply base coat.
- Apply the #629 Black Out black polish by Sally Hansen.
- Apply green glitter by Sinful Colors on the index finger and little finger (the #220 Green Ocean will work great).
- Use CjSH-39 stamping plate by Clear Jelly Stamper to apply the Skeleton Mermaids on the middle and ring fingers.
- Apply gel top coat.
Cute Ghosts Nails Tutorials
by @vics_nails
- Apply White Base Coat.
- Apply the OPI yellow polish (the shades used here are: Summer Lovin’ Having a Blast, Sand in My Pants, Alpine Snow and Sun Sea).
- Blend it as shown in the picture.
- Treat the ghost pattern from the M056 plate by Hellomaniology with Straight Up Black stamping polish.
- Copy the pattern with stamper.
- Fill in the ghosts with white polish and the stars with the OPI yellow polish mentioned above.
- Use a 5mm detail brush (the one used here is by Mitty Nail Art (mittyburns)).
- Apply Sticky Base Coat by Hellomaniology to the nail to help the reverse stamping stick.
- Apply the stamper firmly to the nail plate.
- Cover it with Smudge Free Top Coat by Hellomaniology.
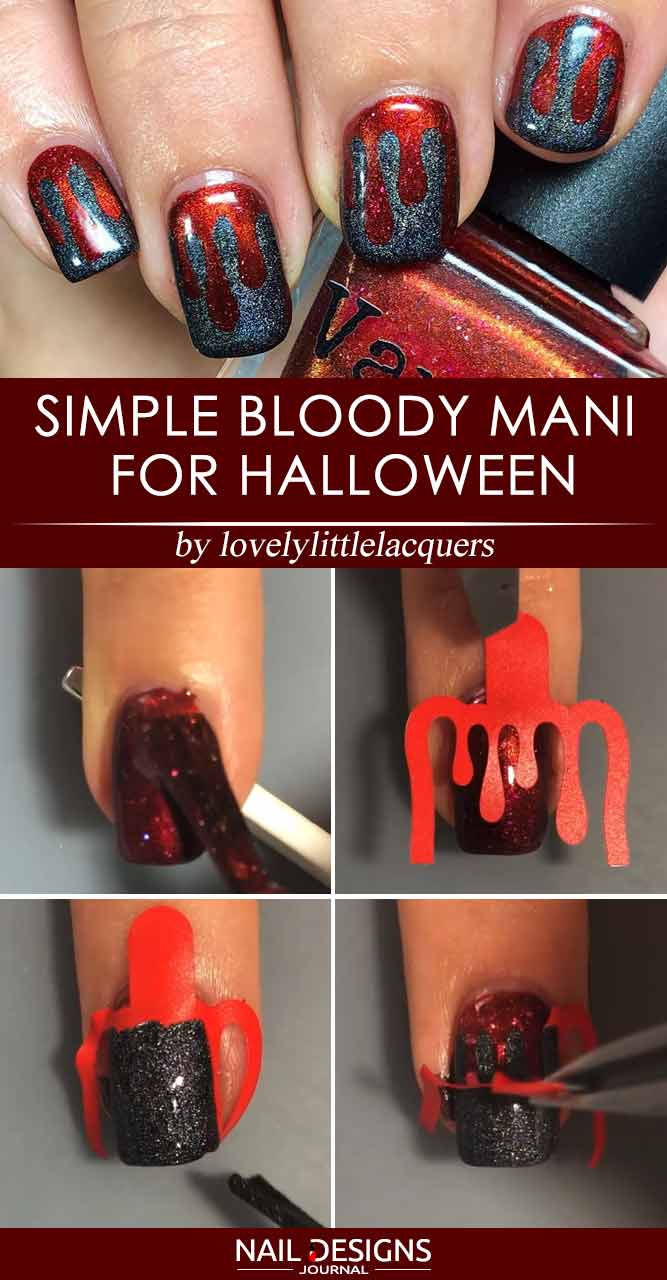
Simple Bloody Mani For Halloween
- Apply red glitter polish (the one used here is I’m a Cherry by Vapid Lacquer).
- Apply Dripping Stencils to the nail base so that the drops reach the middle of the nail.
- Apply black glitter polish towards the nail tip, grabbing the drops.
- Remove the stencils.
- Apply gel top coat.
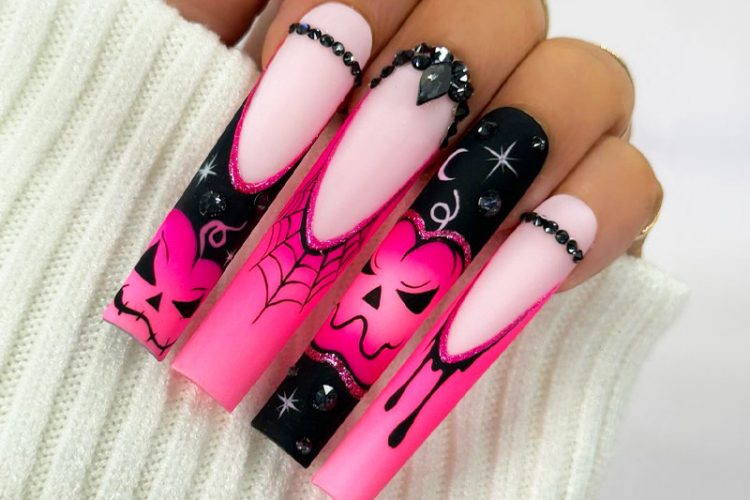
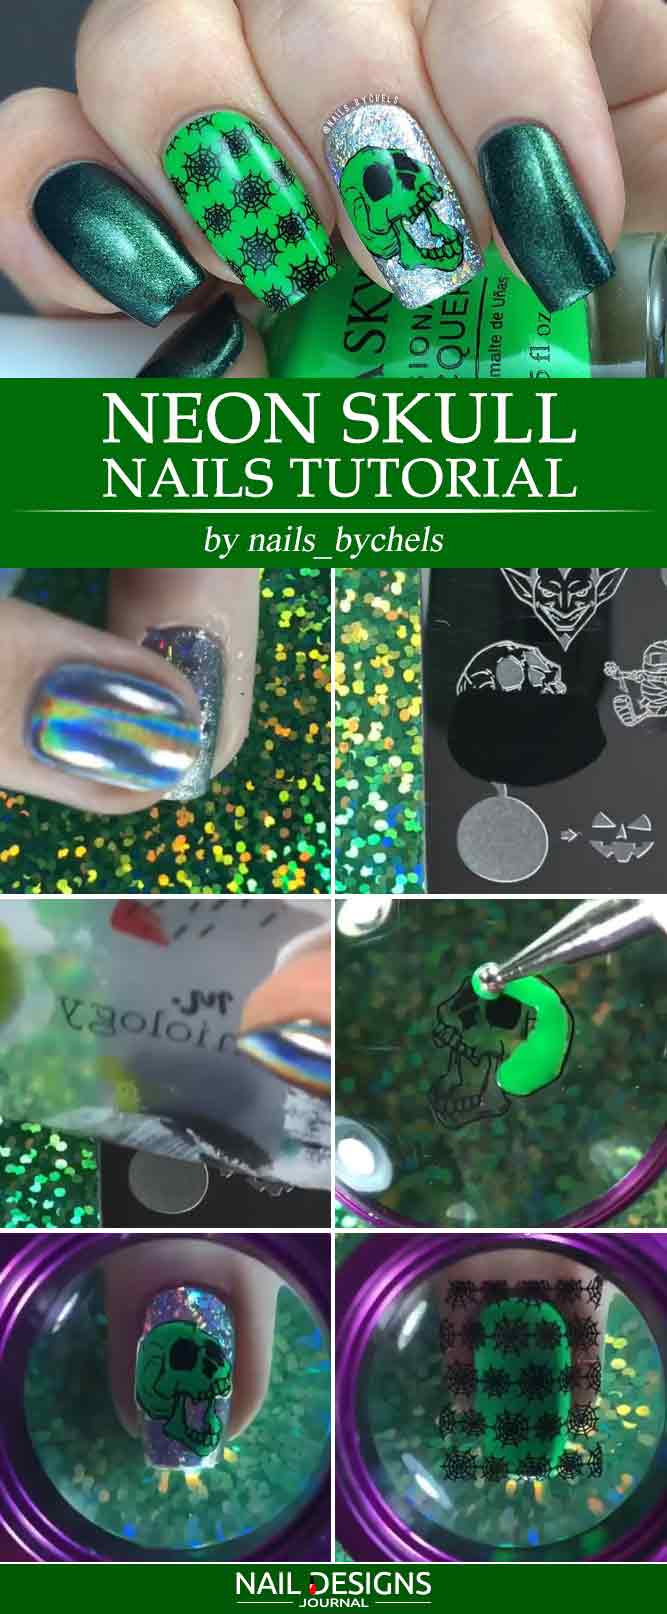
Neon Skull Nails Tutorial
- Apply base coat to your middle finger.
- Apply silver glitter polish.
- Use transfer nail stencils with skull for Halloween art. The Nail Decals Skulls by InstaReadyNailDecal will work great.
- Treat the skull pattern with black stamping polish.
- Copy the pattern with stamper.
- Treat the skull head on the stamper with light neon-green polish. Try the Neon Soak-off Gel polish by Madam Glam (Green Highlighter shade).
- Apply the stamper to your nail and hold it for a while to ensure the pattern transfers well.
- Cover your ring finger with the light neon-green polish mentioned above.
- Apply the stencil with black spider web pattern to the nail and let it stick well.
- Apply gel top coat.
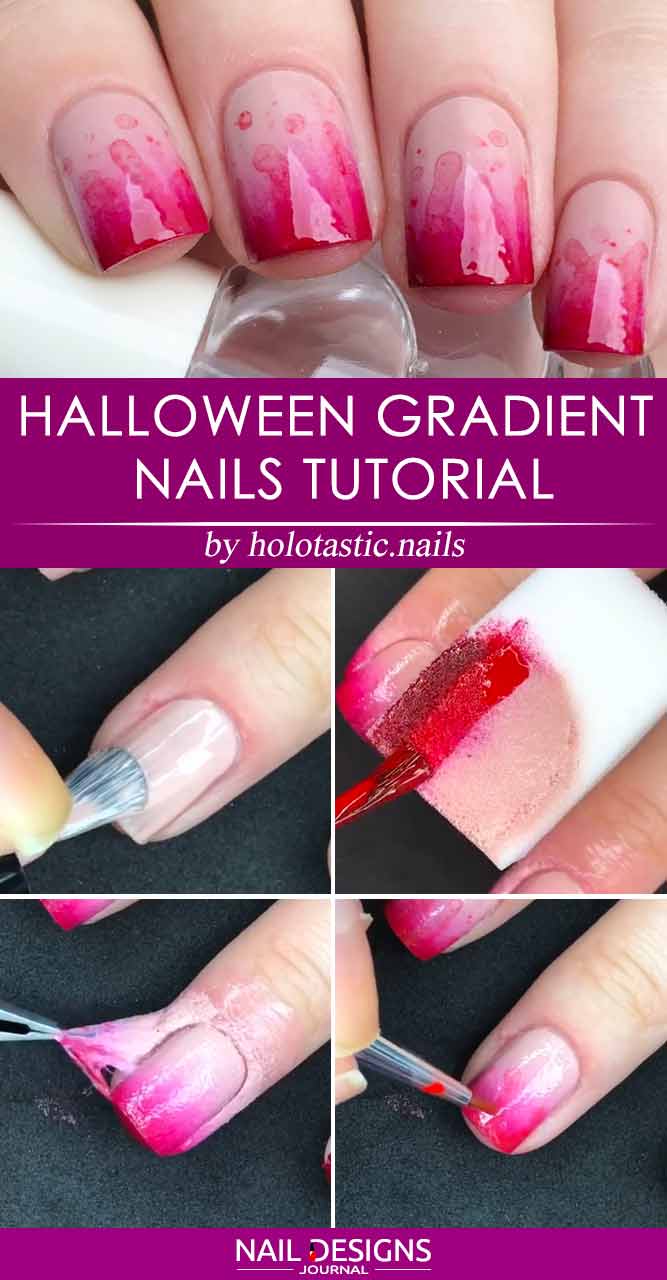
Halloween Gradient Nails Tutorial
- Apply milky-shaded base coat.
- Apply Liquid Latex Nail Skin Removal Tape on the skin around the nail. Try the Nail Anti-overflow Glue by Major Dijit.
- Apply red and coffee latte gels to an ombre manicure sponge.
- Rub the sponge thoroughly into the nail.
- Remove the latex tape carefully.
- Apply gel top coat.
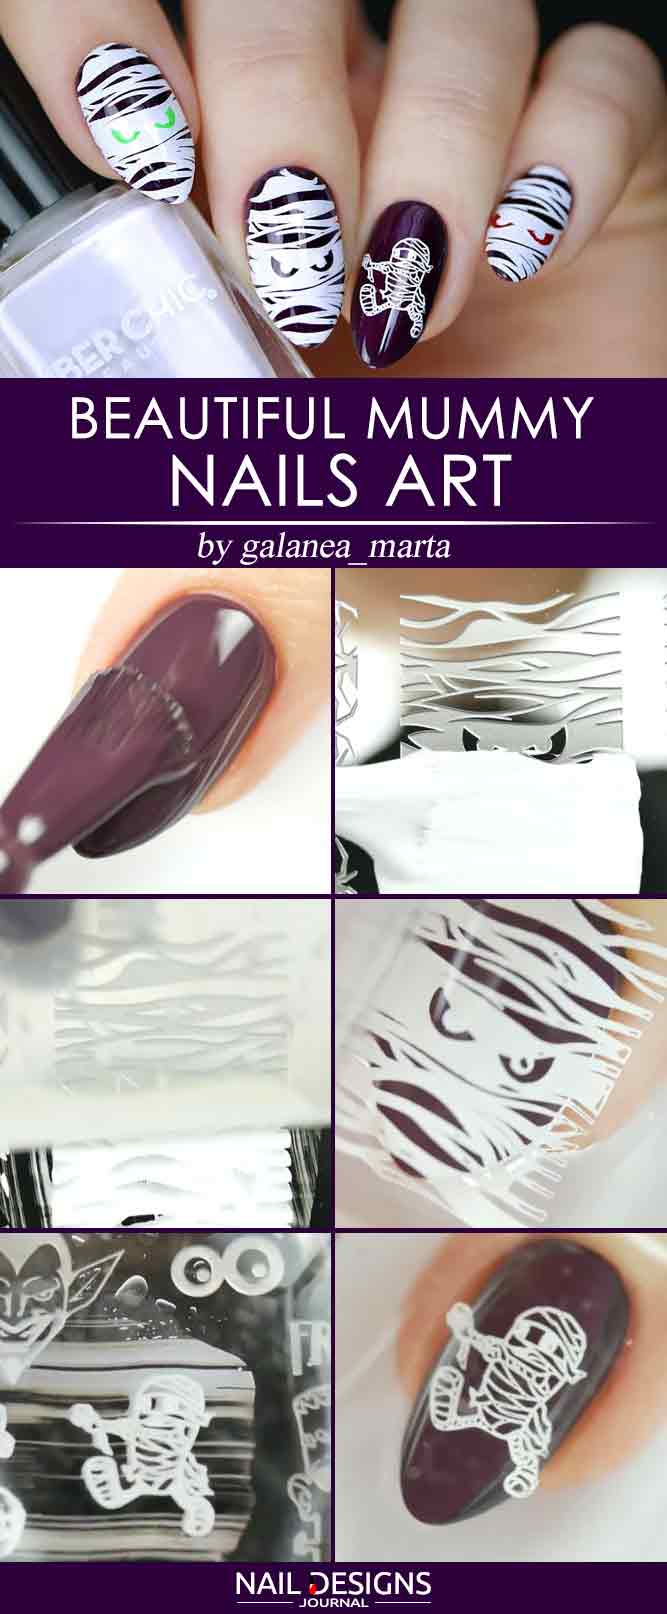
Beautiful Mummy Nails Art
- Cover your middle finger with plum polish.
- Use transfer nail stencils with mummy face for Halloween art. The Art Nail Stamp MouTeen185 Mixed Smiling Face Nail Stamping Plates have some really amazing patterns.
- Treat the mummy face pattern with white stamping polish.
- Copy the pattern with stamper.
- Apply the stamper to your nail and hold it to ensure the pattern transfers well.
- Cover your ring finger with plum polish.
- Choose another mummy pattern from the transfer nail stencils.
- Treat it with gel and apply to the nail using the same scheme.
- Cover your nails with gel top coat.
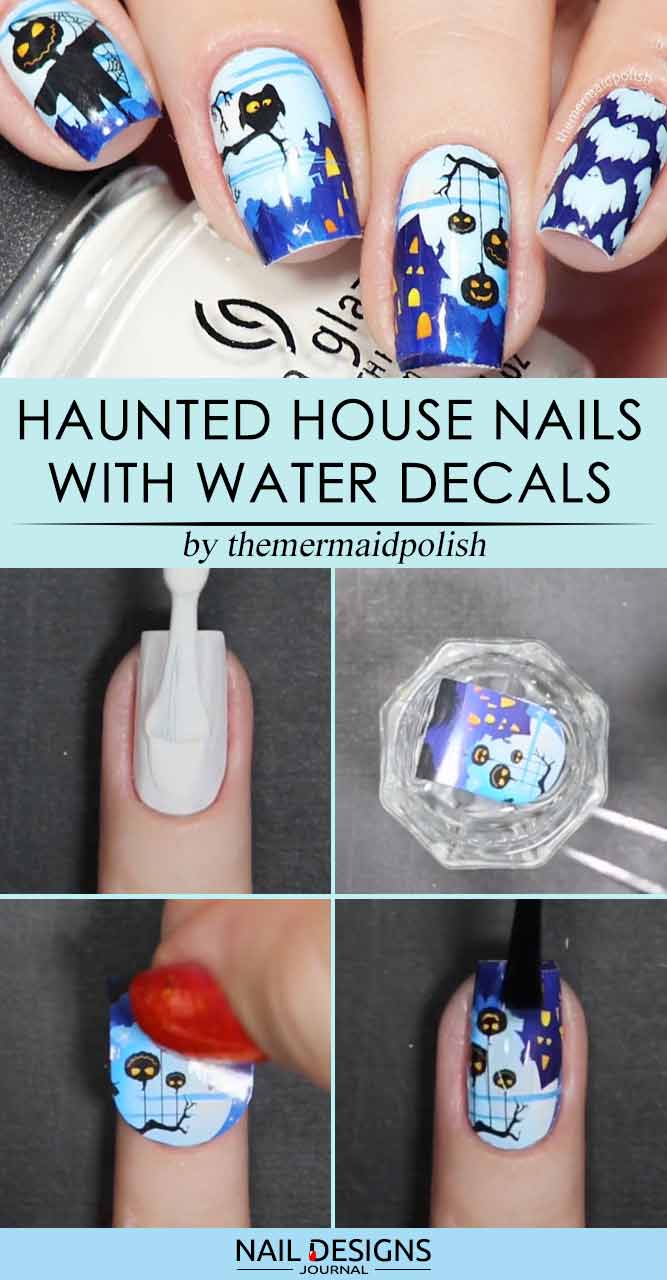
Haunted House Easy Halloween Nails With Water Decals
- Apply white base coat.
- Place the water decal with Haunted House pattern in slightly warm water and wait 20-30 seconds for the adhesive layer to activate.
- Move the decal onto the nail, skicking it from the nail base and upwards. Note that you have 5-7 seconds to correctly place the image on your nail.
- Cover your nail with gel top coat.
Grey Nails With Castle Accent
by @nailsteria
- Apply gray glitter to your nails (the one used here is London Pixiedust by ZOYA Nail Polish).
- Use castle pattern from the Beauty Big Bang 03 stamping plate.
- Treat it thoroughly with Konad black stamping polish.
- Copy the pattern with the Big Bling XL Stamper.
- Apply the stamper to your middle finger and hold it to ensure the pattern had transferred well.
- Use ghost pattern from the Beauty Big Bang 03 stamping plate.
- Treat it thoroughly with the same black stamping polish, copy and apply to your ring finger according to the same scheme.
- Cover your nails with gel top coat.
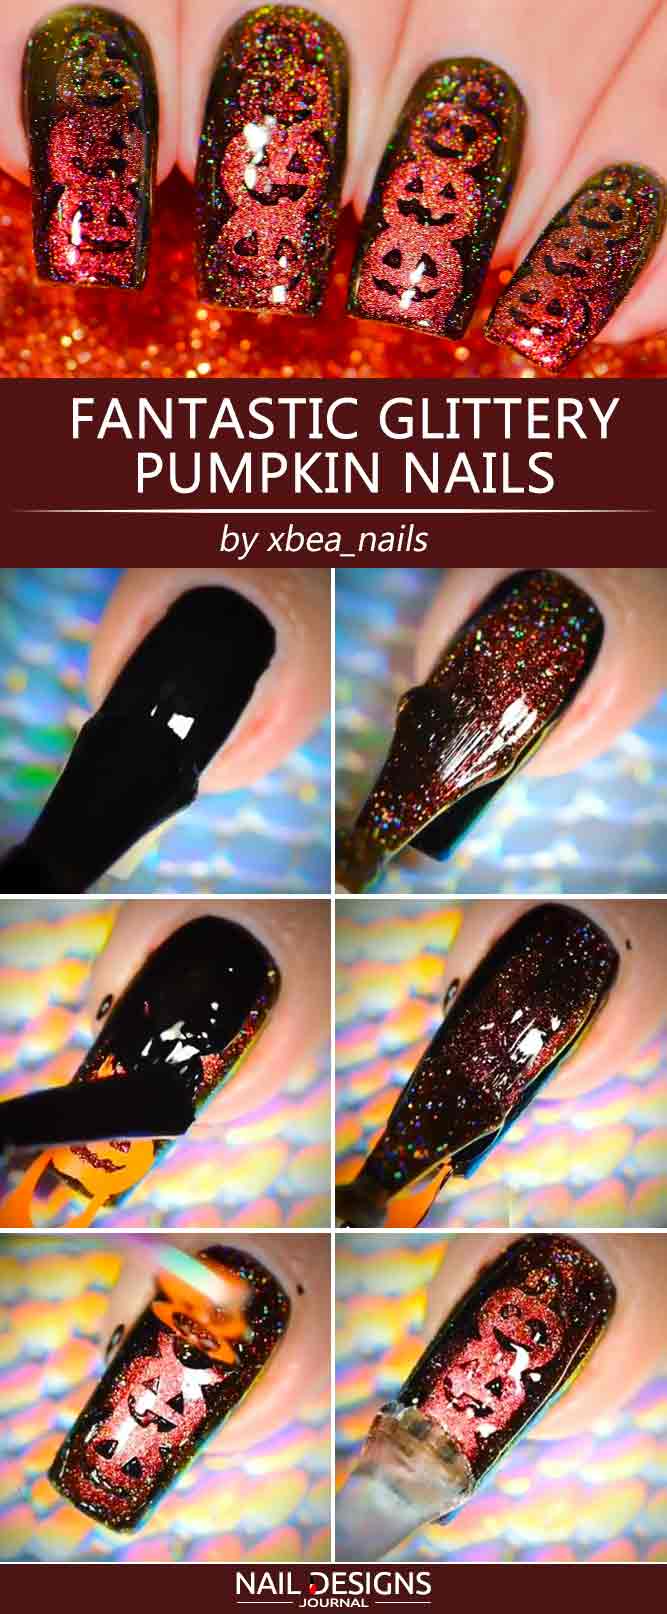
Fantastic Glitter Pumpkin Nails
by @xbea_nails
- Apply glossy black polish. The one used here is Black is Back by Essence Cosmetics.
- Cover it with a thick layer of reddish glitter polish. Try Holographic Chameleon Magnetic Nail Polish, Frantic Fire #43679 by Born Pretty.
- Press the stencil with pumpkins pattern tightly onto your nail. You will find some really amazing patterns in the Pumpkin Topiary Stencils by Whatsupnails.
- Cover the entire nail surface with black polish.
- Apply the reddish glitter polish on top again.
- Remove the stencil with pumpkins.
- Cover your nail with gel top coat. The one used here is HK Girl Top Coat by Glisten & Glow.
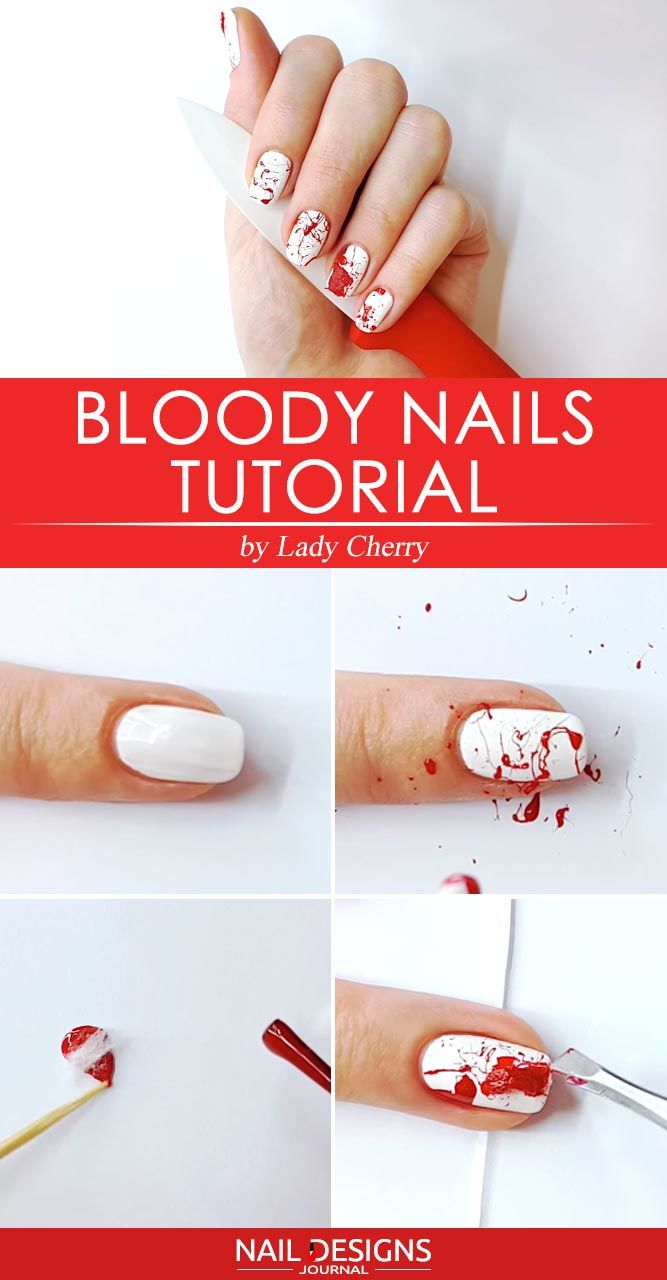
Bloody Nails Tutorial
- Apply white base coat.
- Apply Blood Splatter Nail Polish to a plastic straw using the end of the brush.
- Apply it to the nails as shown in the picture 2.
- Remove any remaining bloody polish from the skin around the nails using a cotton swab.
- Take another cotton swab and cut off its head.
- Tear the cotton head into small pieces and fluff them up.
- Roll each piece of cotton wool in the bloody polish. You can use a wooden toothpick for convenience.
- Apply each piece of cotton soaked in the bloody polish to the nails using metal tongs.
- Cover your nails with a protective layer of top coat.
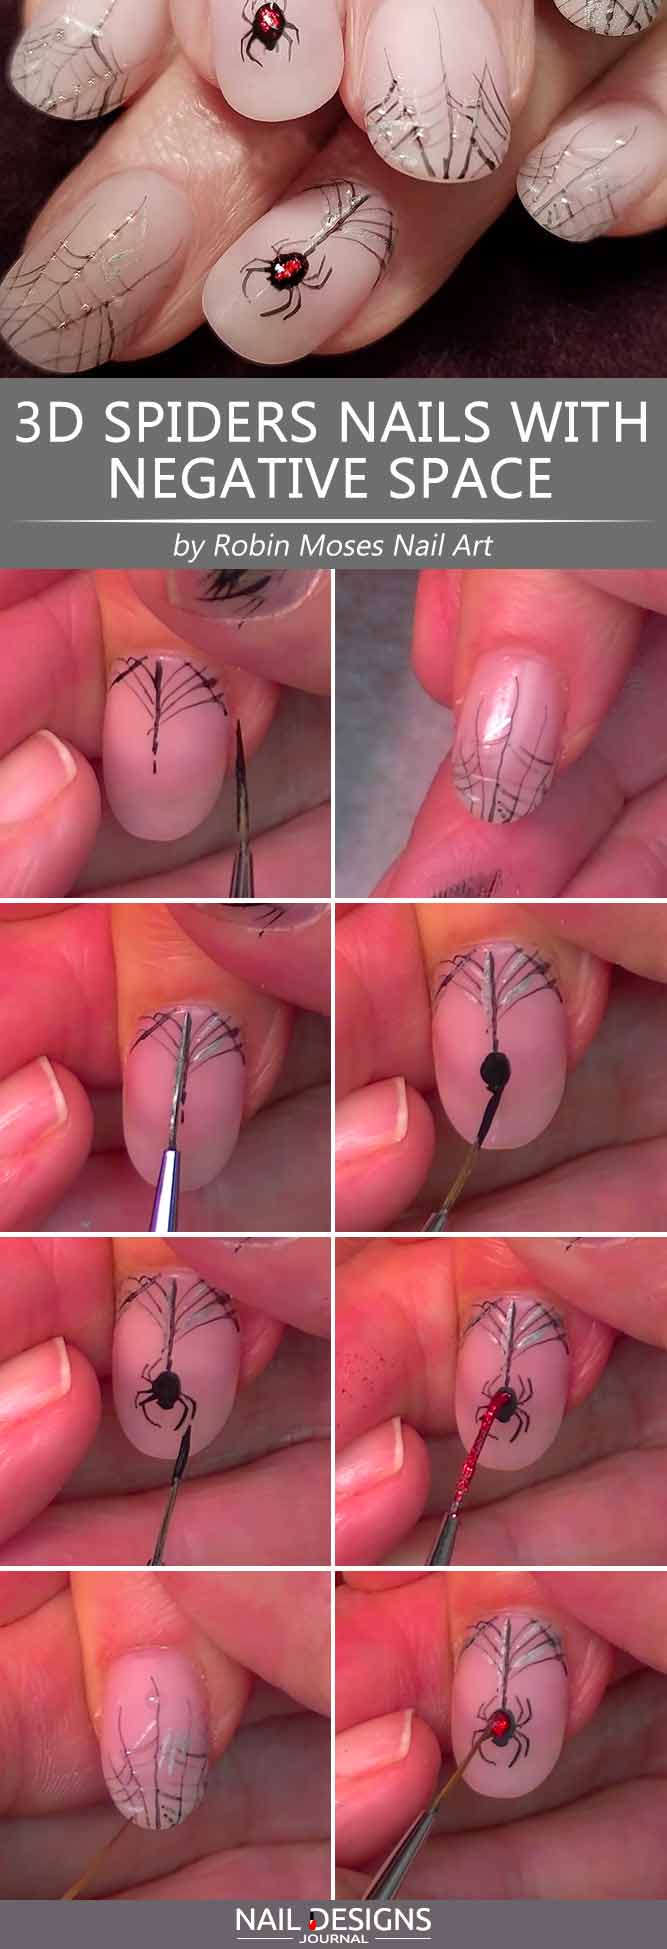
3D Spiders Nails With Negative Space
by Robin Moses Nail Art via Youtube
- Cover your nails with pale pink nail lacquer. Try Peacefully Me 522 by Dazzle Dry.
- Draw a spider web with black polish on your ring finger, starting with a thicker line in the middle of the nail. Add thinner lines on the sides. You will need an extra thin nail brush (7-10 mm).
- Draw another spider web on your middle finger nail, starting from the nail tip to the middle.
- Add some more touches to it with mint silver polish.
- Add more touches with silver glitter polish by slightly touching the spider web with the brush side.
- Do the same on your ring finger.
- Draw the body of a spider with black polish in the middle of the ring finger nail.
- Draw the spider’s legs on the sides.
- Paint the spider’s body with red glitter polish.
- Cover the nail with Mattifying Top Coat (mattie) by Dazzle Dry.
- Apply waterdrops with No Wipe Top Coat Nail Gel by Ellie 99 to the web pattern on your middle finger nail. They will make the web look “watered up”.
- Apply the waterdrops to the spider body and web on your ring finger nail. It will give the pattern dimmension and make your nail art goal higher.
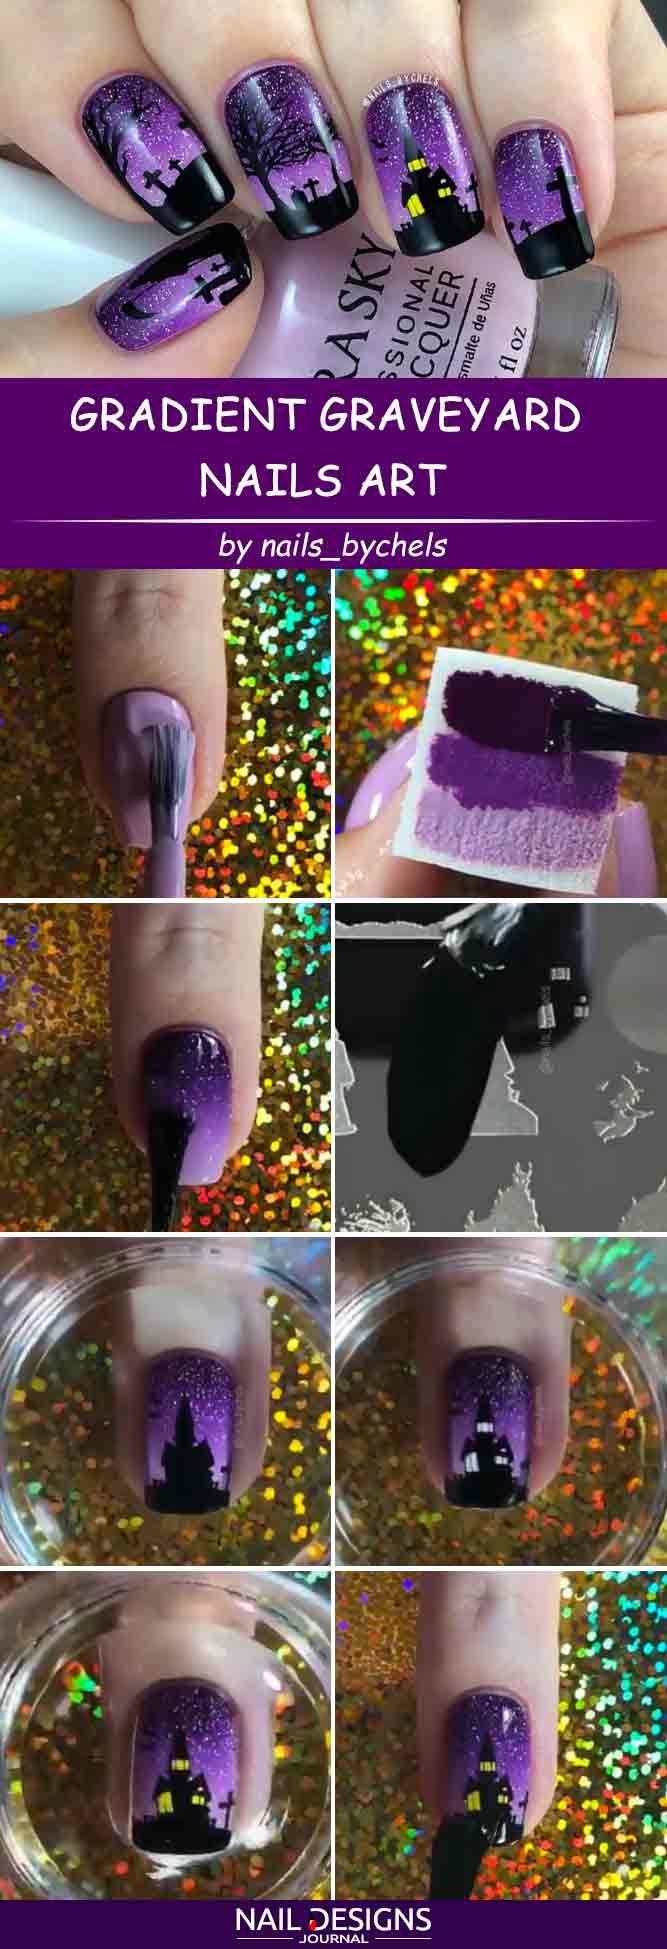
Graveyard Ombre Nails Art
- Cover your nails with Professional Nail Lacquer by Kiara Sky (Totally Whipped).
- Apply a protective coating to the skin around the nail.
- Apply Totally Whipped (light purple), Wanderlust (purple) and Royal (dark purple) polishes successively onto the sponge, from bottom to top.
- Apply the sponge to your nail so that the darkest shade is at its base.
- Wrap the sponge well into your nail to create an ombre effect.
- Remove the a protective coating.
- Cover the nail with holographic nail glitter by China Glaze (Fairy Dust shade). It will create a starry sky effect.
- Use stamping plate by Clear Jelly Stamper (CjSH-37).
- Treat the castle pattern in it thoroughly with black stamping polish.
- Copy the pattern with Stamper.
- Apply the stamper to the nail and hold it to ensure the pattern transfers well.
- Use the pattern with three castle windows from the same stamping plate.
- Treat the pattern thoroughly with white stamping polish.
- Copy the pattern with Stamper.
- Apply the stamper to the nail, so that the castle windows fit into its towers.
- Hold it to ensure the pattern transfers well.
- If you wish, you can treat the stamping pattern with castle windows with yellow stamping polish and repeat the step. This way the windows will be filled with a more mysterious evening light.
- Cover your nails with a protective layer of top coat.
Very often it may seem that creative nail art is something that not everyone can master. However, one look at these simple Halloween nail art tutorial will change your mind forever and will help you become a real manicure pro in the shortest period of time ever!


Was this article helpful?