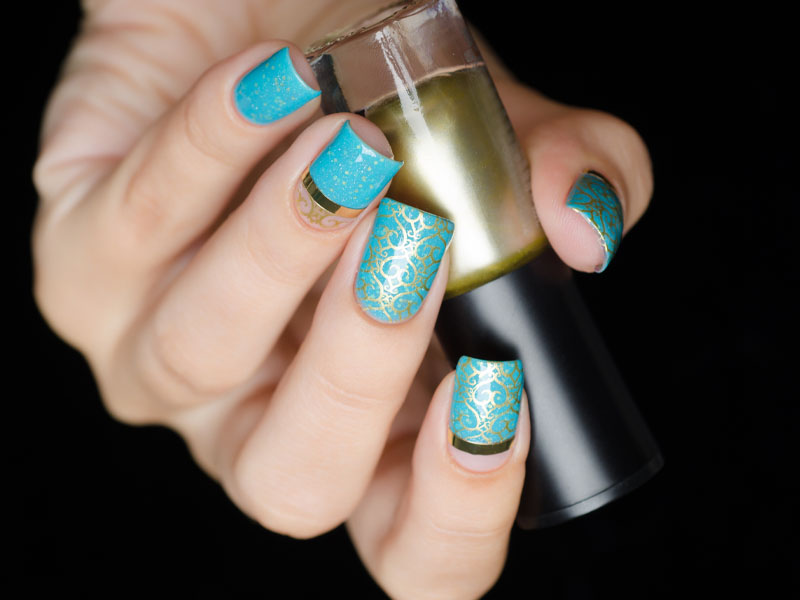

Nail stamping is one of the nail art techniques that is getting popular with every day. The truth is that there is nothing surprising about it since this technique is very versatile and easy to master. The fact it sit is going to be something that we are going to discuss today, so if you are looking for a stamping nail art tutorial – we have got five of them for you. What is more, we are going to list some useful tips and tricks for you here so that your stamping nail art becomes flawless!
Nail Stamping Tips & Tricks That Will Make You An Exepert
Even though nail stamping may seem pretty easy for you after these fancy tutorials but there is also a list of tips and tricks to keep in mind.
- Stamping nail polish matters. The one that is great with one coat application would be the best to use for stamping.
- Clean your stamping plates after every use.
- Use packing paper to clean your stamper.
- Use an old credit card instead of the stamper.
- Start off with the accent nail only.
- Be careful not to smear your design with a top coat that is why you better wait until the design dries out properly.
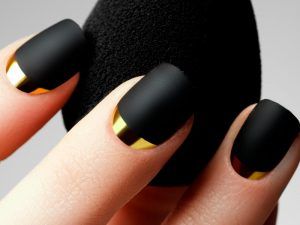
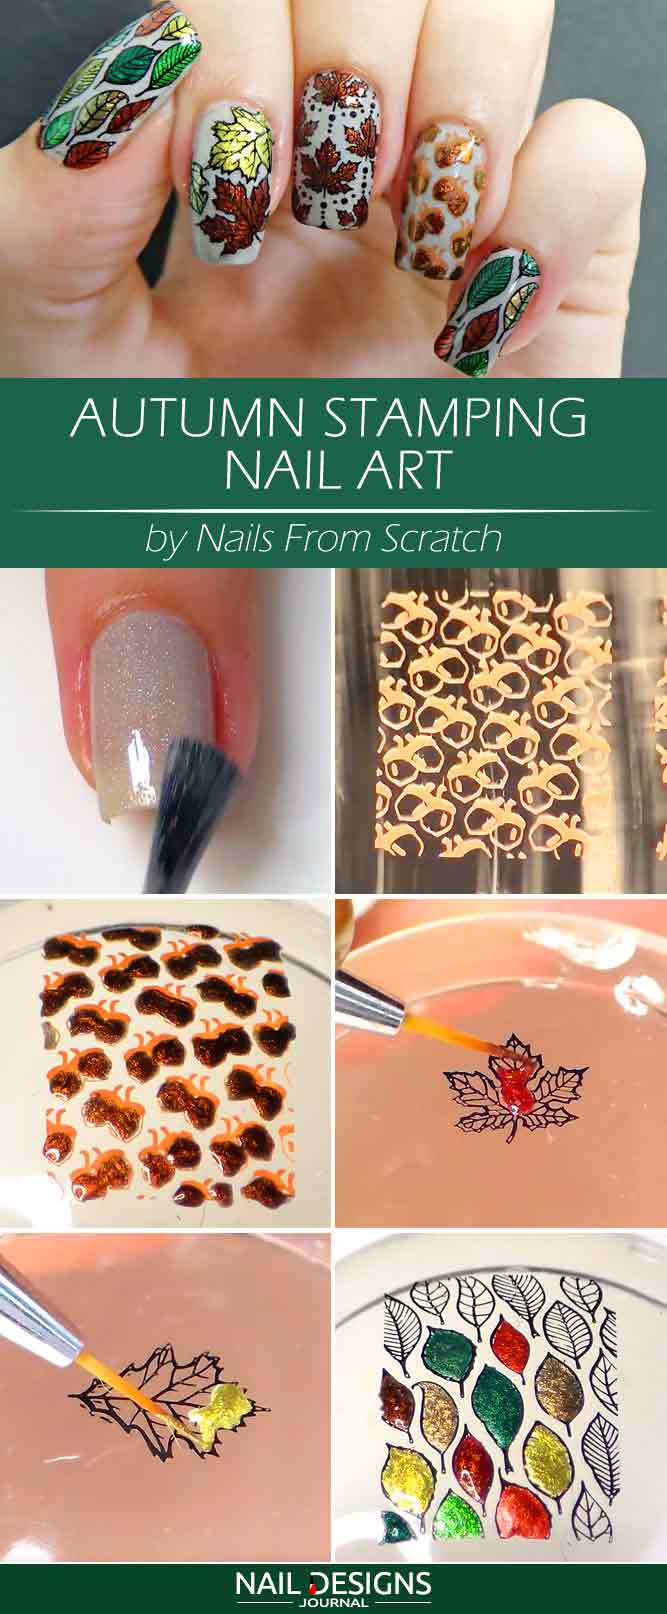
Autumn Nail Stamping Designs
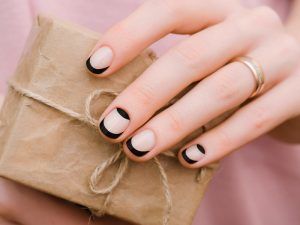
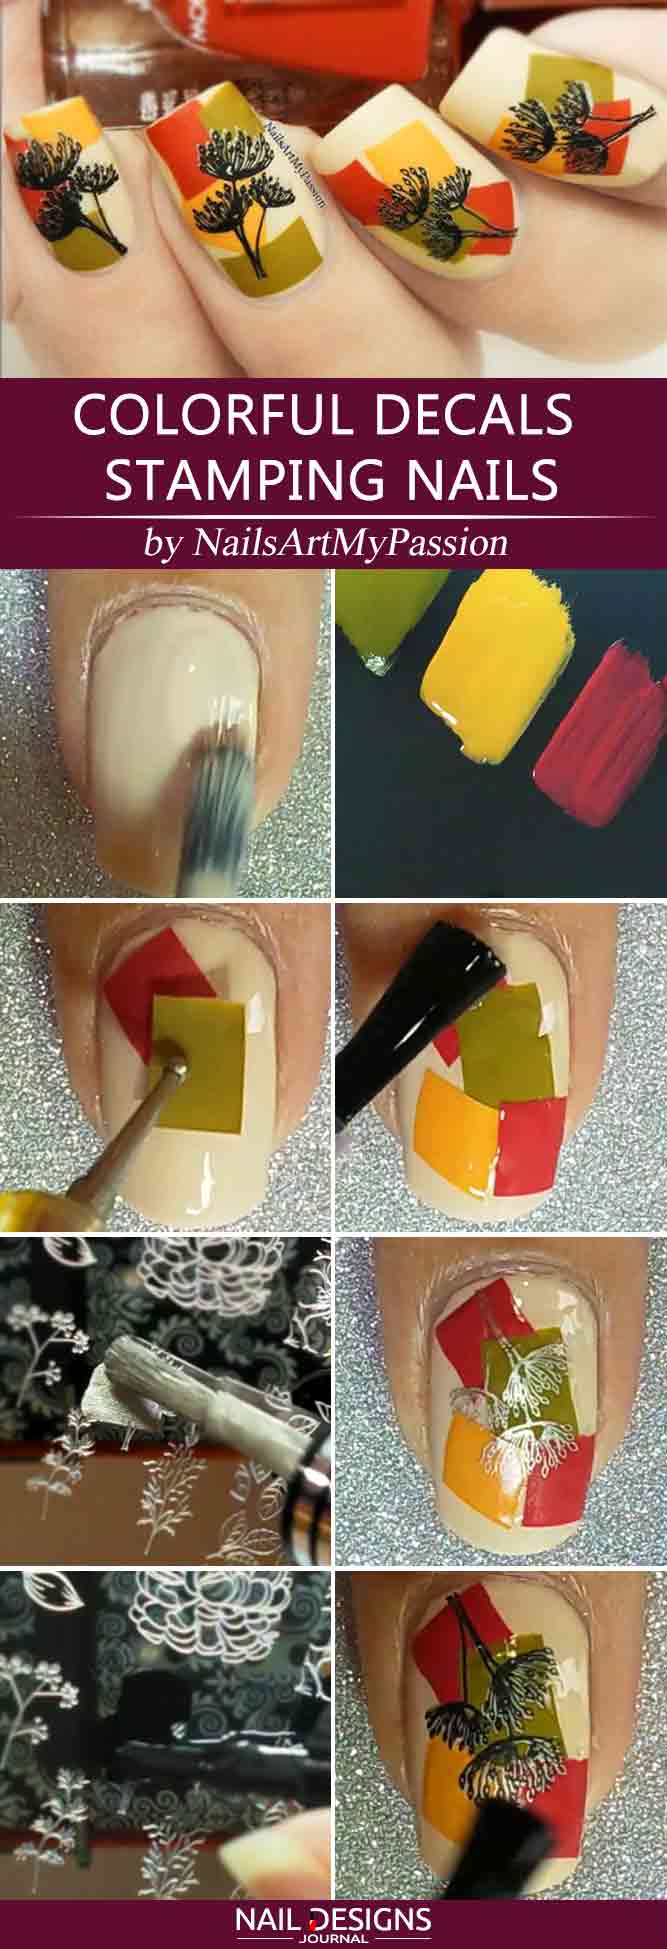
Colorful Decals Stamping Nails
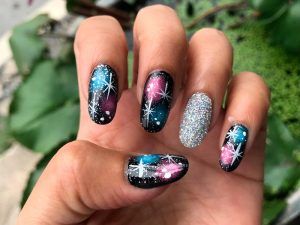
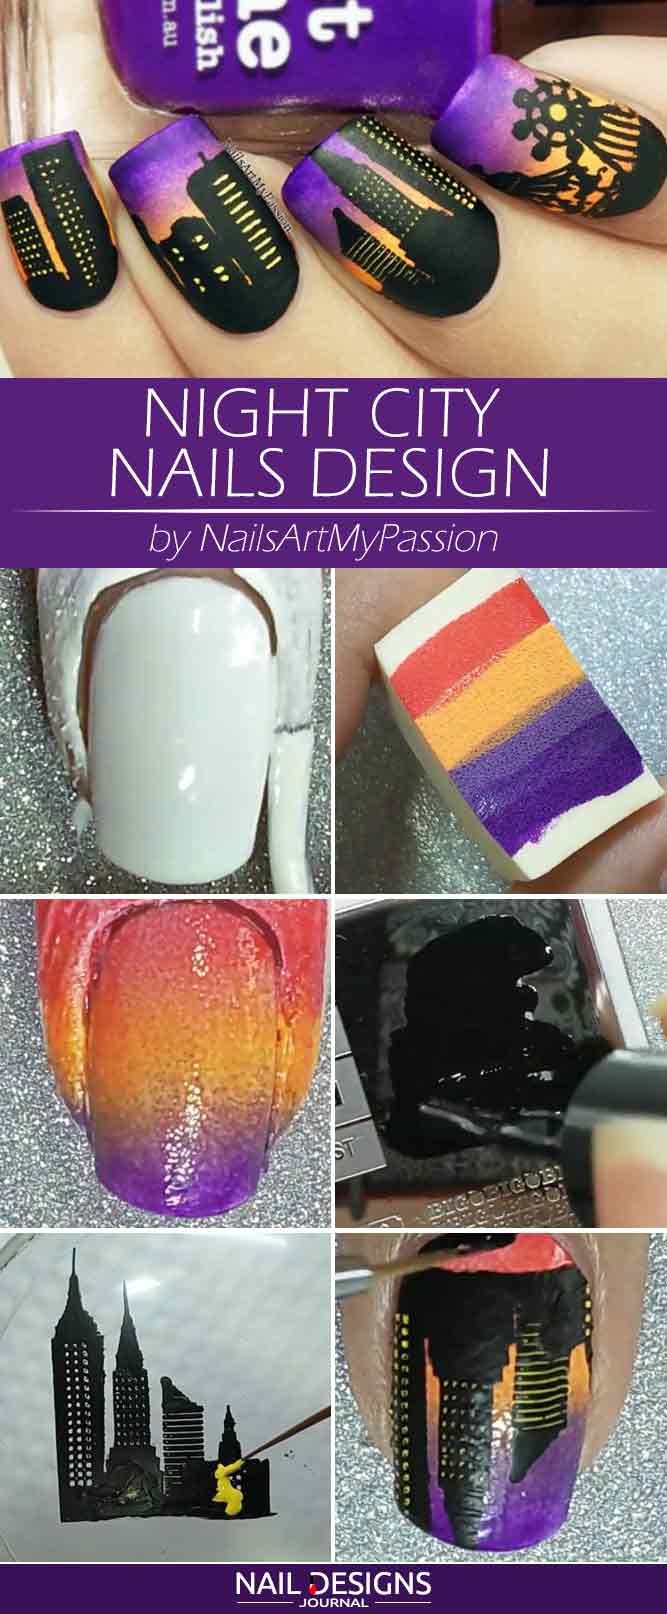
How To Stamping Nails – Night City

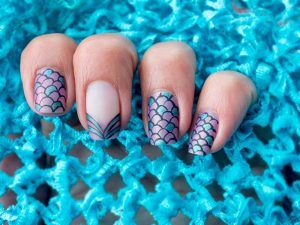
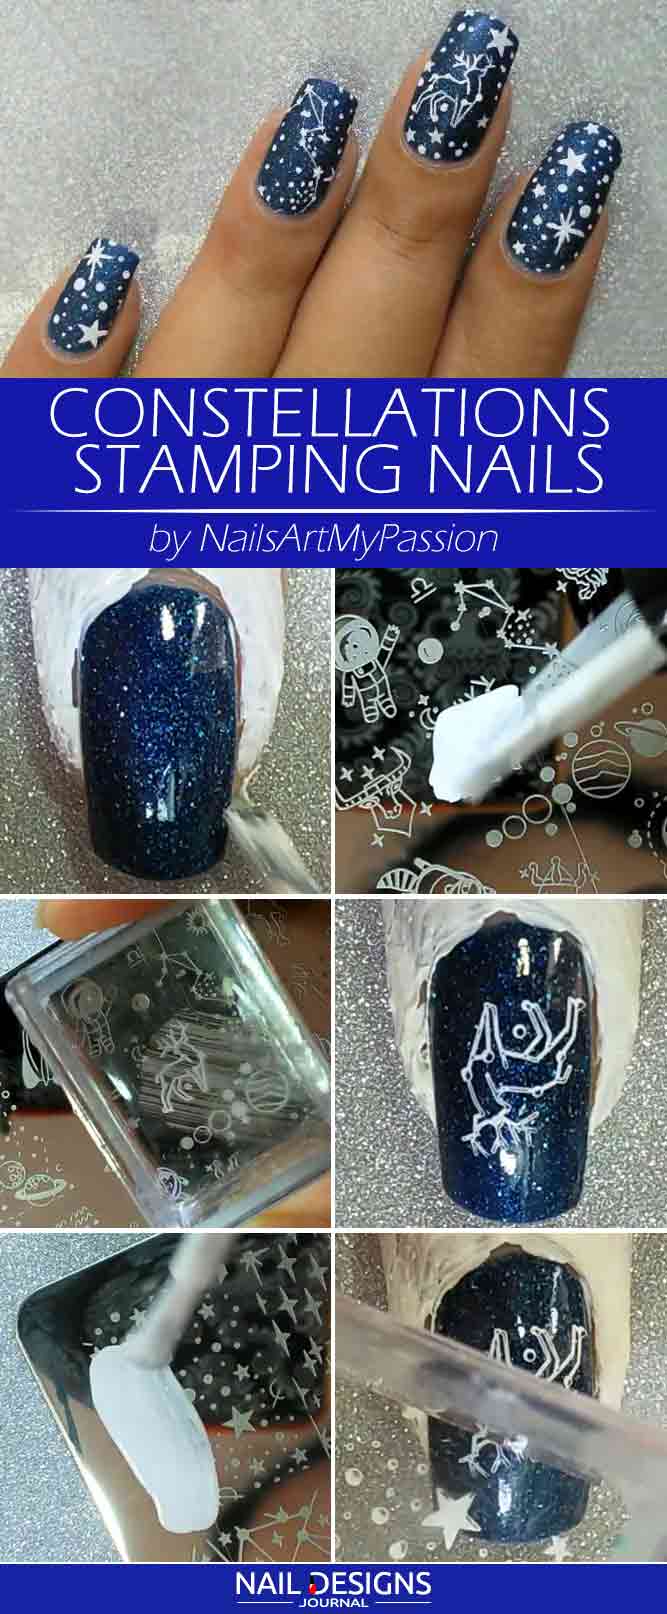
Constellations Stamping Nail Designs
Simple Nail Stamping Design You Can Do In 5 Min
It may seem impossible to create something as gorgeous in just five minutes but can assure you that it is the truth. See for yourself!
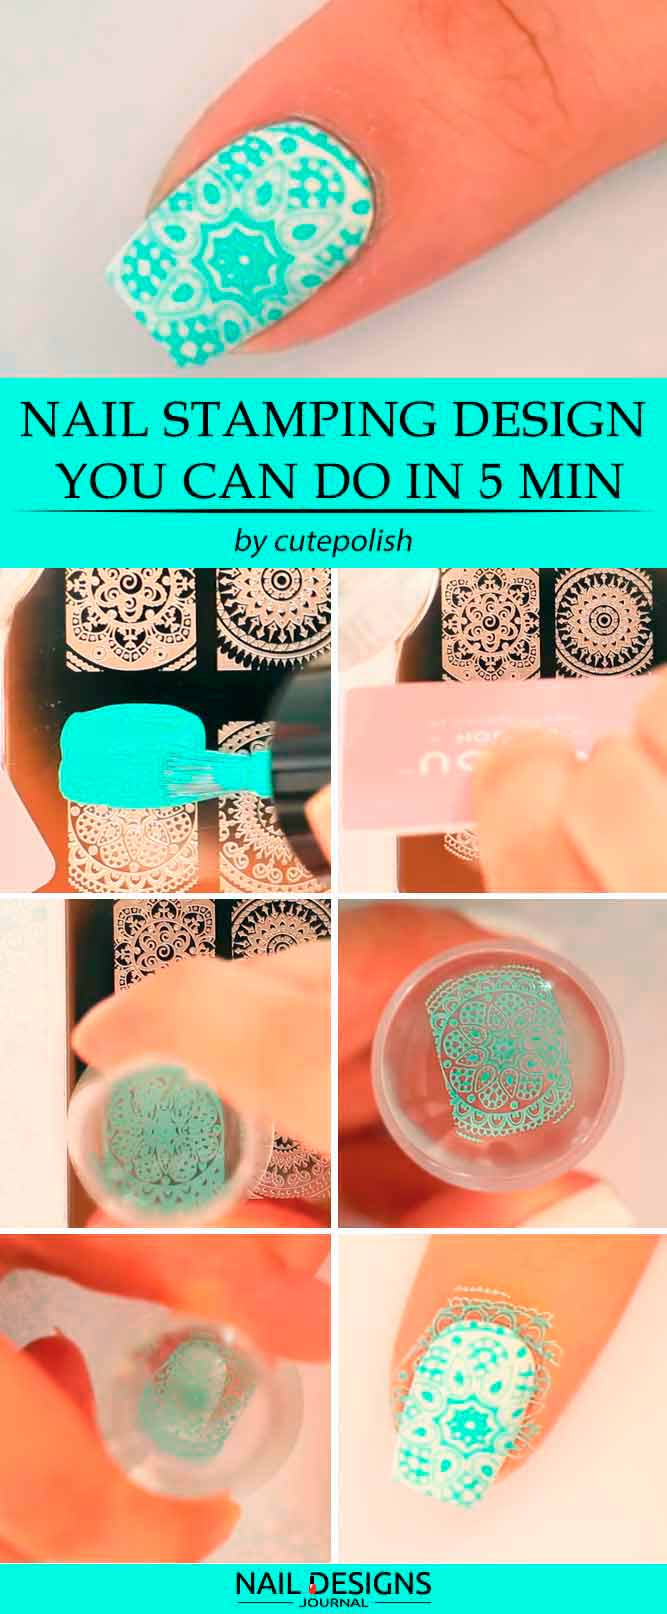
- Apply a base coat.
- Apply white base coat.
- Take your stamping plate of choice and cover the half of the design with mint-shades nail polish.
- Scrape the remains of the nail polish off the plate.
- Firmly press the stamper over the plate so that the design is transferred.
- Press the stamper with the design on over your nail firmly.
- Clean up all the remains.
- Apply a top coat.
Ombre Nail Stamping For Beginners
Ombre nail stamping is easier than you may have even thought!

- Apply a base coat.
- Apply white base coat.
- Take a stamping plate of choice.
- Apply two different colors to the top and bottom of the design.
- Use a scraper to mix the colors a little and to remove the excess nail polish.
- Firmly press the stamper over the plate so that the design is transferred.
- Press the stamper with the design on over your nail firmly.
- Clean up all the remains.
- Apply a top coat.
DIY Nails Decals With Nail Stamping Plates
In case you are wondering if it is possible and how to use nail stamps without stamper it is your perfect chance to learn!
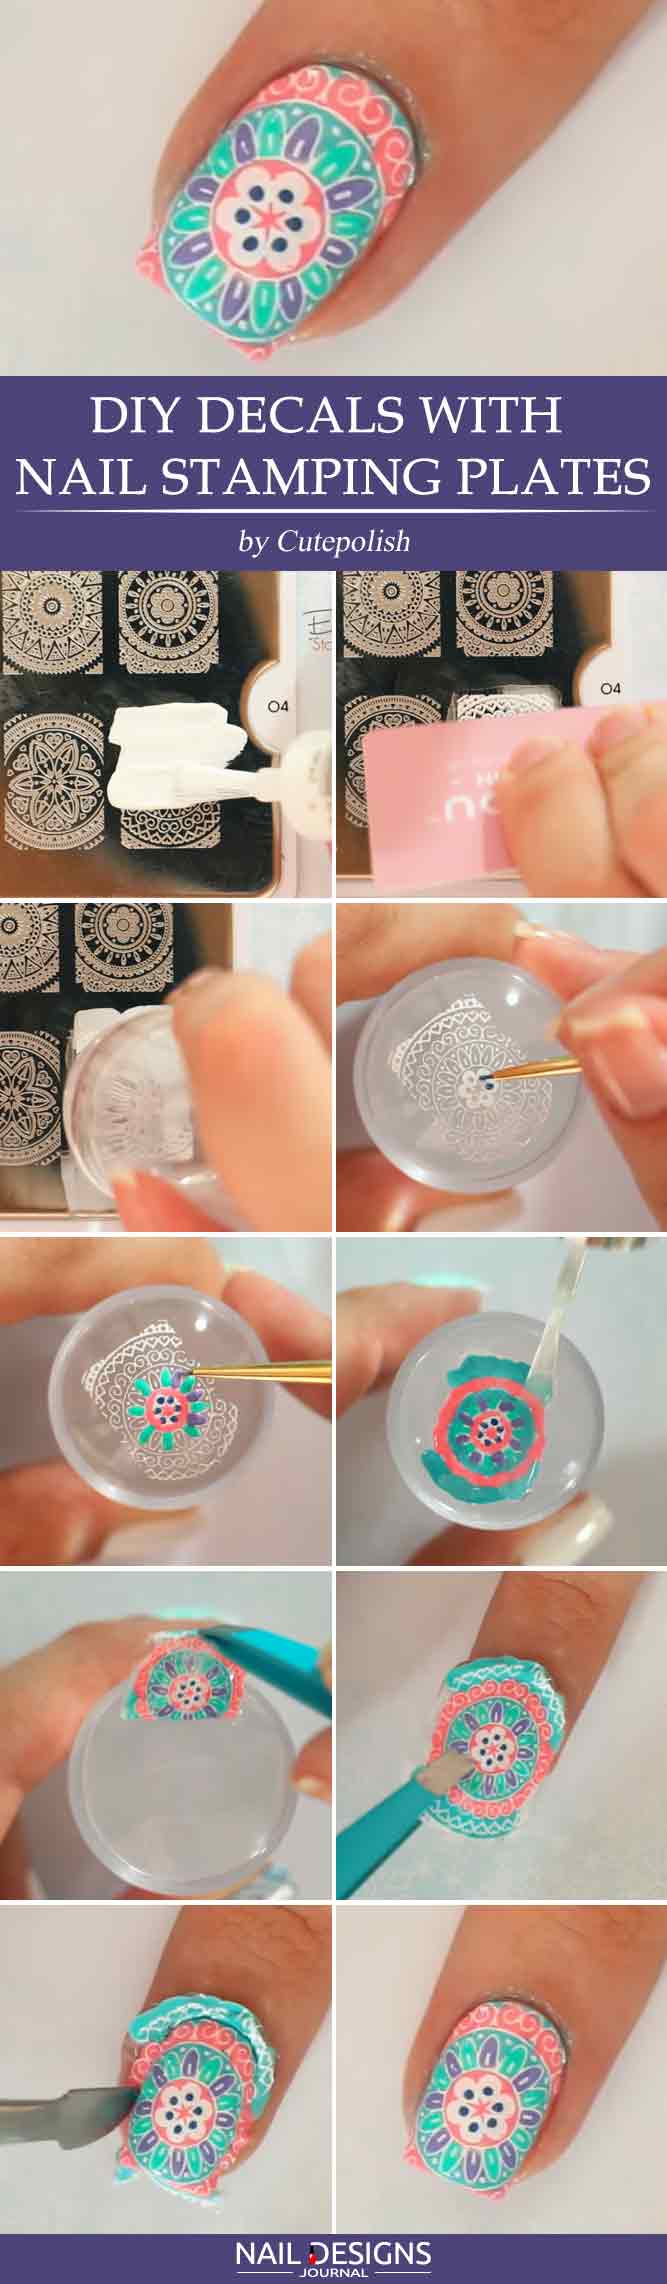
- Apply a base coat.
- Apply white base coat.
- Take your stamping plate of choice and cover the half of the design with white nail polish.
- Scrape the remains of the nail polish off the plate.
- Firmly press the stamper over the plate so that the design is transferred.
- Take your favorite nail polish colors and color the design on the stamper.
- Apply a top coat over the design on the stamper.
- Wait until it dries out.
- Apply top coat to your nails and place the decal while the top coat is still wet.
Easy Multi Color Stamping Nails Design
When one color is not enough – you can add some more!
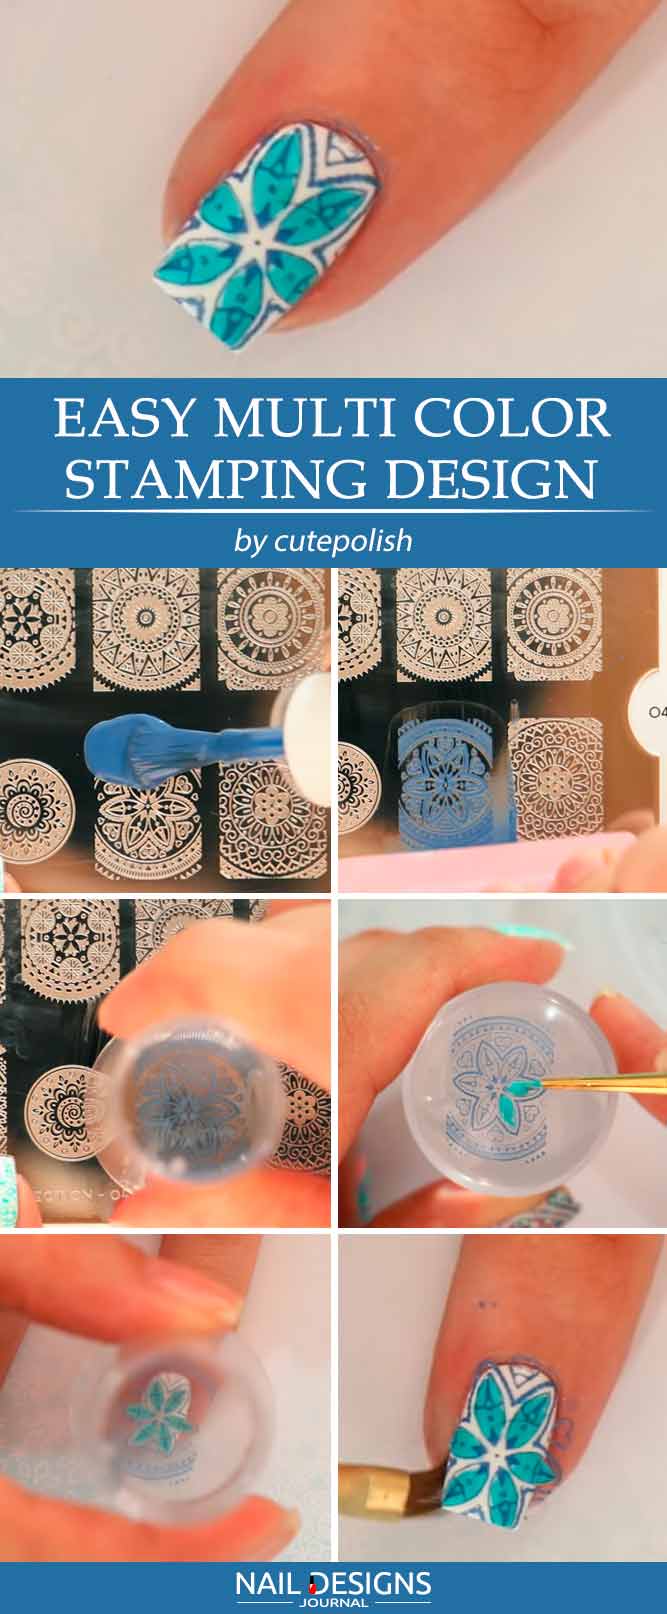
- Apply a base coat.
- Apply white base coat.
- Take your stamping plate of choice and cover the half of the design with blue nail polish.
- Scrape the remains of the nail polish off the plate.
- Firmly press the stamper over the plate so that the design is transferred.
- Take another nail polish and add some more color the design on the stamper.
- Leave it to dry out.
- Apply top coat to your nails and wait until it almost dries, so that it is still sticky.
- Transfer the design from the stamper onto the nail.
- Clean up the messes.
Marble Nail Art With Stamping
If you are looking for something super easy, this tutorial is exactly what you need.
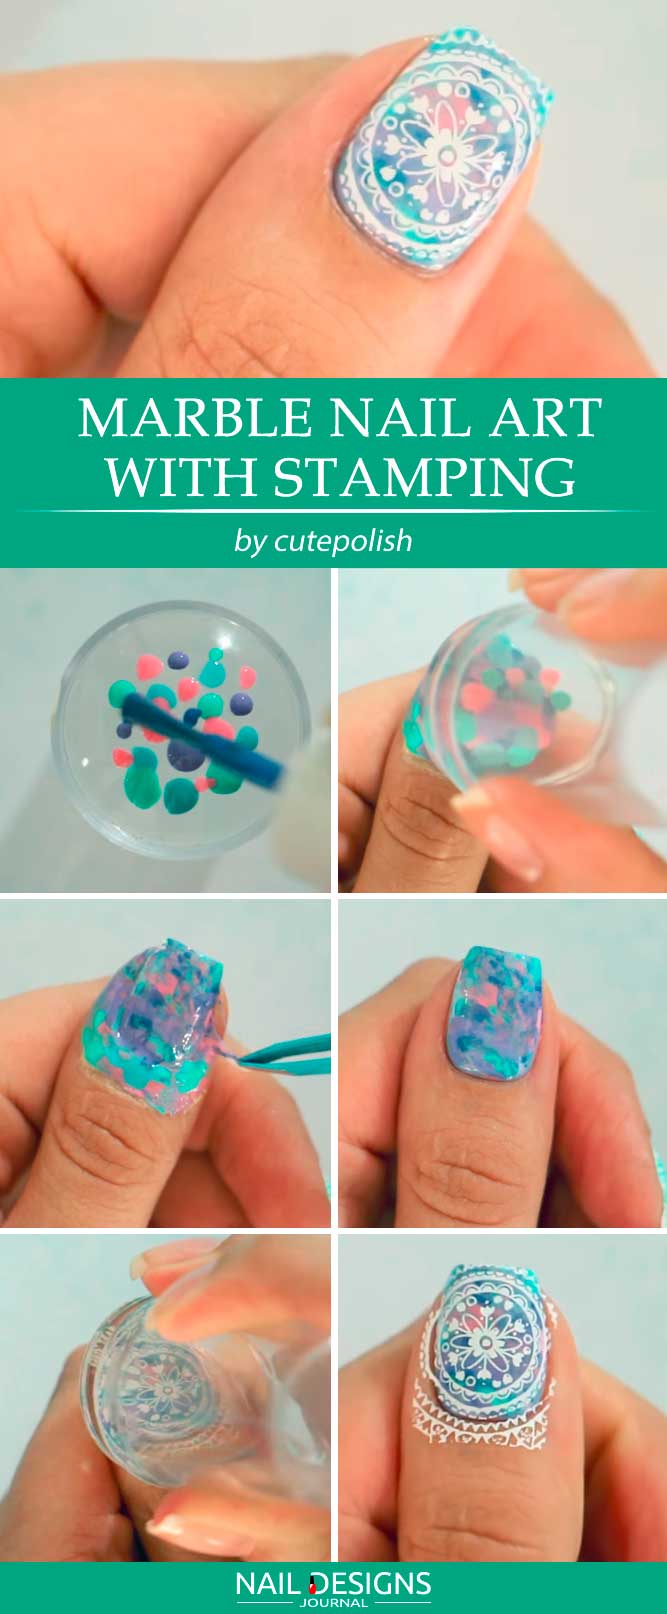
- Apply a base coat.
- Secure your cuticles and skin with liquid latex.
- Take at least four different nail polishes and add different-shaded blobs to the stamper.
- Press the stamper over your nail and move it a little so that the blobs are nicely mixed.
- Remove liquid latex.
- You can leave it as it is or add another lace pattern to the design.
- Apply top coat.
Geometric Nail Art You Can Do In 5 Min
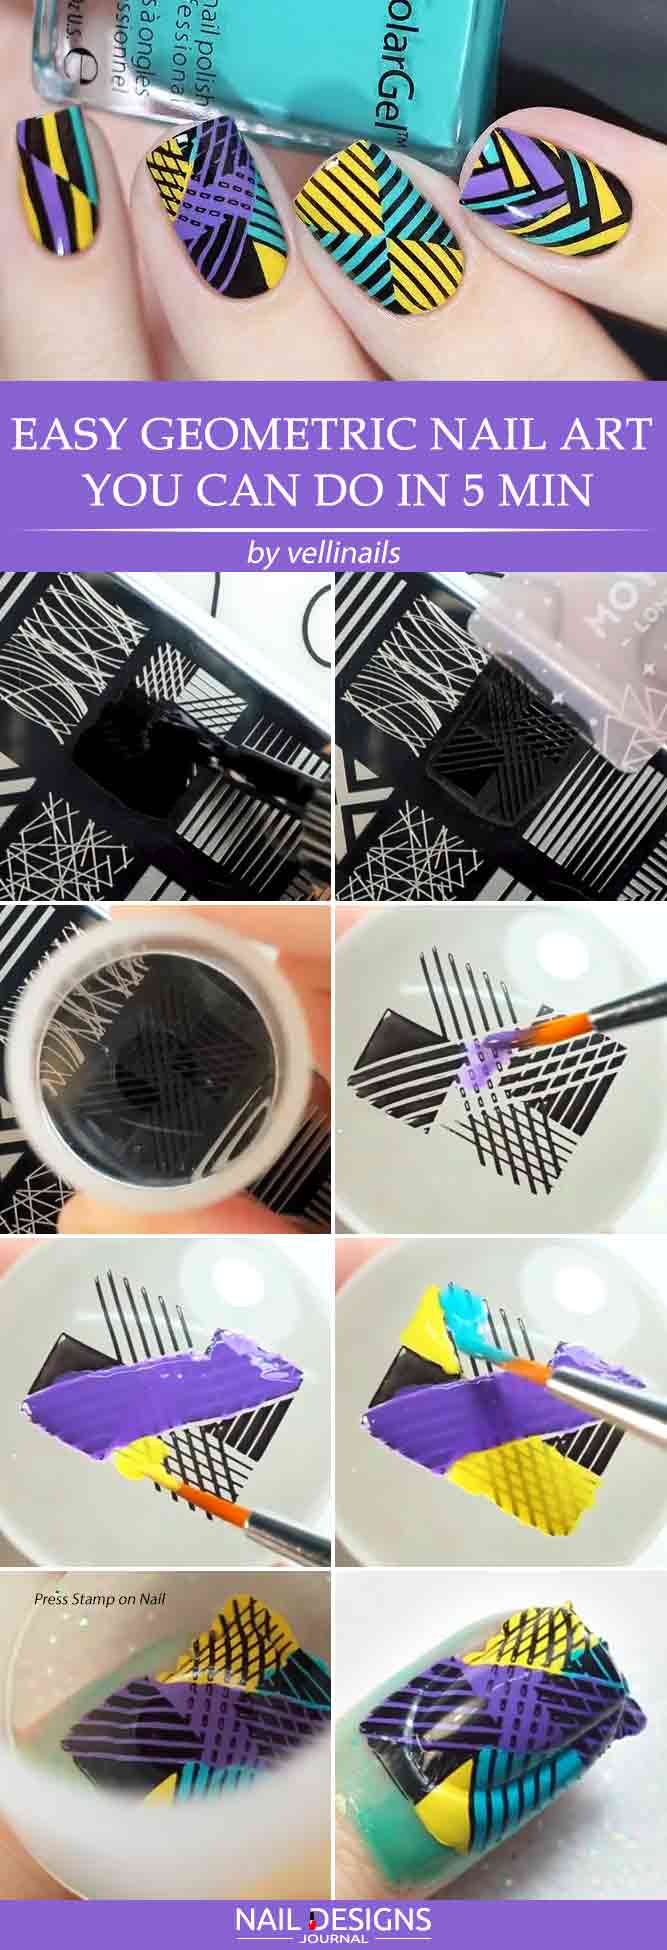
- Apply a base coat.
- Apply beige base coat.
- Take your favorite stamping plate and apply black nail polish to it.
- Transfer the design to the stamper.
- Add purple, yellow and light blue colors to the design on the stamper.
- Apply liquid latex to your nail to secure the cuticles.
- Transfer the design to the nail.
- Clean up all the messes and excess nail polish.
- Apply a top coat.
Cute Nail Design With Layered Stamping Plate
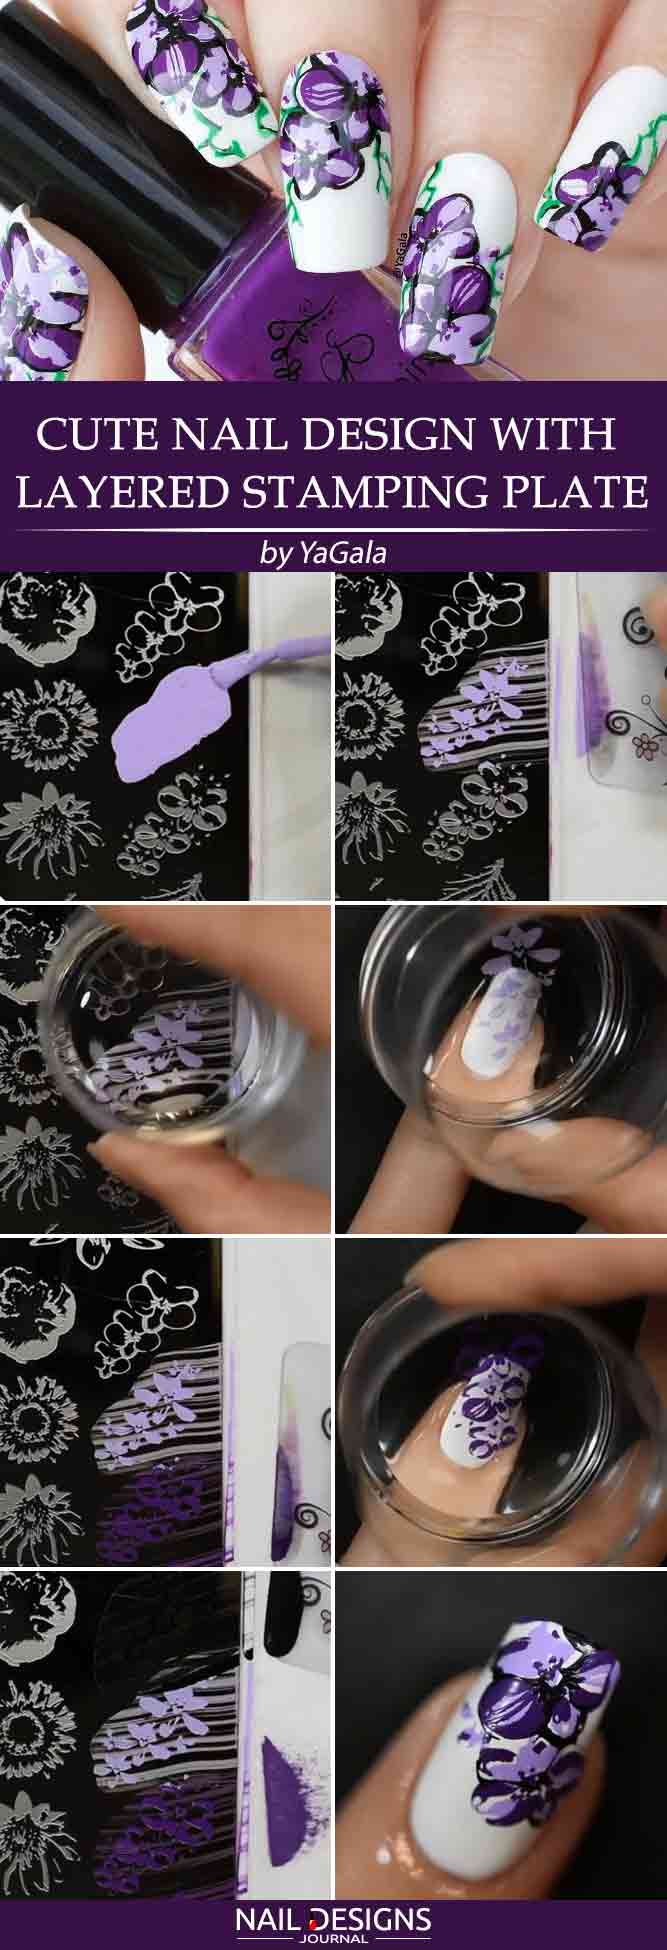
- Apply a base coat.
- Apply white base coat.
- Pick three floral stamping plates.
- Apply light purple nail polish to the stamping plate, transfer the design with the help of a stamper to your nail.
- Repeat the procedure with dark purple and black nail polishes.
- Apply a top coat.
We hope you enjoy these tutorials and will succeed in their replication with the least of time and effort involved. Do not forget to visit us for some more fresh ideas and pieces of trendy advice!
Was this article helpful?