Simple nail designs are so easy to duplicate at home. With the right colors and a few nail tools or everyday household items, you can easily pull off some of the most stylish nail designs!
With these easy nail designs, you’ll be the envy of all your friends! And won’t they be surprised when they find out you did them at home on your own?
You’ll love these cute nails designs we choose just for our faithful readers. All you need is your favorite colors, a few simple tools, a clear top coat and your imagination. Now get to work!
Check out these 20 simple nail designs you can do right at home!
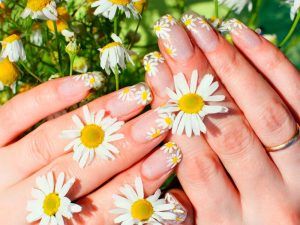
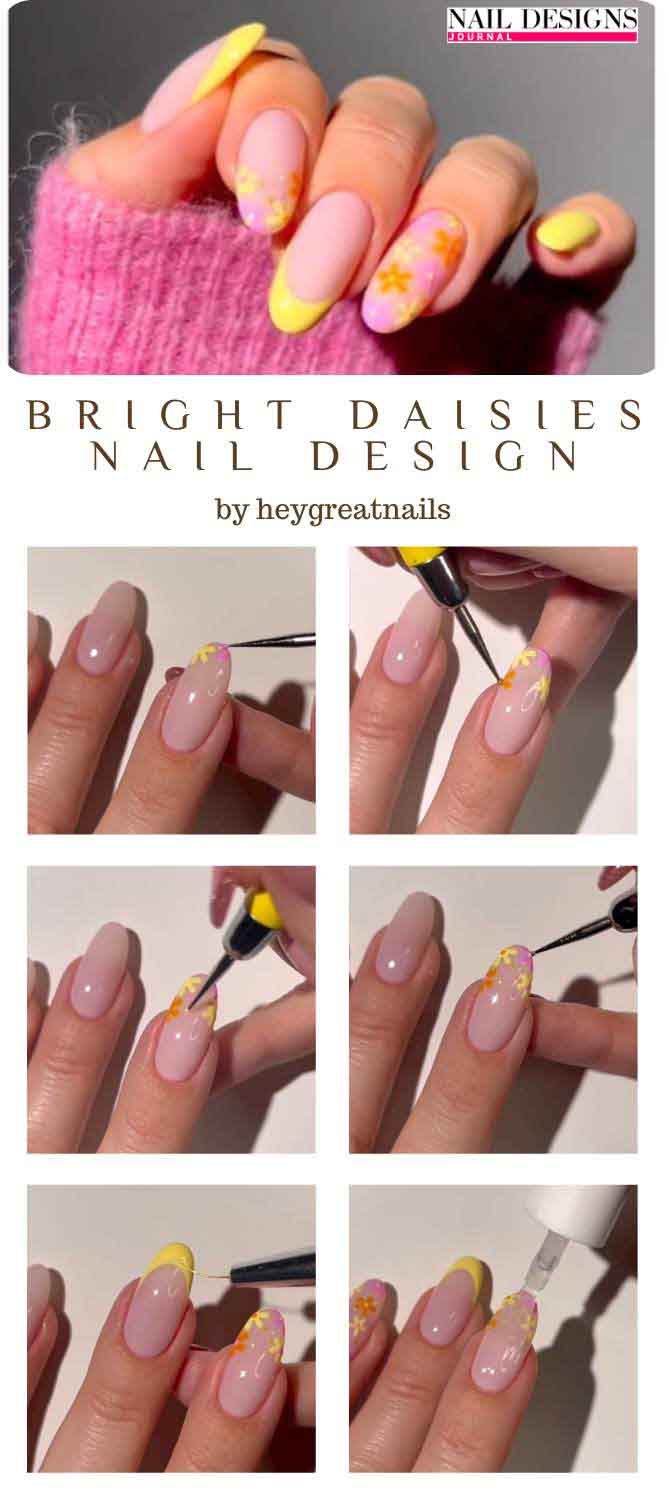
Bright Daisies Nail Design
- Apply a base coat.
- Apply a powder pink nail polish.
- Take yellow, orange and bright pink nail polish and draw a daisy nail design on the tip of the index finger nail using a thin brush.
- Draw a yellow French tip on the thumb and middle finger nails.
- Draw flower nail designs in orange, pink and yellow on the ring finger nail.
- Paint the pinkie finger nail yellow.
- Apply a top coat to every nail.
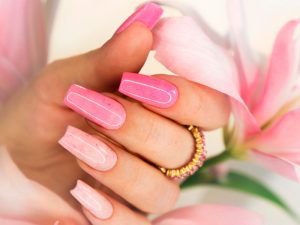
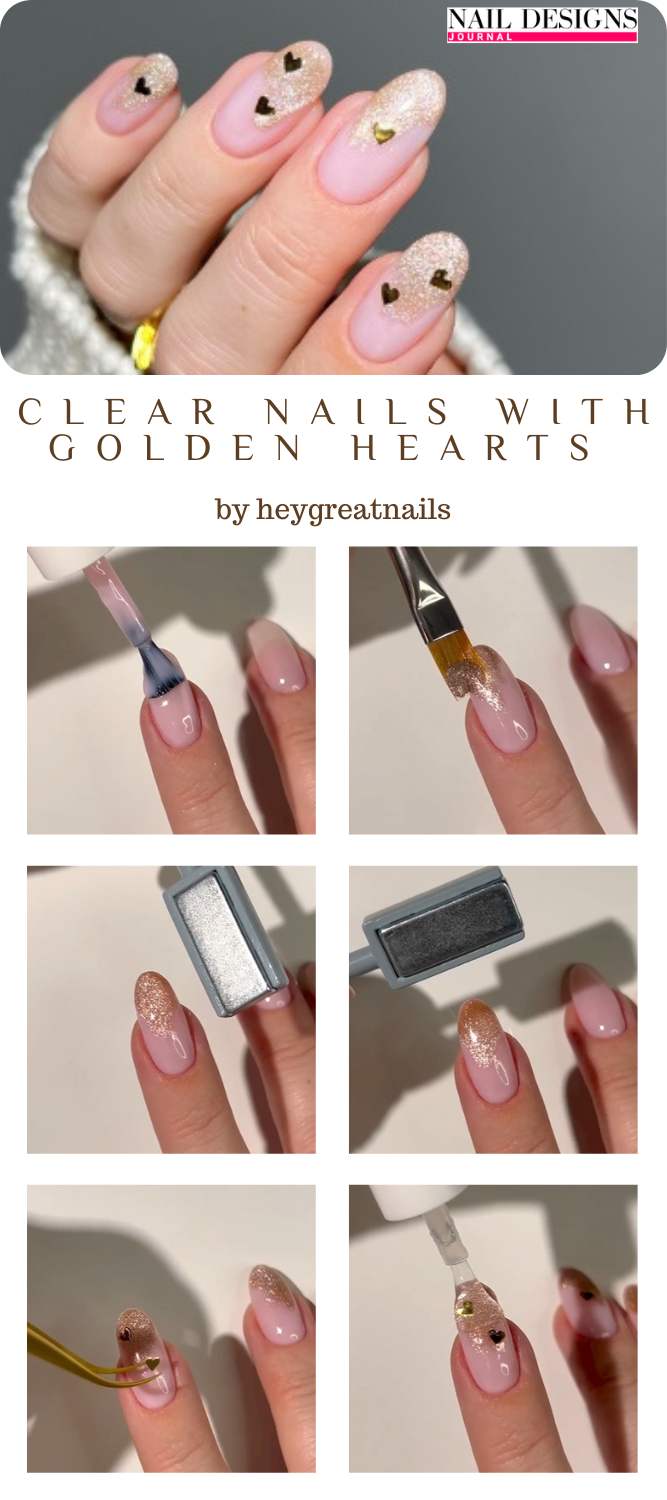
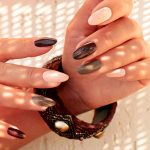
Clear Nails with Golden Hearts
- Use a layer of a pale pink nail polish as the base.
- With a flat brush, apply a magnetic gold nail polish to the tip of every nail.
- Hold a magnet at different angles to create a dimensional pattern on your clear nails.
- Use tweezers to attach gold hearts on top of the magnetic polish.
- Secure everything with a top coat.
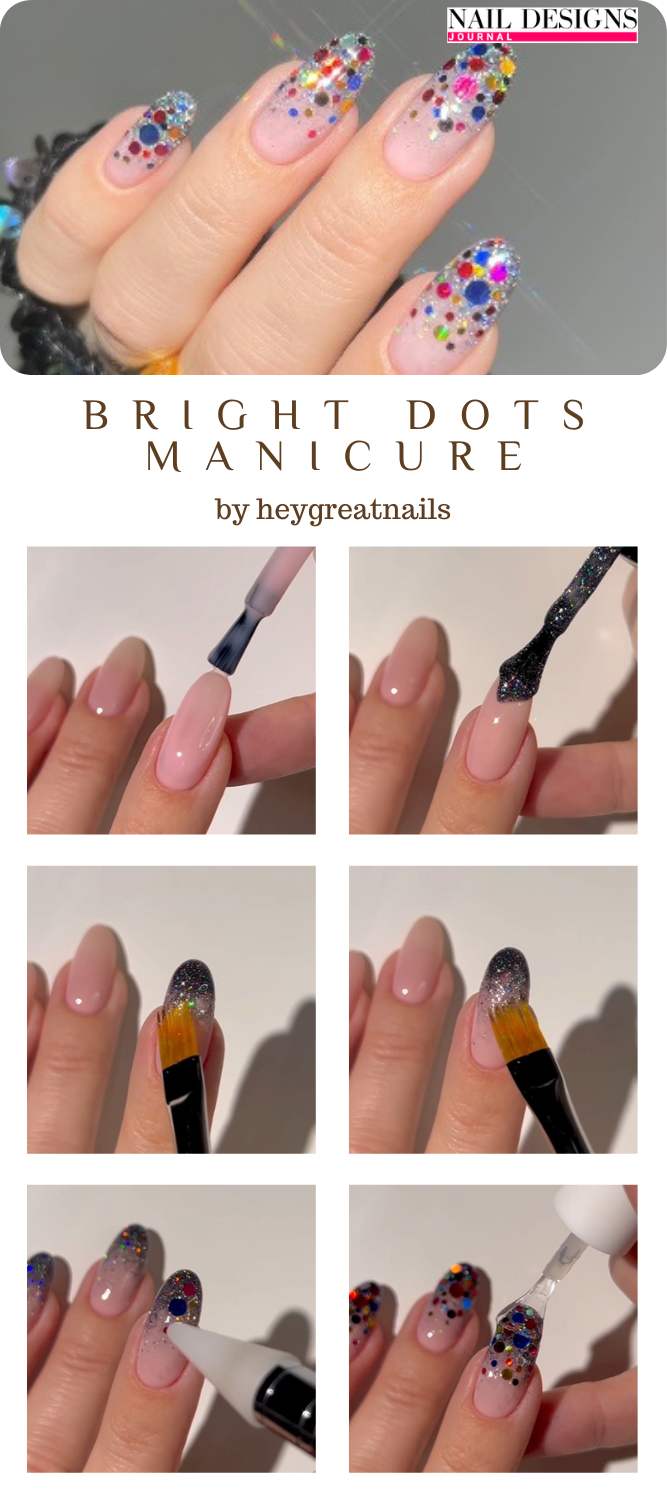
Bright Dots Manicure
- Apply a baby pink base coat.
- For dots manicure, you can use a special dotting device or glitter of different sizes, or a combination of the two.
- Start by applying a multisized colorful glitter polish to the tips of the nails.
- Drag it to the center of the nail with a flat brush to make the coverage thinner.
- Place colorful dots over the glitter polish with a dotting device or use separate glitter flakes instead.
- Apply a top coat.
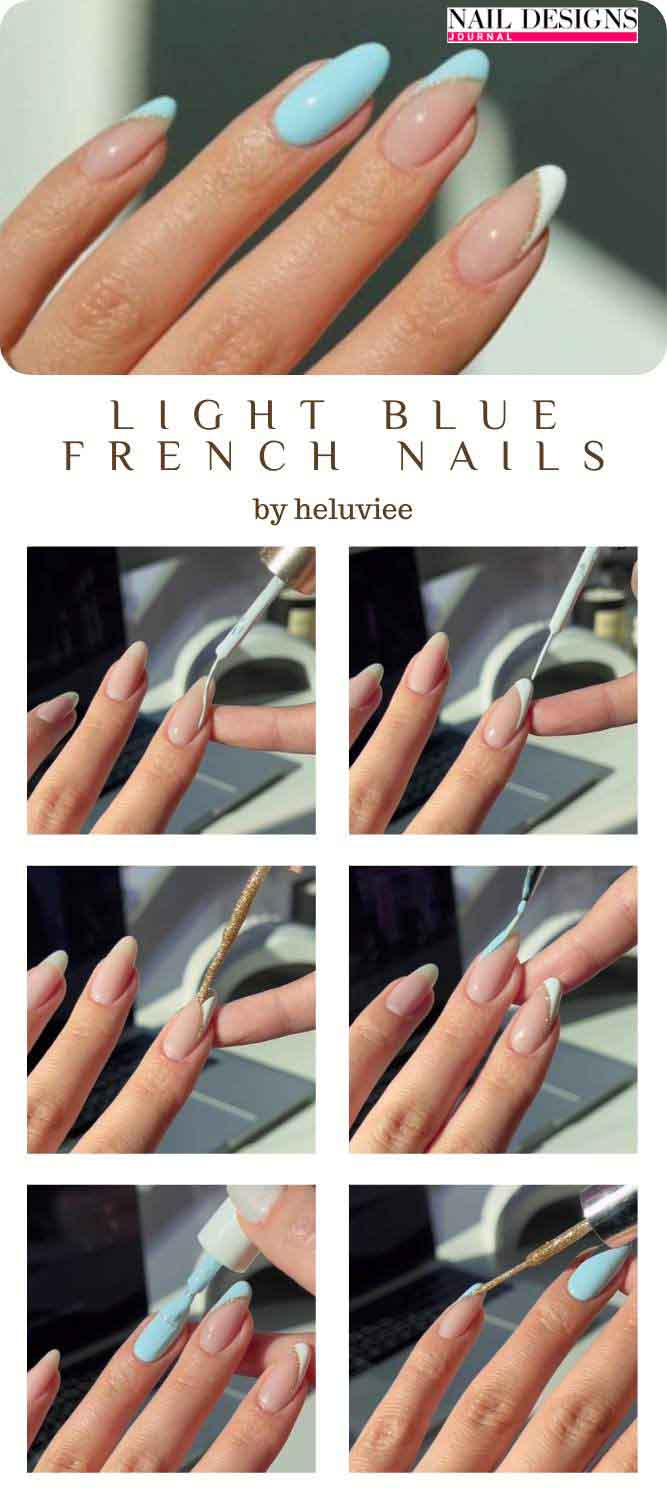
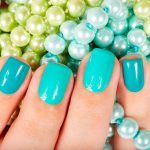
Light Blue French Nails
- Apply a base coat.
- Use a thin brush and a white nail polish to paint the tip of the nail on the index finger. Apply the polish starting from the middle of the nail one the right and moving upward to the left.
- Repeat the previous step for the middle and pinkie nails, yet apply the polish from left to right.
- Define the outline of the French manicure with a gold shimmer nail polish.
- Finish the manicure with blue nails on the ring finger and the thumb.
- Apply a top coat.

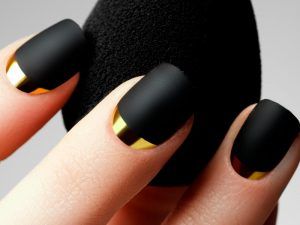
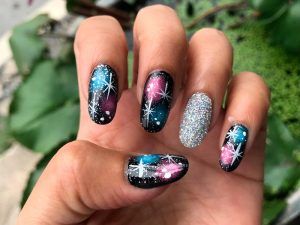
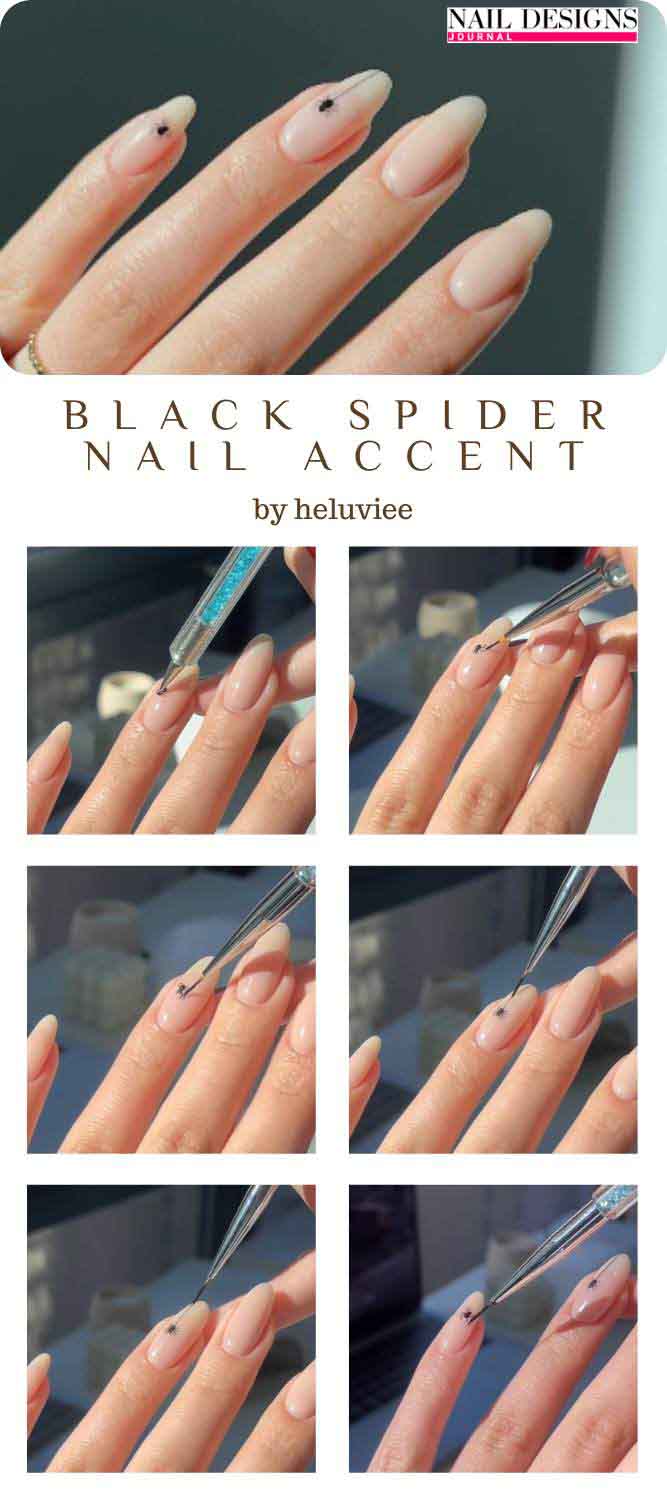
Black Spider Nail Accent
- Apply a base coat.
- Draw a black dot in the middle of the ring finger nail.
- Using a very thin brush and a black nail polish, draw the legs of the spider, which are six tiny lines, sticking in an outward direction from the dot.
- Draw a straight thin black line from the spider to the tip of the nail.
- Repeat steps 2-4 for the pinkie finger nail.
- Finish off your Halloween nails with a layer of a top coat.
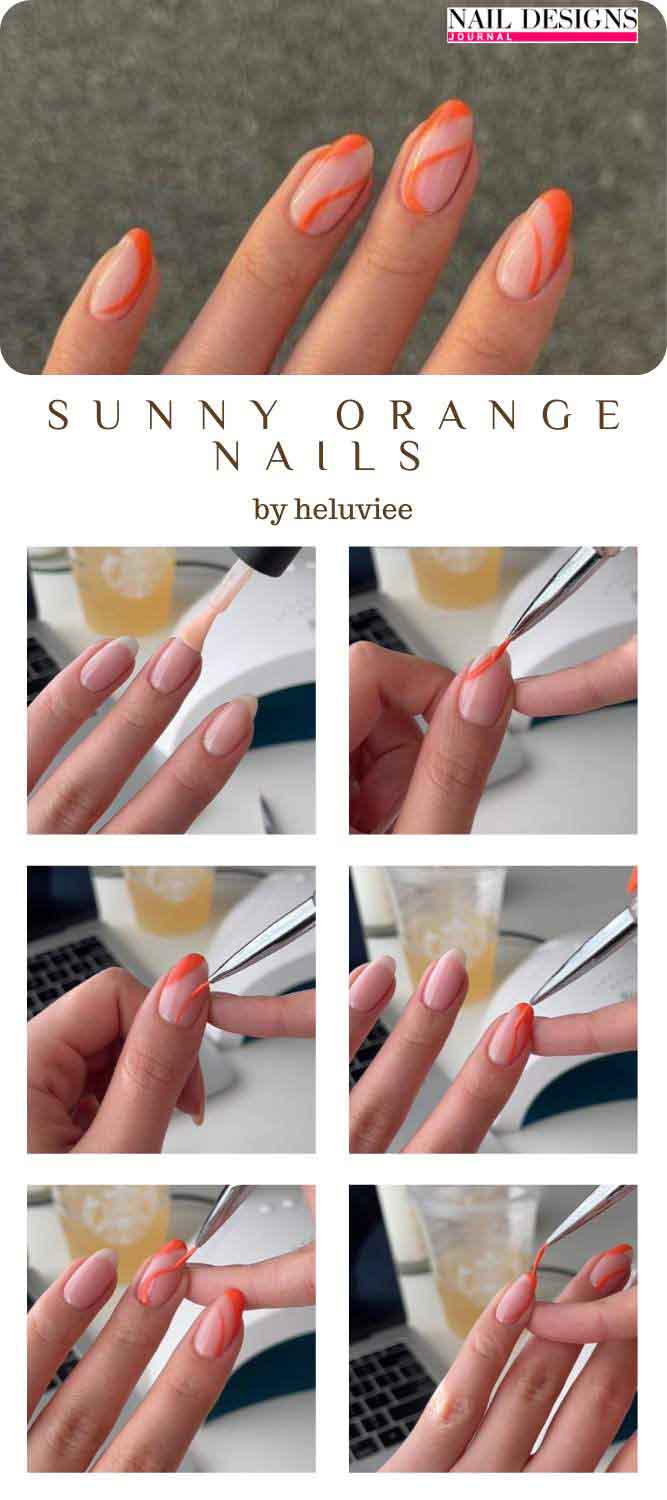
Sunny Orange Nails
- Apply a base coat.
- Take a bright orange nail polish and a small brush and apply an angled line to the tip of the middle and ring finger nails.
- Follow up with a curved line that mimics the previous line.
- Draw a curved line with the same nail polish and brush on the right side of rest of the nails. Complement the pattern with another line on the index finger nail.
- Apply a top coat.
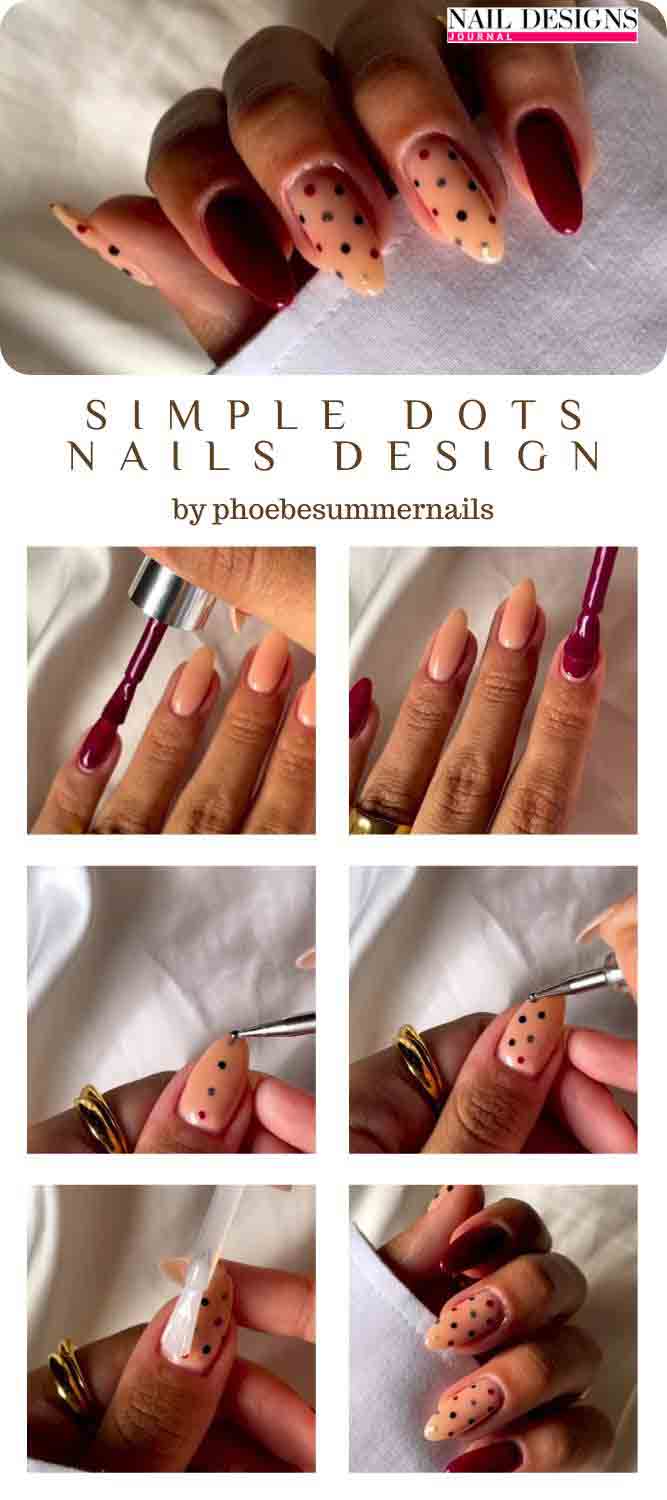
Simple Dots Nails Design
- Apply a base coat.
- Paint the index and pinkie finger nails burgundy, while applying a beige nail polish to the rest of the nails.
- Take a dotting tool and apply small dots with burgundy and dark blue nail polishes to the beige painted nails.
- Apply a top coat.
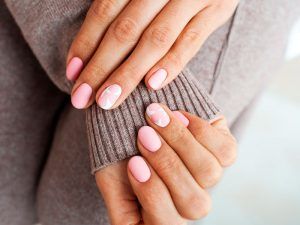
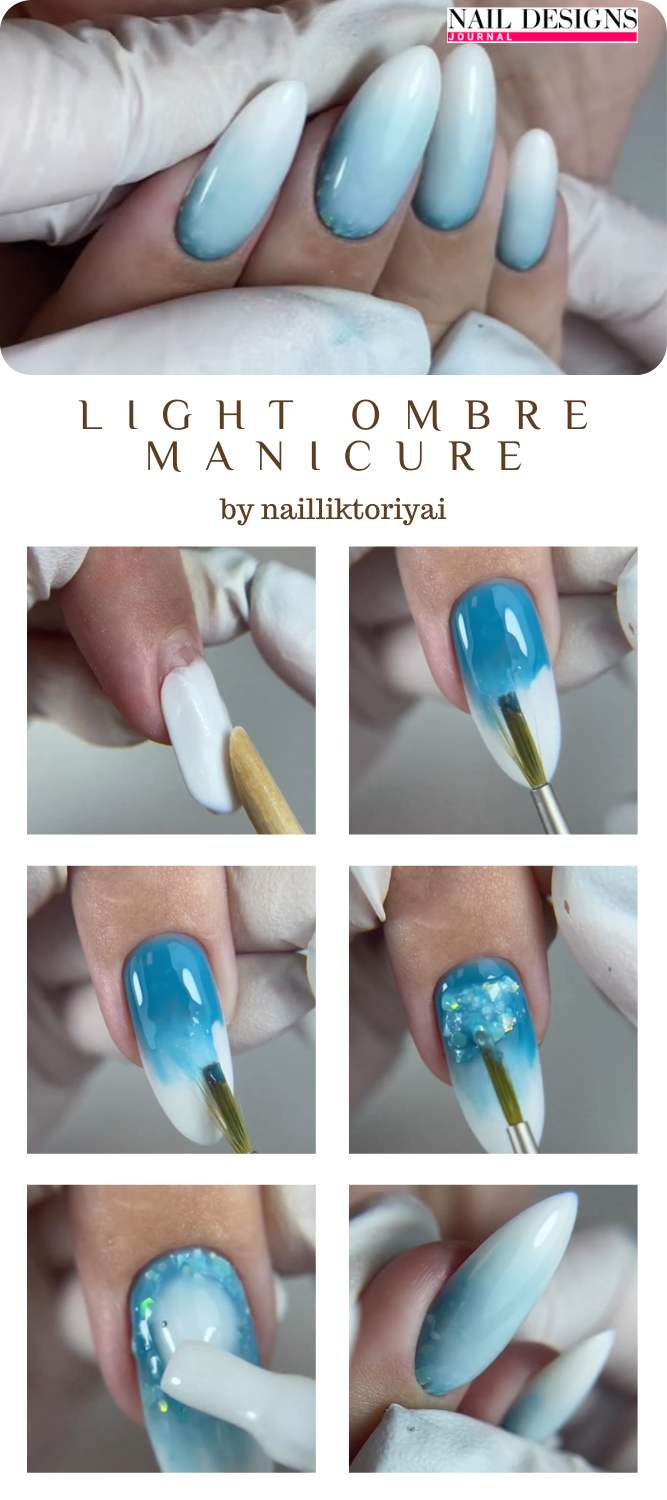
Light Ombre Manicure
- Apply a white base from the middle toward the tips of the nails.
- Apply a blue nail color to the base of each nail toward its middle.
- Blend two colors together.
- Use a foil nail polish on the base of every nail.
- Finish your manicure with a top coat.
Swirled Nail Art
- Apply your favorite base coat. Don’t let it dry.
- Paint one bold stripe in the middle of your nail with another polish.
- Mix them slightly together with a bobby pin.
- Gently apply the mixed colors to the surface of your nails and let dry.

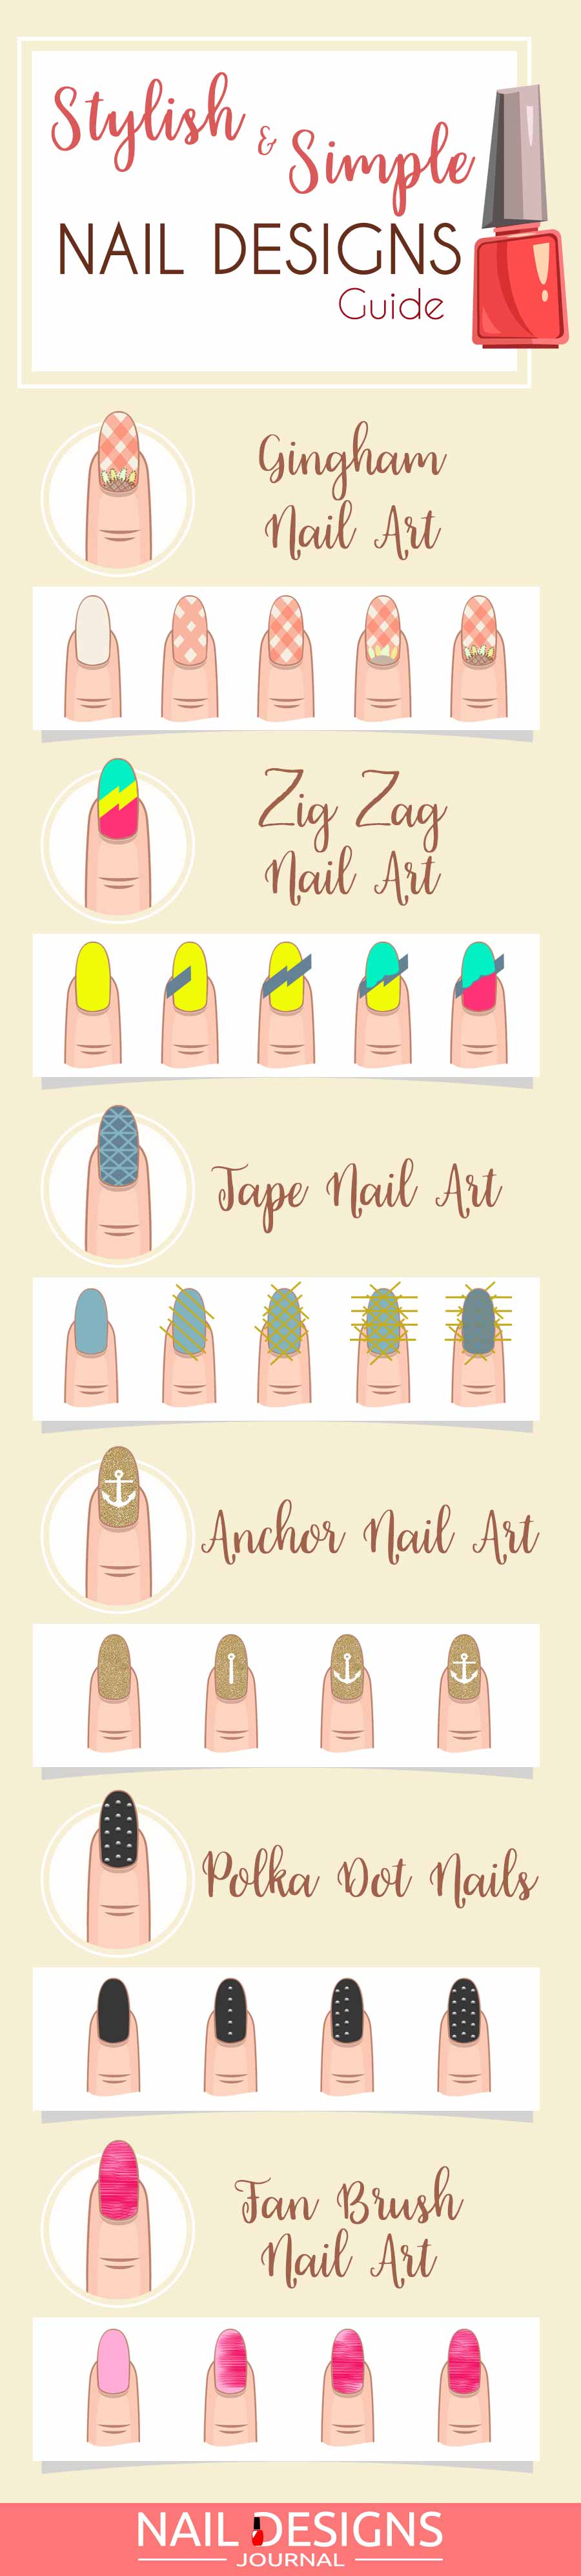
Zig Zag Nail Art
- Paint your nails with a base coat.
- Allow to dry.
- Use a brighter color to paint a zigzag line down your nails.
- For a more dramatic look, paint your nails tips with another color.

Simple Doticure Art You Can Do In 5 Min
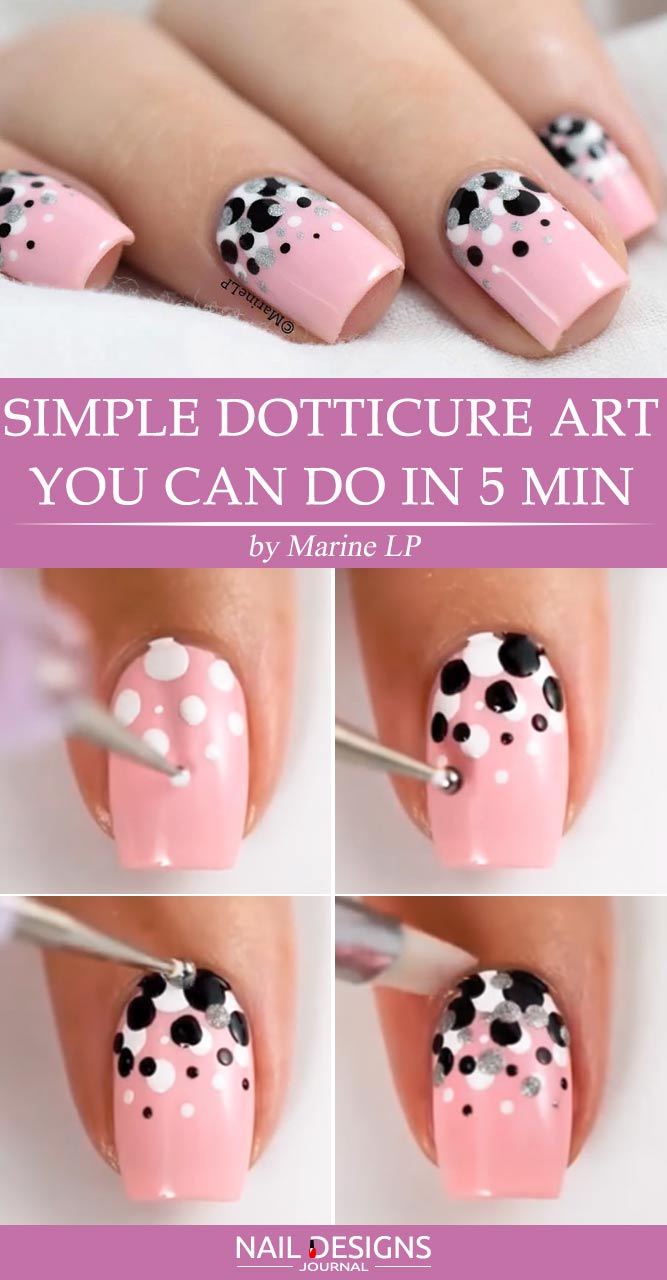
- Apply a base coat.
- Apply baby pink base coat.
- Use white nail polish and different-sized dotting tools to create various-shaped dots on your nail.
- Use black nail polish and repeat the procedure.
- Use silver sparkly nail polish and repeat the pattern.
- Apply top coat.
Quick and Easy Stamping Nail Art
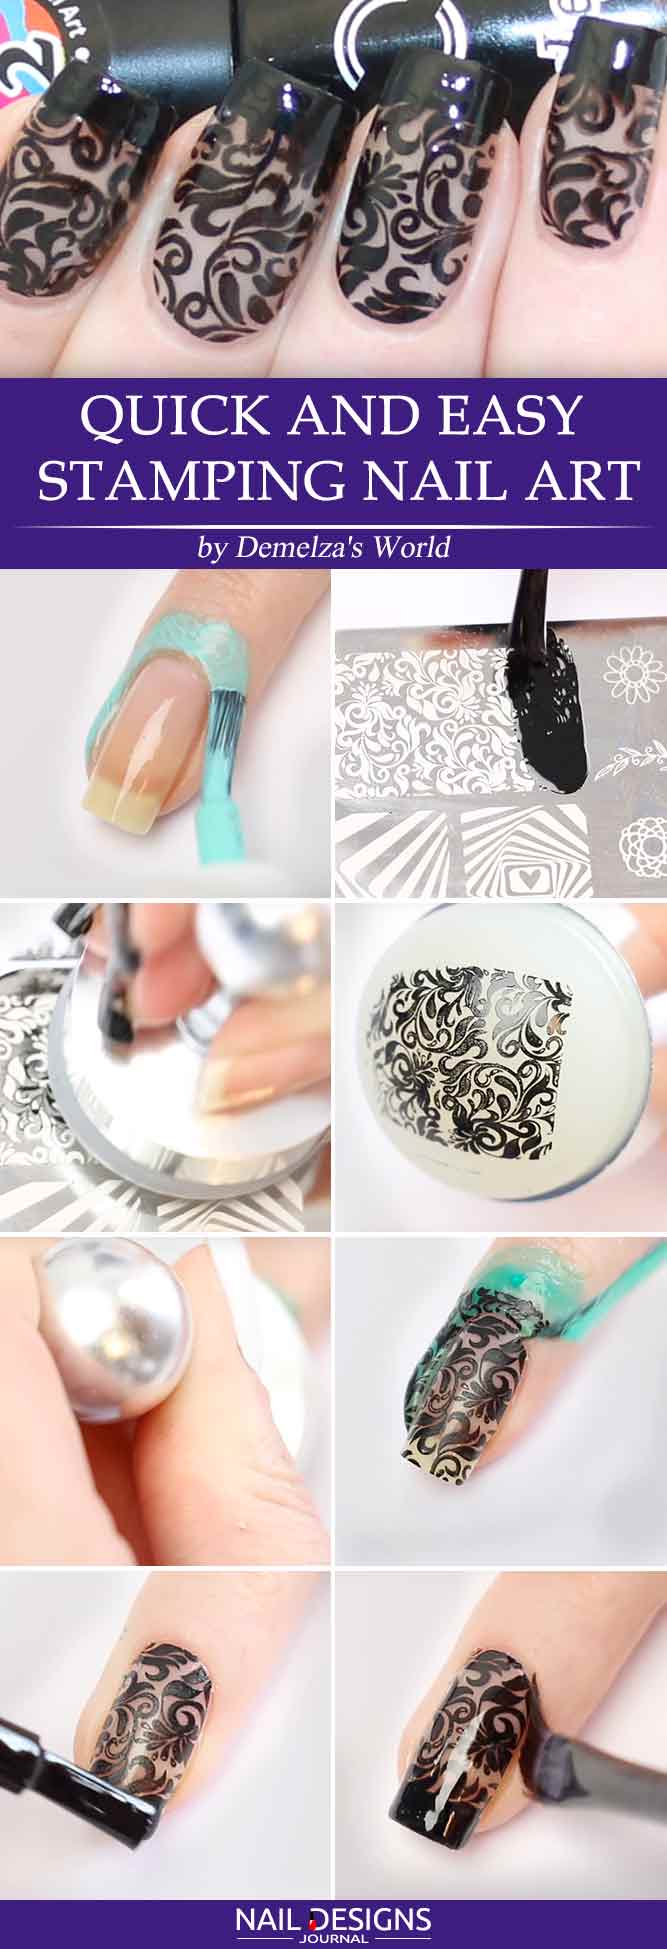
- Apply a base coat.
- Apply liquid latex around your nail.
- Apply black nail polish to your stamping plate of choice.
- Press the stamp onto your nail.
- Add a black French tip to the top of your nail.
- Remove liquid latex and clean up the messes if any.
- Apply top coat.
Quick And Easy Heart Nail Art
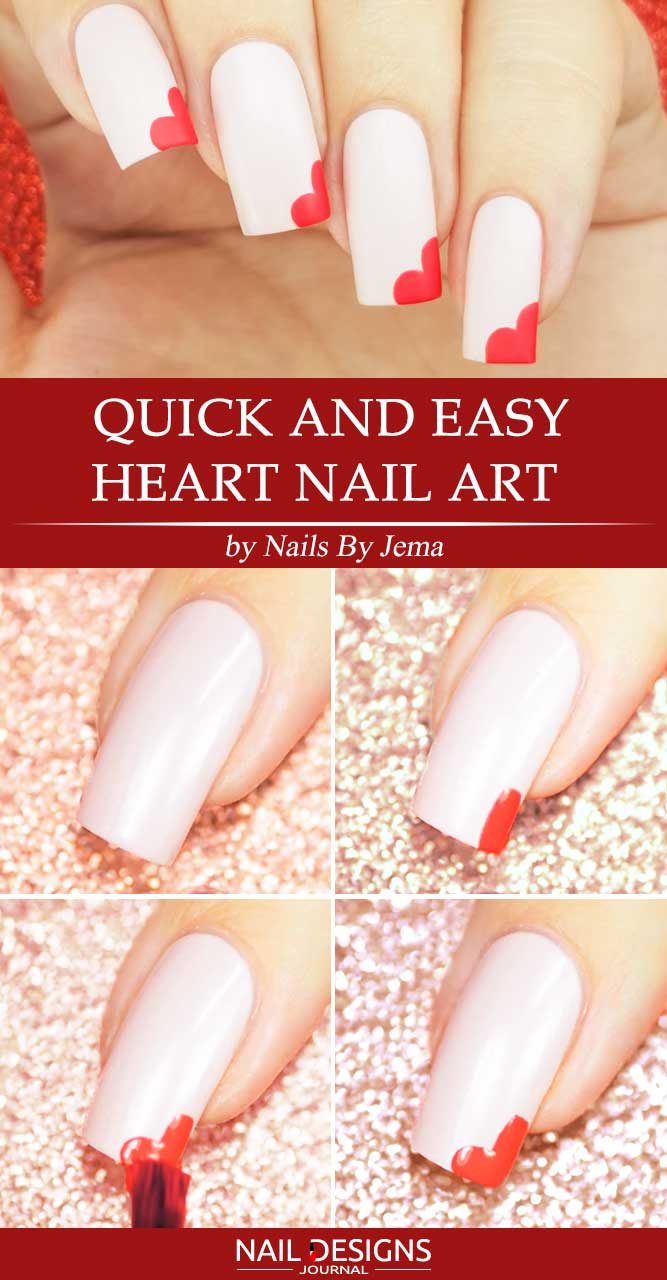
- Apply a base coat.
- Apply pale pink base coat.
- To create heart design, apply red nail polish to the corner of your nail in two lines, vertical and horizontal.
- Apply top coat.
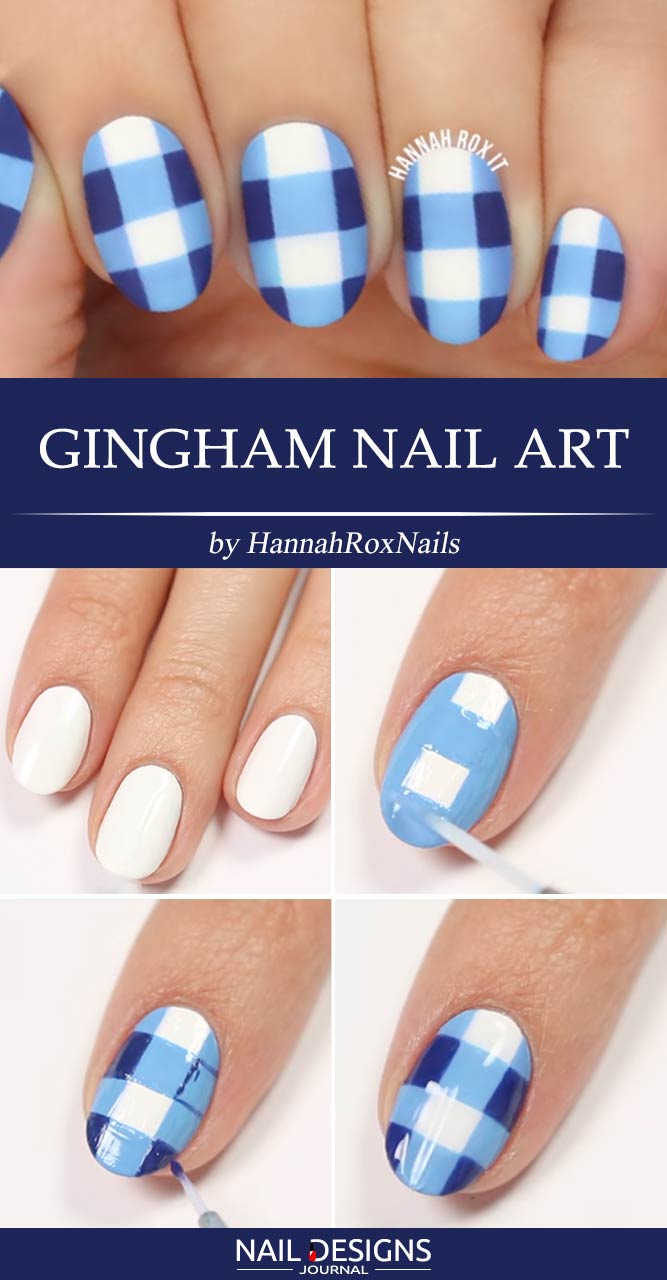
Gingham Nail Art
- Paint your nails with the base color of your choice.
- Paint a section of scotch tape or nail tape with a 2nd color.
- Allow both to dry completely.
- Apply a clear top coat to seal.
Negative Space Nail Art In Few Steps
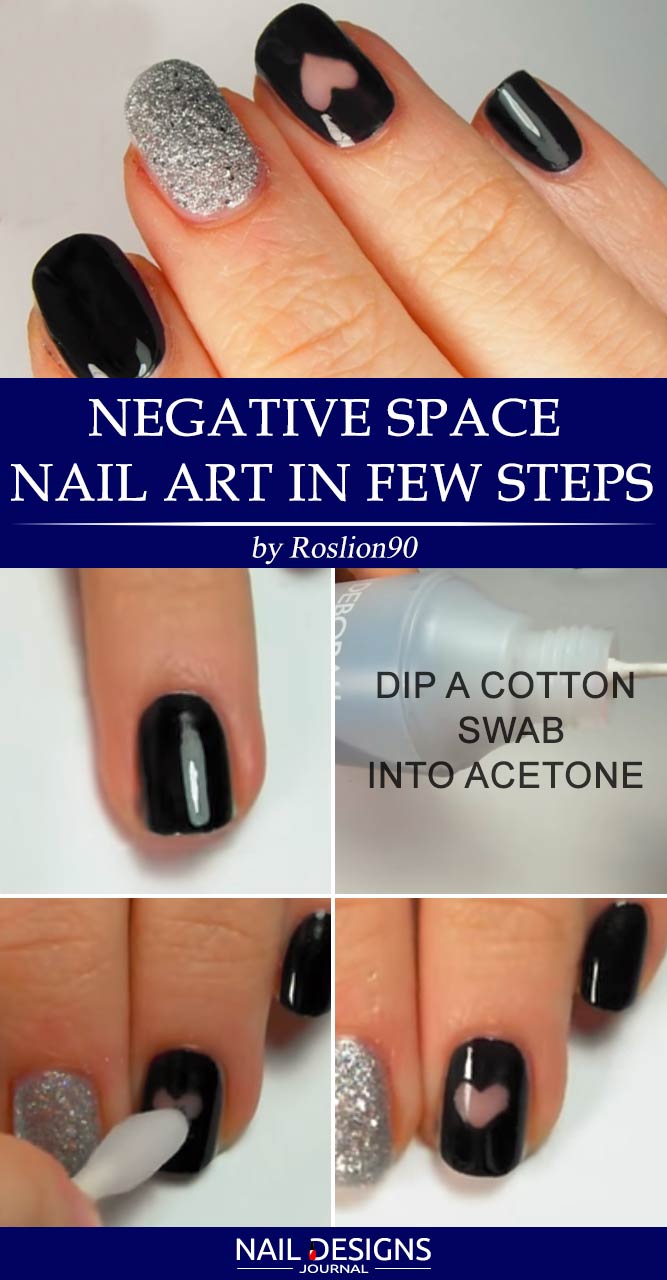
- Apply a base coat.
- Apply black nail polish to all of your nails but middle one.
- Apply silver sparkly base to your middle fingernail.
- Use a Q-tip and nail polish remover to create a negative space heart shape on your nail.
- Apply top coat.

Stylish Chevron Nail Art in Simple Steps
- Apply a base coat.
- Apply pale pink base coat.
- Form two chevron shapes with the help of thin sticker stripes.
- Cover the top of your nail with black nail polish.
- Add glittery nail polish to the bottom triangle of your nail.
- Remove the stickers.
- Apply top coat.
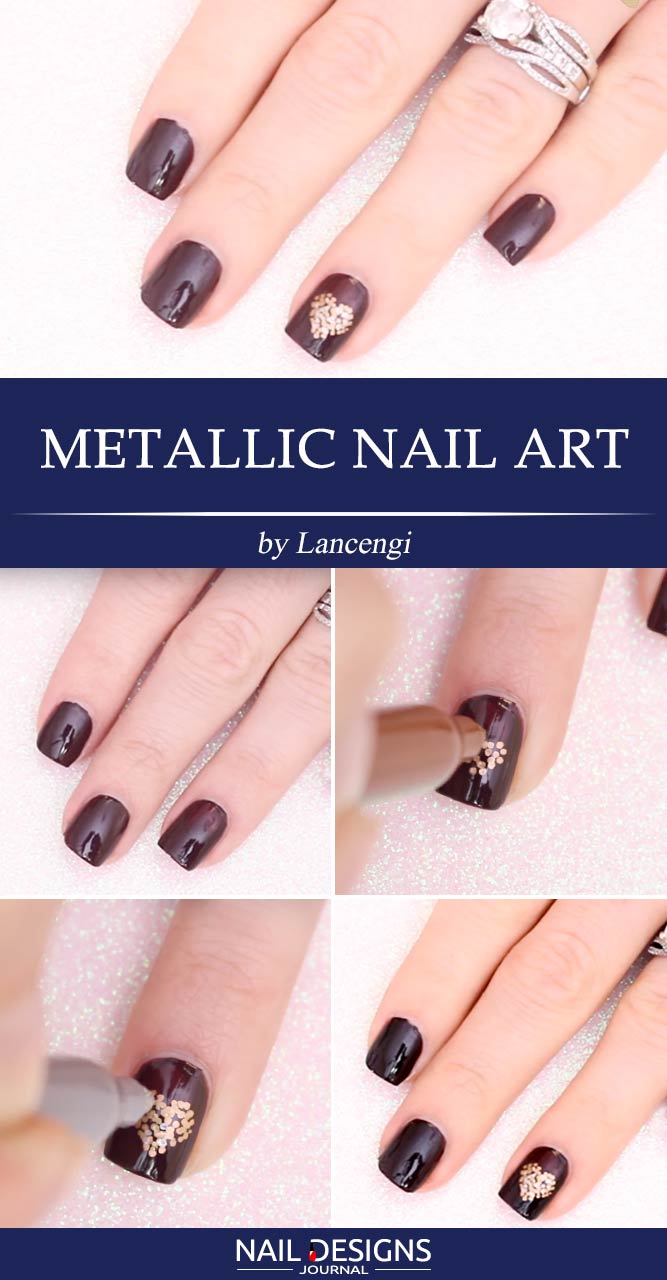
Metallic Nail Art
- Apply your favorite color as a base coat.
- Allow to dry completely.
- Use a metallic gold or silver Sharpie marker to make some fun designs.
- Allow to dry.
- Apply a clear top coat to seal.
*For some extra bling apply silver or gold gemstones to your artwork!
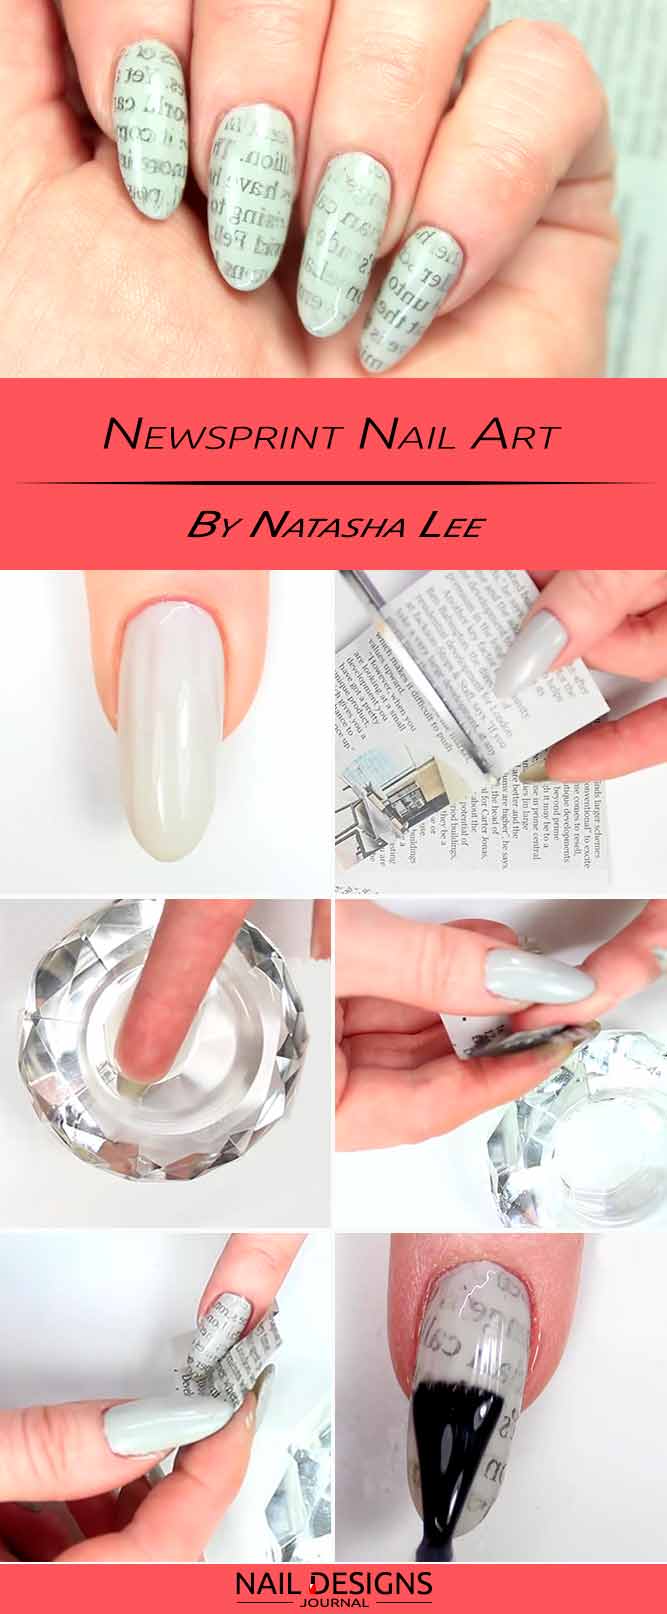
Newsprint Nail Art
- Paint your nails grey.
- Allow to dry.
- Soak your nails in rubbing alcohol for a few seconds.
- Place a newspaper print side down on your nails.
- Gently dab the paper onto your nails before removing.
- Give it few seconds to set before sealing with a clear top coat.
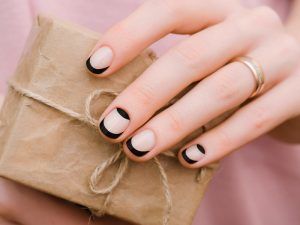
DIY Half Moon Nail Art with Vinyl Stencil
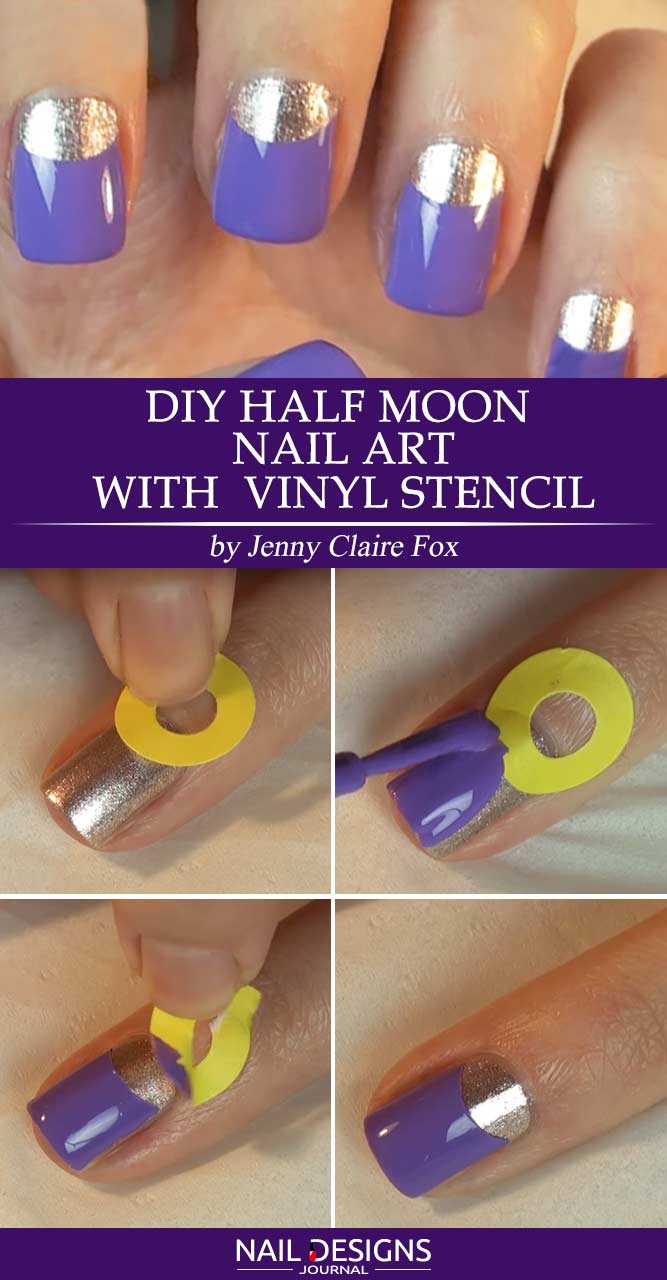
- Apply a base coat.
- Apply a gold metallic base coat.
- Place a reinforcement label on the bottom of your nail.
- Apply the purple base to the top of your nail.
- Remove the sticker.
- Apply top coat.
Perfect Dry Marble
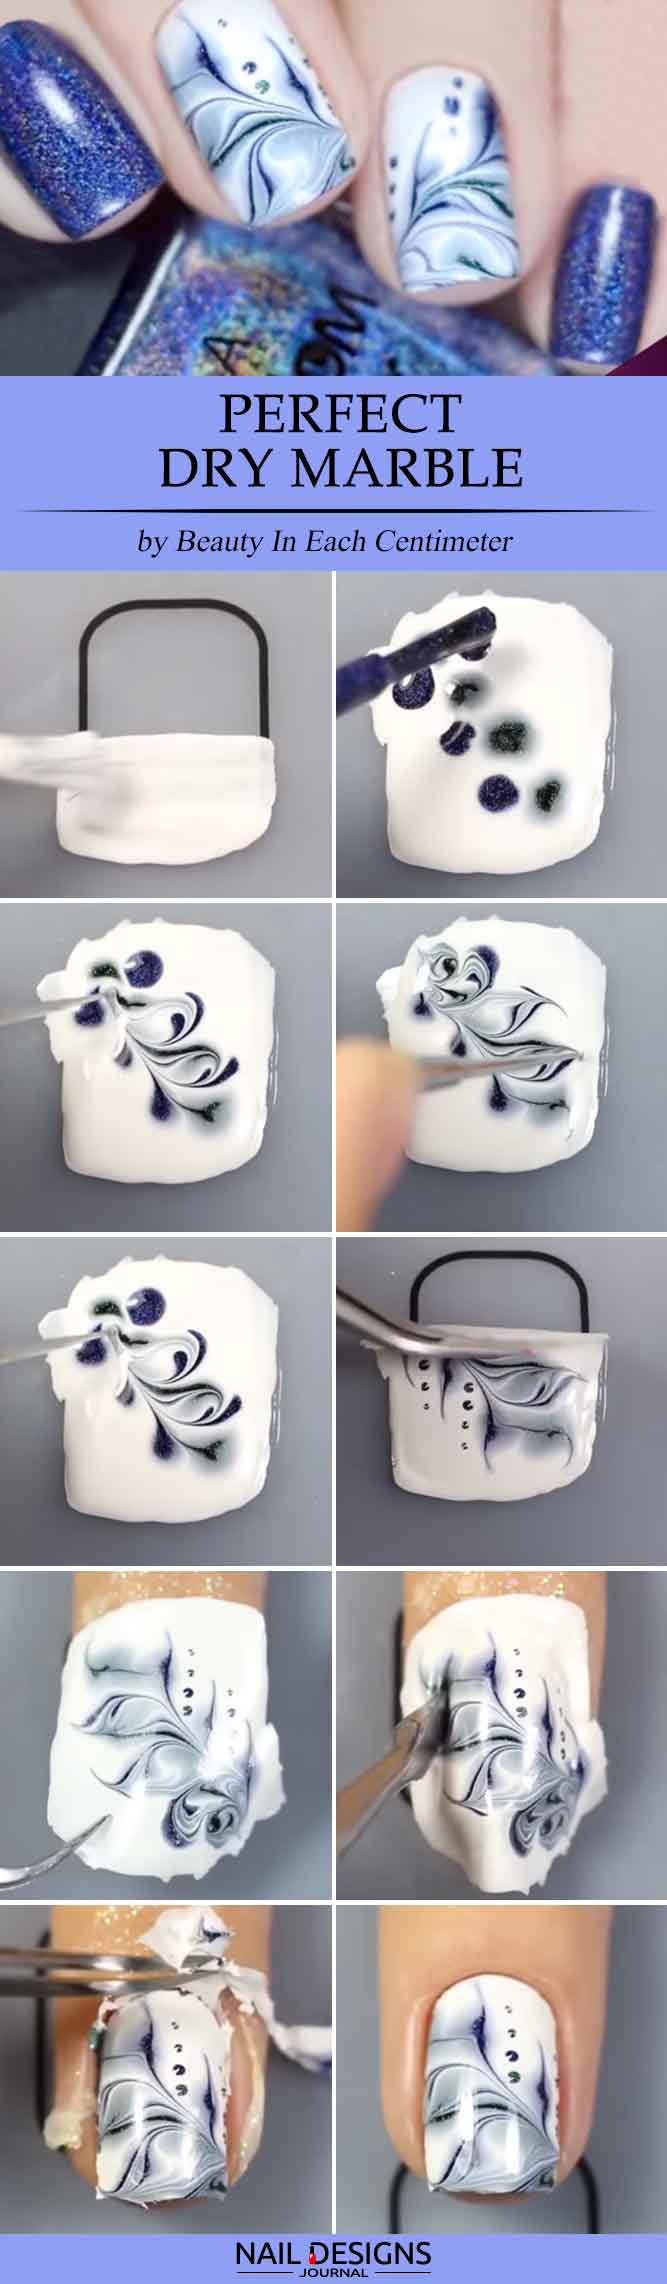
- Apply a base coat.
- Apply white nail polish to the cellophane base.
- Add different-shaded blobs to the white decal in three rows until it dries out.
- Use a small dotting tool to mix the blobs, so that a design is created, do that before nail polishes dry out.
- App the decal on your nail.
- Remove all the unnecessary pieces.
- Apply top coat.
Rhinestone And Floral Nail Art
- Apply a pretty color as a base coat and allow to dry.
- Paint a floral design in a 2nd color and outline the flowers with rhinestones.
- Allow to dry completely.

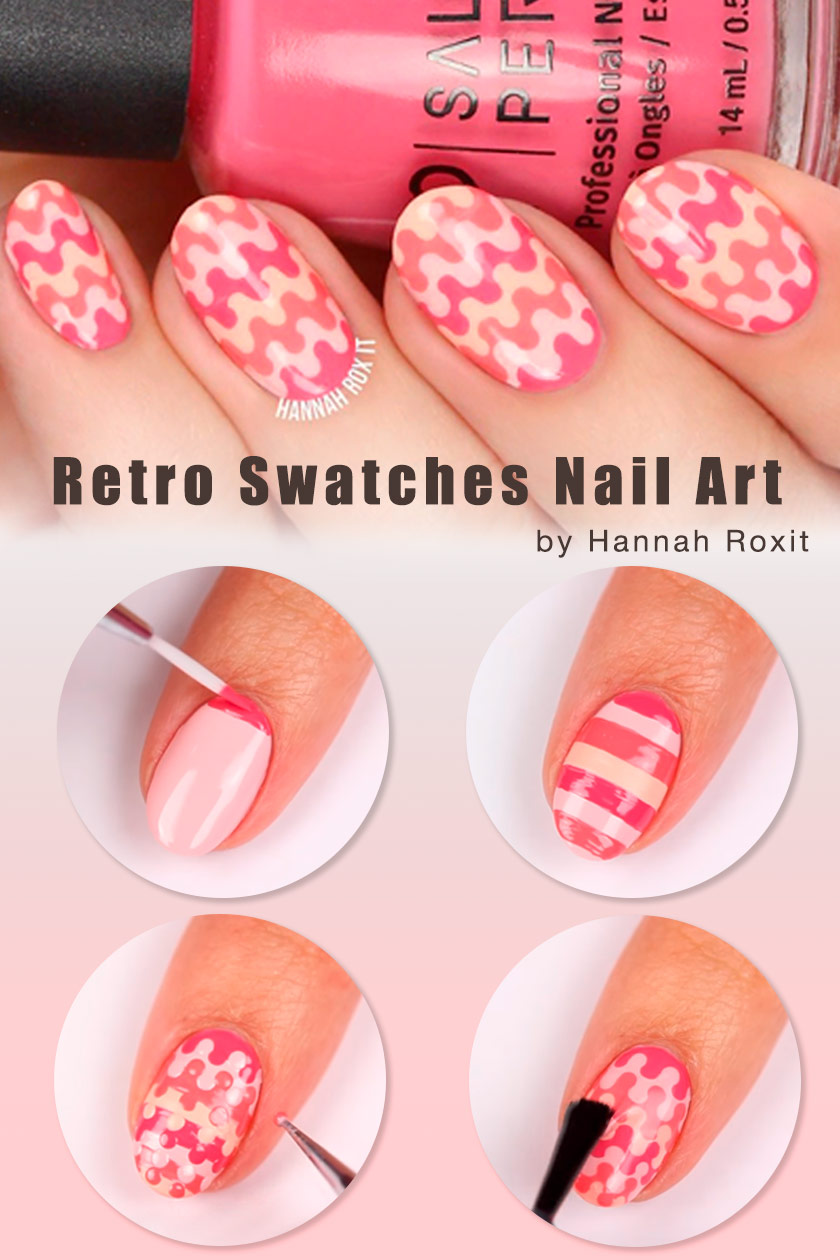
Retro Swatches Nail Art
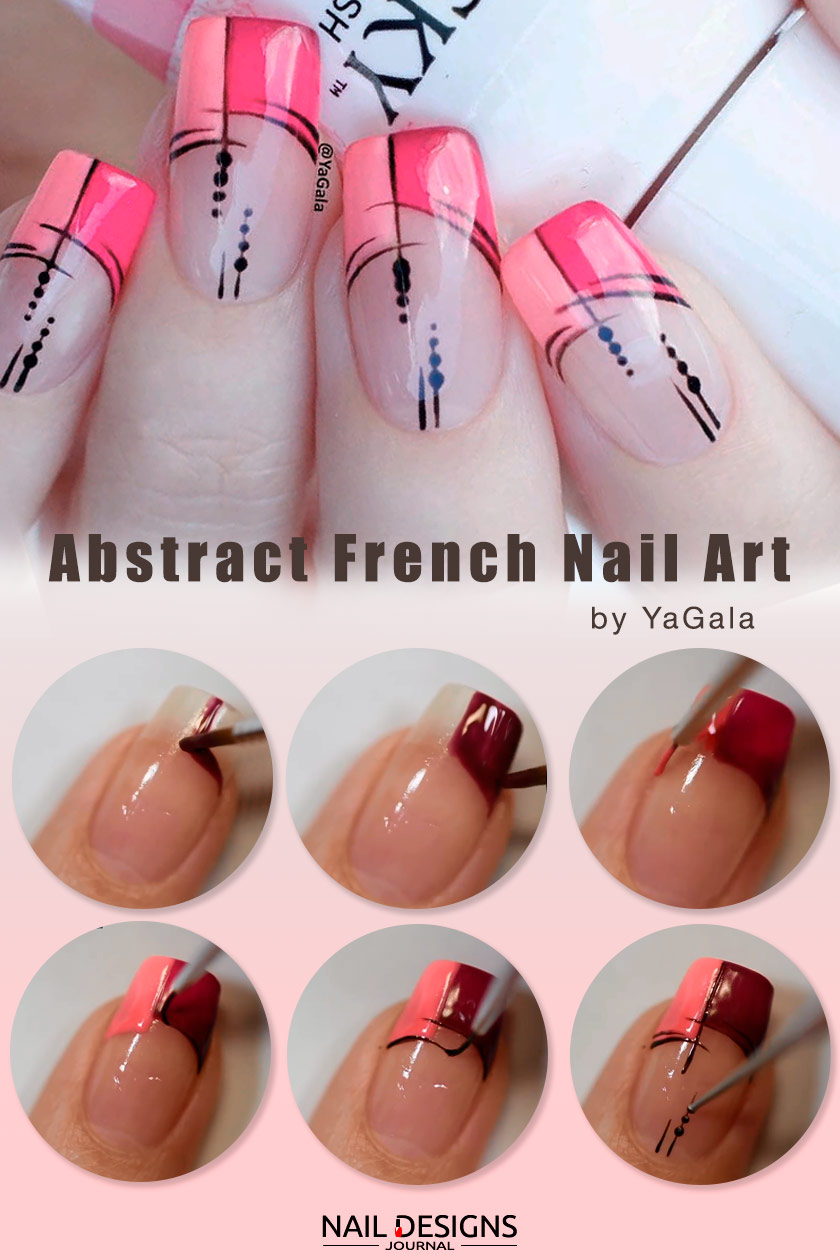
Abstract French Tips Nail Art
Easy Water Marble Nail Art

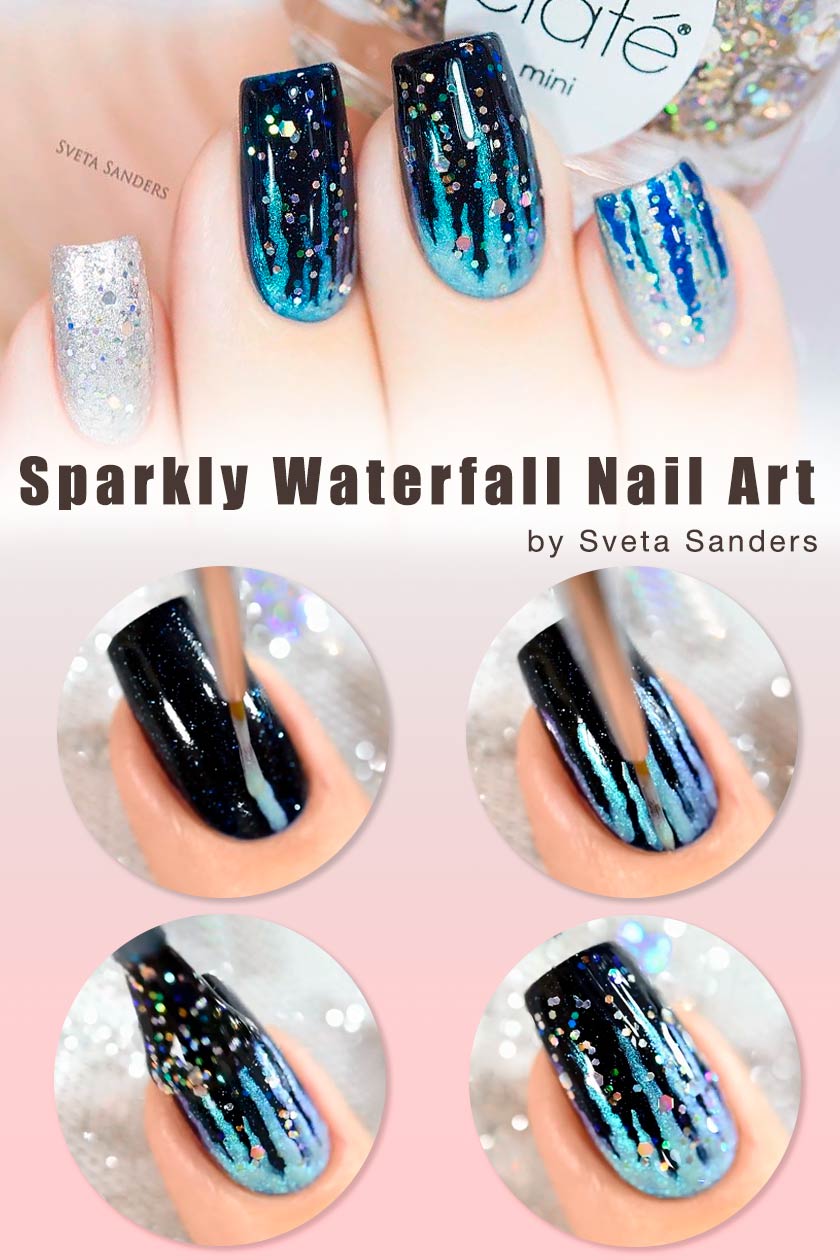
Sparkly Waterfall Nail Art
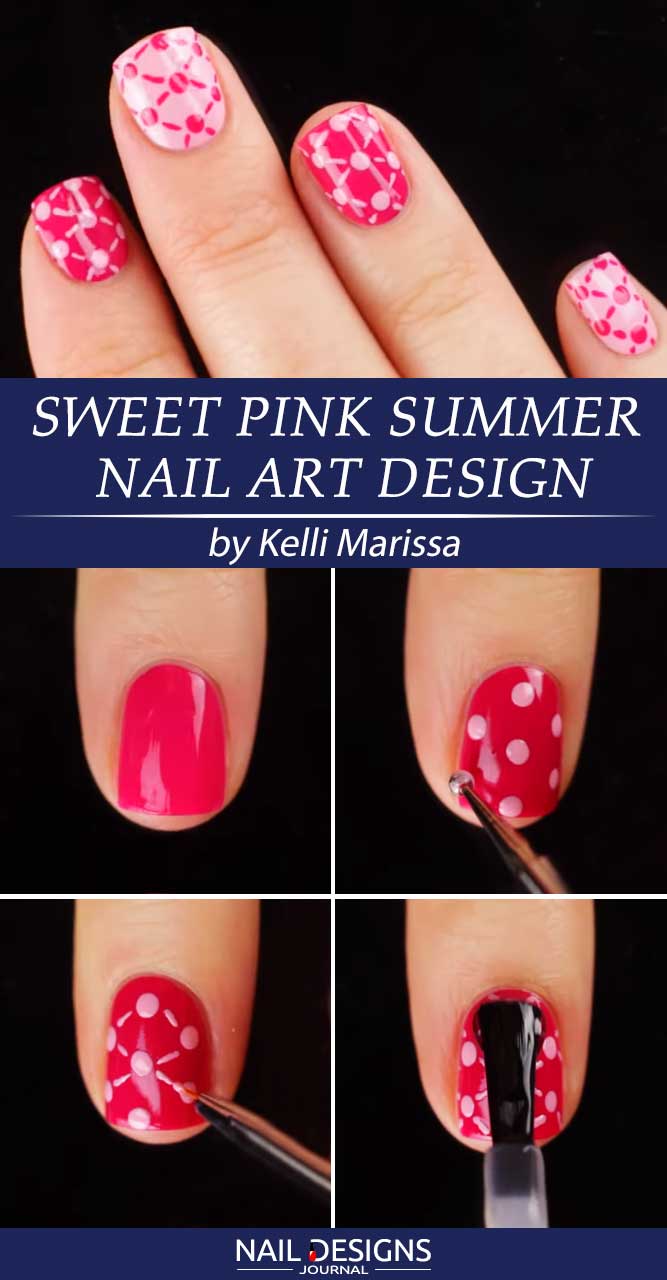
Sweet Pink Summer Nail Art Design
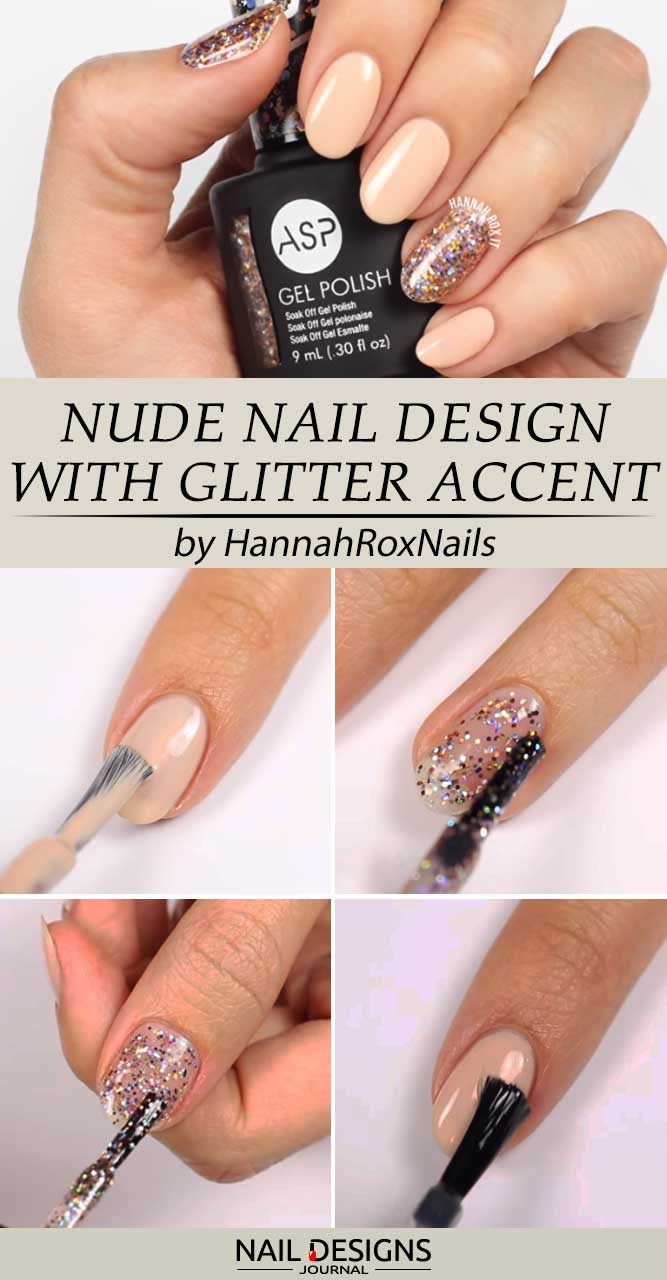
Everyday Nude Nail Design With Glitter Accent
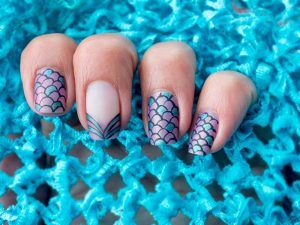
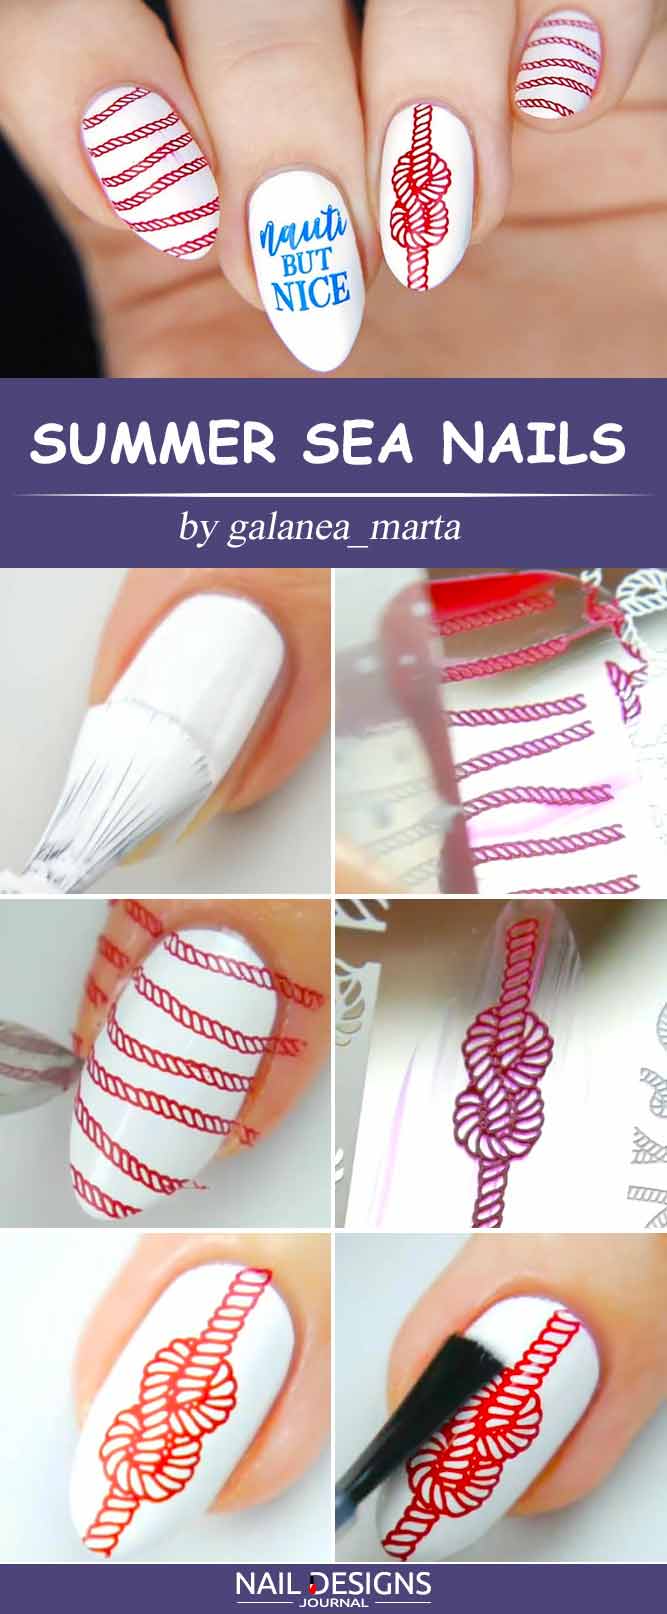
Summer Sea Nails
1. Apply a base coat.
2. Color your nails with white nail polish.
3. Apply liquid latex to protect your nail.
4. Choose a stamping plate with marine patterns.
5. Apply some red nail polish to the chosen design.
6. Transfer the pattern to your nail with the help of a stamper.
7. Remove liquid latex.
8. Repeat the procedure with other patterns.
9. Apply a top coat.
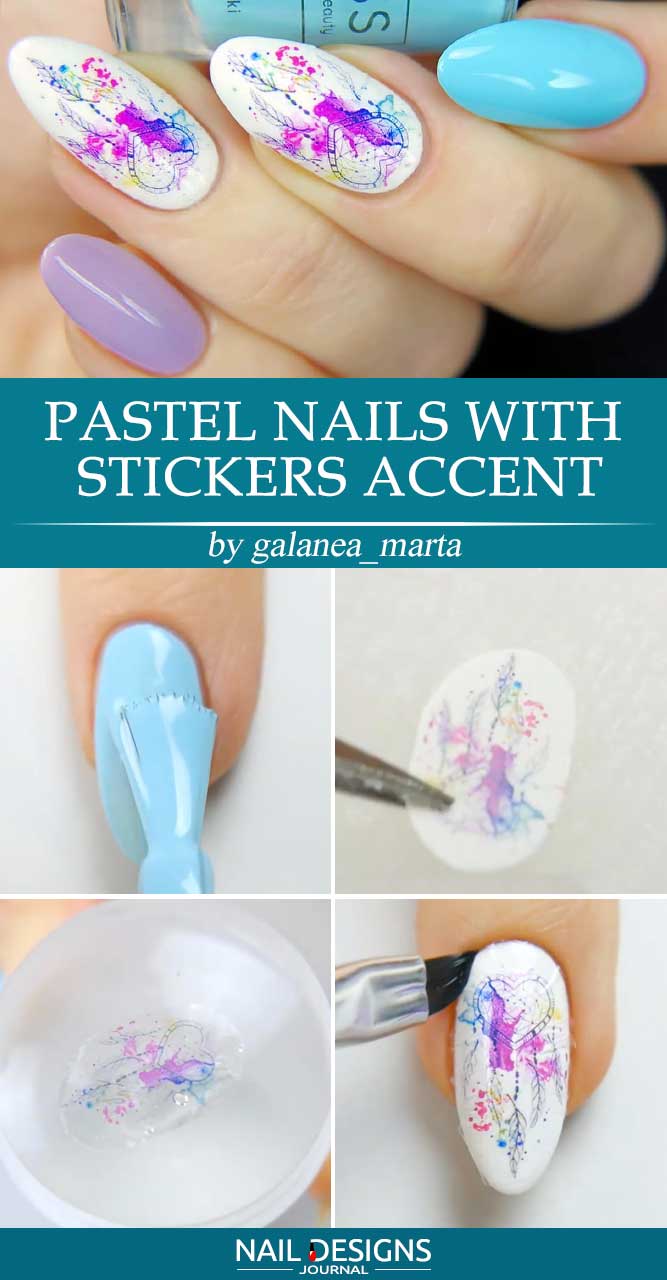
Pastel Nails With Stickers Accent
1. Apply a base coat.
2. Color your nails with white, lilac, and blue nail polish.
3. Choose a water decal to transfer to the white base.
4. Wet the sticker and remove it from the paper base.
5. Apply the sticker to your stamper.
6. Press the stamper over the white base.
7. Clean up the messes.
8. Apply a top coat.
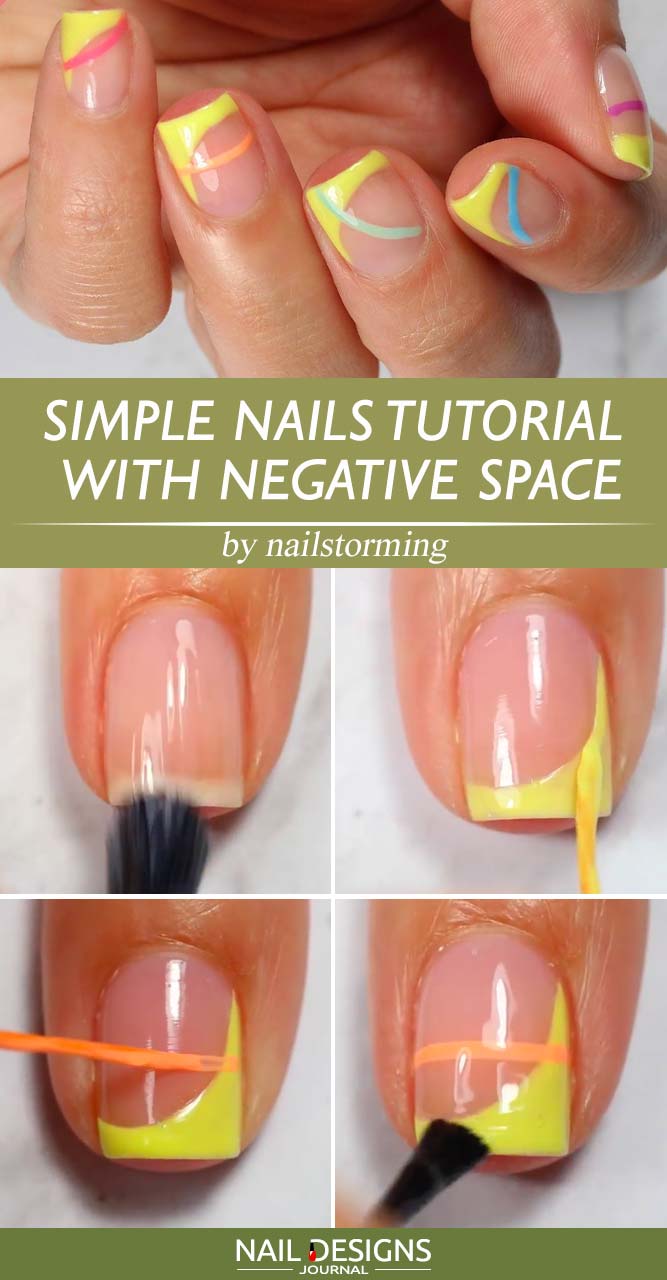
Simple Nails Tutorial With Negative Space
1. Apply a base coat.
2. Color your nails with transparent nail polish.
3. Use a thin detailer brush and bright yellow nail polish to create an angled French tip.
4. Add a thin horizontal orange line to the middle of your nail.
5. Repeat the design using various nail colors and angles for the stripes.
6. Apply a top coat.
Ombre Nails With Glitter Accent
1. Apply a base coat.
2. Color your nails with white nail polish.
3. Secure your nail with liquid latex.
4. Add layers of red, pink, and white nail polishes to the sponge.
5. Transfer the ombre to the white base.
6. Repeat when necessary.
7. Add two sparkly silver horizontal lines to the design.
8. Apply a top coat.

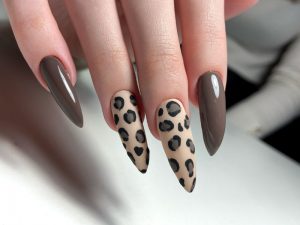
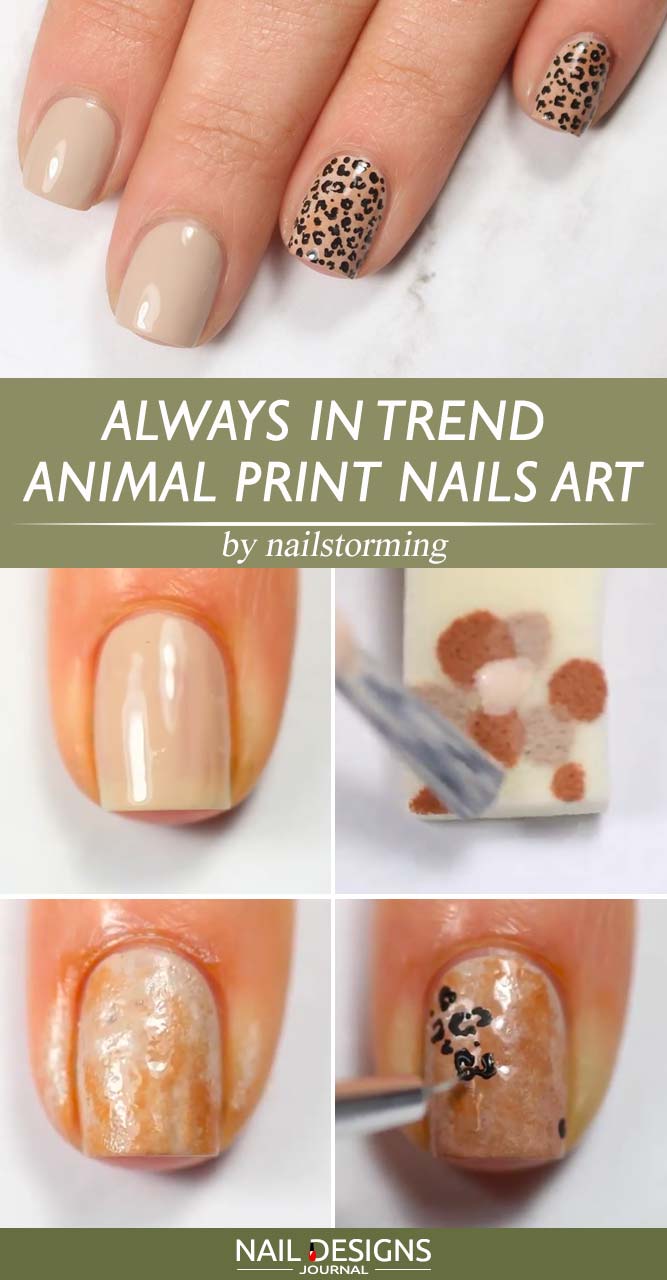
Always In Trend Animal Print Nails Art
1. Apply a base coat.
2. Color your nails with beige nail polish.
3. Use different-colored blobs over a sponge to succeed with an ombre effect.
4. Apply the sponge over the beige base.
5. Using a thin striping brush and black nail polish created leopard pattern over the ombre base.
6. Apply a top coat.
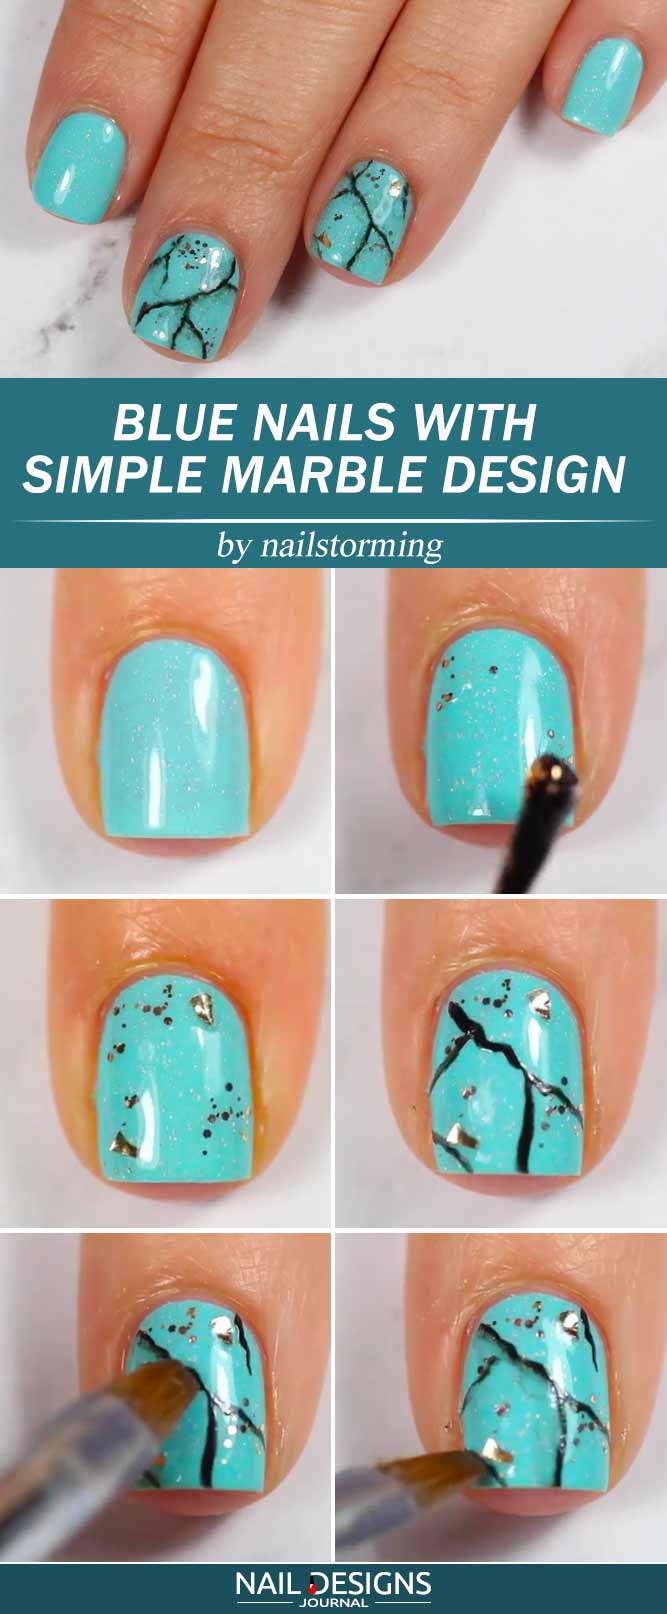
Blue Nails With Simple Marble Design
1. Apply a base coat.
2. Color your nails with sparkly blue nail polish.
3. Add some silver sparkles to the design.
4. Apply a base coat.
5. Draw some abstract thin black lines over the base.
6. Dissolve the lines using a brush and some nail polish remover.
7. Apply a matte top coat.
See how simple it is to do your own awesome nail art? Try one and tweak it a bit to match your personality. Or, mix and match different designs for a funky look that’s all your own! Your friends are sure to be impressed when they see your cool and creative simple nail designs.
Main photo by la_avenail
Was this article helpful?